Download updated ImgView.cpp (last updated Wed, Feb 26 02:41 PM).
Download updated files (ImgView.cpp and svmmath.h). Also update definition of BestFitIntersect as shown in svmmath_reference.cpp, contained in the same zip file (updated Feb 21 05:27 PM).
Download skeleton code (last updated Wed, Feb 26 02:41 PM) and sample executable (last updated Wed, Feb 26 02:41 PM).
The interface allows you to load an image and add points, lines, and polygons. After you compute the 3D position of those points, you can save the model and reload it for further editing. When you are done, you can dump the model in VRML 2.0 format and view it in VRML viewer.
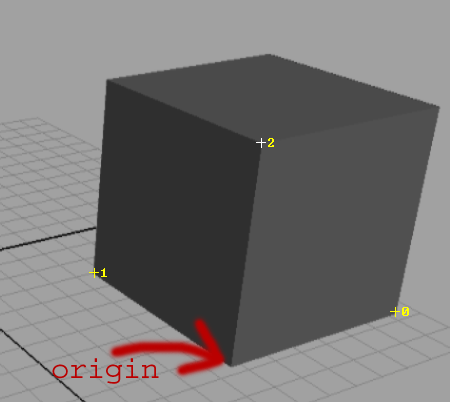
To compute the homography or the 3D positions of points, you will primarily interact with the program through the "point stack". You can push a point onto the stack by pointing at it with the mouse and pressing the space bar. To pop a point off the stack, point the mouse somewhere else and press the space bar. When a point is put on the stack, a number that indicates its position on the stack (0 = bottom) will appear next to it, as shown in the image below:
 .
It can then be used to compute 3D positions of other points. A more detailed
description on how to do this for different menus is given
below.
.
It can then be used to compute 3D positions of other points. A more detailed
description on how to do this for different menus is given
below.
To create a 3D model using the program, you will follow the steps below:
The file IO related functions are under "File" submenu as usual.
Open Image: Load an input image of .tga format.
Open Model: Load a saved model from a text file. Loads the reference coordinate frame (vanishing points, homography) and points, lines and polygons that you last worked with.
Save Model: Save the reference coordinate frame (i.e., the vanishing points, homography for the reference plane) and the model (i.e., points, lines, polygons) into a text file (with the file name extension .txt) for later use.
Save VRML: Save the 3D model and texture images into VRML 2.0 format so that it can be viewed in VRML viewer.
The "Edit" submenu, you have the following choices:
Point: Add or delete points. To add a point, left click. To delete a point, move to the point till it is high lighted as white, then press "Backspace". The point can be deleted if it is not used by any other lines or polygons. For a reference point, the 3D coordinate can be entered by moving the mouse over it and pressing the enter key. A dialogue box will pop up where you can enter the 3D coordinates for the point directly. To specify the reference height, check the box on the dialogue window that says "use for reference height".
X Line, Y Line, Z Line, Other Line: Add or delete lines. To add a line, the first left click defines the start point, and the second left click defines the end point. If you want to reuse one of the existing points as start/end point, just press "Ctrl" when you left click. To delete a line, move the mouse onto it till it becomes white and press "Backspace". In "X Line" edit mode, the lines you add are supposed to be parallel to the X axis in 3D. Similar meaning for the "Y Line" and "Z Line" mode. Lines added in "Other Line" mode may have any orientation. You can reuse an existing point for a new line endpoint by holding down Ctrl while left-clicking on that point.
Polygon: Add or delete polygons. Each polygon consists of a list of points. To add a polygon, you sequentially left click on desired positions and then press "Enter". A closed a polygon will be drawn. ( You don't have to click on the first point to make the polygon closed, the system automatically does it for you. ) To delete a polygon, move the mouse to the center of the polygon, shown as a white square, and press "Backspace". Every time you create a new polygon, you will give a name for it, e.g, "ceiling", "floor", which will be used as the texture file names when you save the model in VRML. The texture file name for a particular polygon will be the polygon name with ".gif" extension. As in the case of lines, existing points may be reused as new polygon corners by holding down Ctrl while clicking on it.
The "Draw" submenu, you can toggle the following options:
Points: Draw points or not.
Lines: Draw lines or not.
Polygons: Draw polygons or not.
Draw 3D: Draw it in 2D or 3D mode.
When "Draw 3D" is not checked, all the image and points, lines, and polygons are drawn in image plane. You can edit them and
zoom in/out: Ctrl+/-;
move image: Drag with right button;
When "Draw 3D" is checked, all the points, lines, and polygons are drawn in 3D (based on your computation of X,Y,Z for each point). The image is texture mapped onto the polygon (based on your estimation of homograph H, invH). You can not edit in this mode, but you can
scale up/down: Ctrl+/-;
move model parallel to the viewing plane: Drag with left button;
move model further/closer: Drag with left button upwards/downwards, with Alt down;
rotate around X: Drag with left button vertically, with Ctrl down;
rotate around Y: Drag with left button horizontally, with Ctrl down;
rotate clockwise/counterclockwise: Drag with left button to the right/left, with Shift down;
The "Tools" submenu contains the main features of the program for computing 3D positions. Most of your work will be about implementing these features.
Compute VPs: Compute vanishing points using the lines you added along each axis by Edit->X Line/Y Line/Z Line command.
Compute Homography: Compute the homography from the reference plane to the image plane. 4 reference points should be on the point stack. If fewer than 4 reference points are on the stack, x and y vanishing points are used as remaining reference points.
Same Z Plane: Compute the 3D position of a new point that is on the same plane as another point whose 3D position is already known. The new point and the known point should be on the point stack, with the new point on the top.
Same XY: Compute the 3D position of a new point that is directly above another point whose 3D position is already known. The new point and the known point should be on the point stack, with the new point on the top.
Guidelines: When this option is enabled, whenever the cursor is near enough to the line connecting either two points on the stack or one point on the stack and a vanishing point, the line will appear in the window and you can use it to guide your work. If you want to snap to the line, hold down Ctrl while placing your point. This can be useful, for instance, when you want to specify a distant point that may have the same X, Y coordinate as an existing point, or that lie on the same Z plane as an existing point, or both. These points may be good to use as the corners of a polygon later on. .
svmAux.h, PriorityQueue.h: defines some auxiliary data structures and functions.
svm.h: defines the following important data structures:
struct SVMPoint {
    double u,v,w;
    double X,Y,Z,W;
    bool known();
};
typedef CTypedPtrDblList<SVMPoint> PointList;
where (u,v,w) is 2D Homogeneous Coordinates in image plane, and X, Y, Z, W are 3D Homogeneous Coordinates in 3D world. If w = 1, (u, v) is image coordinates, ranging from 0 to image width and 0 to image height respectively. If w=0 means the point is at infinity. Otherwise, (u/w, v/w) is image coordinates. Similar means for X, Y, Z, W.
known() returns true if the 3D position of this point is known, false otherwise.
struct SVMLine {
    int orientation;
    SVMPint *pnt1, *pnt2;
};
typedef CTypedPtrDblList<SVMLine> LineList;
where orientation indicates whether the line is supposed to be parallel to X, Y, Z axis or just any possible orientation in 3D.
struct SVMPolygon {
    CTypedPtrDblList<SVMPoint> pntList;
    double cntx, cnty;
    double H[3][3], invH[3][3];
    char name[256];
};
typedef CTypedPtrDblList<SVMPolygon> PolygonList;
where each polygon consist of a list of SVMPoint and the pointers to the SVMPoints are saved in pntList.
(cntx, cnty) is the mean of all points in the list, used for polygon selection in UI. H is the homography from normalized texture image of this polygon to the original image; that is, if the INVERSE of H is applied to the image coordinates (u,v,w) in the pntList, the result is the texture coordinates, ranging between [0,1]. invH is the inverse matrix of H. H is used when generating texture images from original image. invH is used to convert image coordinates in pntList to texture coordinates. Whenever you change H, please update invH using Matrix3by3Inv function in svmAux.h.
name is the name of the polygon. name.gif will be used as texture file name for VRML file. If the polygon has a name "wall", the texture image name should be "wall.tga". "wall.tga" maybe contain something more than a wall, you want to use your scissor programming to cut the wall out of its background. Based on the mask from your scissor and wall.tga, you want to generate a wall.gif with Photoshop, in which background are transparent and the foreground are opaque. If you do this for all the polygons, and save the model as VRML. The skeleton code will generate a VRML file, using polygon's name with ".gif" extension as texture image filename. That's the reason use want to follow my naming convention: wall-->wall.tga-->wall.gif ! If you put the VRML file and all *.gif texture image files under the same directory, you can view it with a VRML viewer.
ImgView.cpp/h: defines and implements imgView class, which handles most of the UI messages and drawing routines. You will work with the following member data:
SVMPoint xVanish, yVanish, zVanish;
SVMPoint refPointOffPlane;
double H[3][3], Hinv[3][3];
xVanish, yVanish, zVanish are vanishing points for X, Y, Z axis, respectively.
refPointOffPlane is the point off of the reference plane that defines the reference height R, as described in lecture.
H is the homography from the reference plane to the image plane, and Hinv is the inverse of H.
vec/mat.h: utility functions for vector and matrix operations. Supports common operations such as +,-,*,/ in vector/matrix domain, as well as vector/matrix specific operations including cross product, inversion, etc. You will find these functions quite handy for the matrix and vector computations involved in this project.
ImgView.inl (part of ImgView.cpp to be filled in, in a separate file):
svmmath.cpp: