Date
Assigned: November 6, 2001
Basic Lighting – The Orange Due: Tuesday, November 13, 2001
Set Background -- Due: Thursday, November 15, 2001
Character Lighting: Tuesday, November 20, 2001
Final Lighting Revisions Due: Thursday,November 22, 2001
Summary
There are three distinct parts to this assignment. All parts will be completed individually, not in groups. In the first part, you will be doing character lighting on a simple object—an orange—in order to familiarize yourself with character lighting concepts. In the second part, you will be doing master lighting (a.k.a. background or set lighting) on a complete scene. The skills for these two types of lighting are different and we will cover with you in class how to approach these projects and how the skills differ. Finally, in the third part, you will be given a completed scene with the master lighting already done. Your task will be to pose and light a character in this scene, using the knowledge you’ve gained in the previous parts.
After spending considerable time learning the lighting tools and types
available to you, please remember that good lighting is an art not a science . .
. We're not looking for a perfect physical replica of the "real" world. We're looking for believable lighting that presents your character and set
in a well composed environment -- all in support of your compelling story.
Experience with the software tools, and the development of a critical eye is essential for those who wish to produce exciting CG lighting
environments. You will be painting with light. Be sure to apply all of your experience with other artforms to this exercise.
Getting
started
·
Browse to
x:\cse458_01au\_Shared\project3. Here you will find two pairs of files:
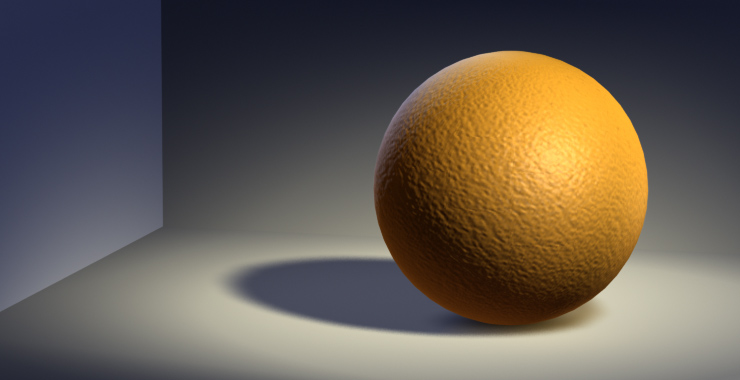
1. orange.mb and orange.tga
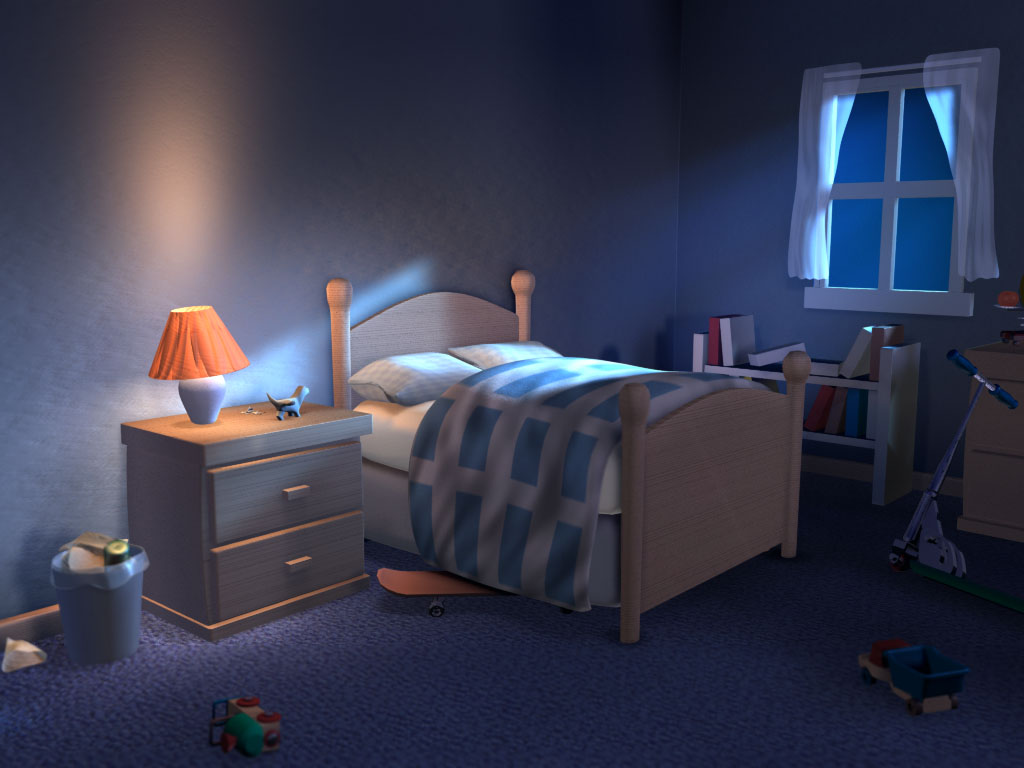
2. bedroom.mb and bedroom.tga
These files
will be used for parts 1 and 2, respectively. Copy them to your personal
directory. The files for part 3 will be made available following the second
critique.
·
Read the
lighting section of the Maya manual (Help->Library->Rendering->
3.Lights and Shadows) and play around in Maya with the various types of lights.
·
An additional
resource is the Mastering Maya Complete book (chapter 20) in the lab. There are
also many tutorials on the web—some better than others. You can find a good general (not Maya specific) lighting tutorial here.
What
to do
PART 1 (due Nov 13)
PART 2 (due Nov 15)
1. Review the Bedroom image (bedroom.tga, see above, or as jpg) that has been provided for you, and the demo information from class. The lighting here is considerably more complicated, so be sure to take the time to determine how to approach it. To help you break down the lighting, examine the contribution from each light in the sample.
2. Open the bedroom.mb scene file, and light the scene, matching PRECISELY the lighting in the provided image. Again, you may find that you can match the look reasonably well, reasonably fast. We will be looking for perfection from this assignment. Please be sure to analyze the image you are given and work very hard to match it. You will be at a distinct disadvantage if you miss the demo in class, so be sure to be there.
3. Do NOT change the camera or any of the geometry in the scene. Work only with the lighting.
PART
3 (due Nov 20)
1. Browse to X:\cse458_01au\_Shared\project3 and copy the file bedroom_with_lights.mb to your personal directory. Note that this file will not be available until Nov 15 after critiques.
2. Import your two objects into this scene and choose one of them to be a “character” in your story. You will be asked to apply all of the information that you have been given thus far to compose a complete shot with character lighting that supports your “story”. Light the “character” so that the object can be clearly identified, and all of the detail and the color are accurate. Remember that your "character" need not--and probably will not--be humanoid; it can be a toy mouse, a bowling pin, or any of the objects created by your group.
3. Be sure to consider the composition of your scene and the potential content of the story. You can make up whatever story you enjoy. Feel free to add other objects as needed. For Part 3 ONLY, you should position the camera to best compose your shot.
4. The master lighting in this scene is FINAL. Do not modify the existing lights or do anything else that will affect the master lighting. Only light your character(s) and objects.
Tips
& What we’re looking for
Turn
in
Each
part of the project
will be critiqued in class on their respective due dates. You should prepare
for critique in the same manner as previous assignments. For Part 1 (the
orange), your critique can be shorter than usual. Email regarding
specific discussion topics for the critique will be sent closer to the due
date.
Remember
to allow for adequate rendering time.
Copy
only your final rendered image (.TGA, Production Quality) for
each section to the X://cse458_01au/username/turnin/proj3 directory. Render
them at the same resolution as the images provided.