
Initial Setup
You start by opening the fruit
bowl file from the Shader Basics lesson. .
Open the
File
1. From the file menu, select Open Scene
2. Double click on the file you created in the previous
lesson (myfruitbowl2).
Turn on Hardware Texturing
1. In Maya, click in the perspective window to make it active,
then press the space bar to bring
up the marking menus.
2. Click on the Shading menu and
select Hardware Texturing.
This
will turn on interactive texturing, so that you can view your textures in
the perspective window.
Creating a projection map
In this section, a
planar projection map is used on the apple. A planar projection places the
texture on a separate Surface Placement object instead of the object itself. The
placement object can be transformed in 3D space until the texture is properly
"projected".
When you use projection maps, you can ignore the seam that was created when
the apple was built. and apply the texture evenly over the whole surface.
Open the multilister and the shader editor
1. Select Window->Multi-lister. The multilister
contains the shaders
created in lesson
10.
2. Double-click on the AppleSG shader icon to open
the Attributes editor.
Open the color-map window
3.
In the attributes editor, click on the map button next to color. Note: The
texture selection window is displayed
4. Under 2D textures, click the "As Projection" icon, which specifies that this shader will be a projection map.

5. Click on the Ramp button under 2D Textures to create a
Ramp projection
map.
Edit the ramp texture.
6.
Select CIRCULAR RAMP as the Ramp type to apply the color in a circular
manner, and change the interpolation to
BUMP to get a smooth transition
between
the ramp colors

Change the colors of the ramp
You only need two colors for this particular texture.
1. Click on the X next to the blue color to delete it.
This leaves only
red and green.

2. Slide the red to the top of the ramp by grabbing the red circular handle and sliding it to the top, and the green to the bottom of the ramp.
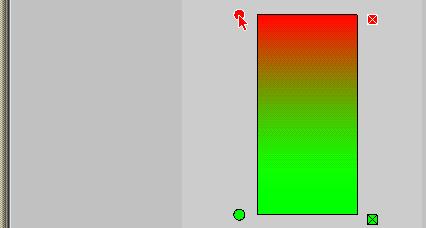
3. To edit the green, click the circular handle, then
click in the green
color sample,
beside RAMP COLOR to open the Color editor.
4. Change
this color to a greenish yellow by changing the HSV values:
60 for Hue(H), 0.675 for
Saturation(S), and 0.725 for Value(V).
5. Close the color
editor before proceeding.
Add bruising to the apple by adding noise.
You can make the apple appear more realistic by adding
surface discoloration.
1. In the Ramp Texture Attributes
section of the editor, change the Noise
value to 0.1
2. Open the HSV Color Noise section of the Ramp editor.
3. Change Val Noise to 0.1 to add a slight, realistic
bruising to the apple.
Positioning the Projection Map
1. Close
the ramp editor, but leave the Multilister open.
2. Double-click
on the projection1 texture to open the Attribute editor.
3.
Double-click on the place3dTexture2 tab, to edit the projection's
position.
4. To position the
projection map, enter in the coordinates for the
translate box 0.4757, 0.2254, 1.8734. For the
Scale box enter in the
coordinates 1.5602,
1.5602, 1.6751.
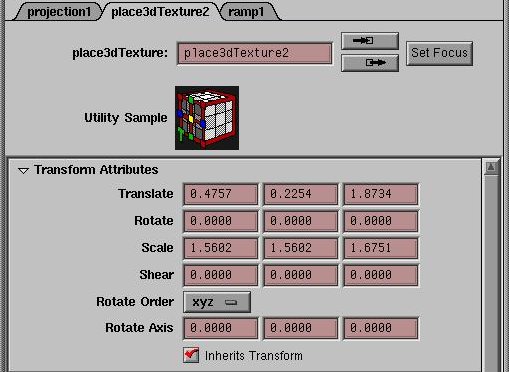
Note: it is also possible to interactively
scale the projection box,
by selecting it within Maya, and then move it and scale it into
place, just like you would with any other object.
6. Once the projection box is moved into place, then
deselect all of the
objects.
Surface Mapping
Next, you will modify the
Banana shader by adding a color ramp to make the banana ends black. In this
example, however, you place the texture with
surface mapping. This means that the texture is
"stretched" around the banana surface, instead of being "projected" onto it.
Edit the Banana's shader
1.
In the multilister, double click the BananaSG shader to open the Shader editor.
2. Click the Map.. button next to the Color sample to
open the Texture
selection
window.
3. Make sure that under the 2D Textures section
that the Normal button is
selected, and not the As projection button.
4. Click the
Ramp button to create a ramp texture. The Multilister window
now displays a Ramp#2 icon under
the texture section.
5. In the Attribute Editor click on
the ramp2 tab, and you should now see
the parameters associated with
the ramp.
6. Change the Ramp type to U RAMP, and the
Interpolation to smooth.
7. Click on the circular handle
that defines the position for the red
handle, then click on the color
sample to open the color editor.
8. Change the HSV values
as follows: Hue to 0, Sat to 0, Value to 0.
Leave the color editor open.
9. In the Ramp editor, click the circular handle for blue
and set the same
values in the color
editor to change it to Black.
10. Click on the circular
handle for Green, and change its value to 47 for
Hue, 0.725 for Sat,
and 1 for Val.
You Attribute Editor should now look like this:

Add Noise to the Ramp
1.
Change the Noise parameter of the Ramp texture to 0.05.
2. Close the color editor and the Ramp editor.
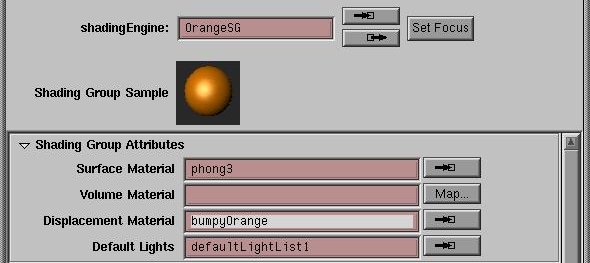
Placing a Displacement Map the Orange
Next, you apply a displacement map to create a bumpy surface for the orange.
The orange currently uses a smooth orange-colored shader. The displacement
map forms a bumpy pattern on its surface without effecting the color.
Import the Displacement Map
1. A displacement shader has already been created, so the texture must
be imported into the Multilister.
From the Multilister, select
File->Import->Texture/Material/
ShadingGroup.
2. In the Import Dialog, type in the path
/home/cse458/Tutorials/texture/bumpyOrange and then press the
Import button.
3. Open the Attribute Editor for the OrangeSG shading
group by
double-clicking the
OrangeSG icon.
4. Click on the OrangSG tab to make it
active.
5. Under the Shading Group Attributes menu, type
bumpyOrange into the
textbox next
to Displacement Material. This will place the bumpyOrange
texture as the Displacement
material for the orange.
Bump Map the Bowl
Although bump mapping
changes the appearance of an object's surface, it modifies the surface normals
of an object without actually modifying the
surface. Bump-mapping affects
how light reflects for a surface, creating the illusion of bumps by making
surface areas lighter or darker, depending on the
direction surface normals
are pointing in. The easiest way to see this difference would be to render a
displacement mapped object and a bump mapped
object side by side. You would
notice that the surface edges of the bump map are not bumpy while the
displacement map has bumps at the edges. In certain
situations, the illusion
created by a bump map is all that is required. Since bump mapped surfaces render
quickly, you should use them instead of
displacement maps whenever possible.
Change the shaders Ray Trace parameters
1. Double-click the BowlSG icon to bring up the attribute
editor.
2. In the Attribute editor, click on the Ray
trace options tab to
drop down
the Ray tracing options.
3. Change the Refractive Index
to 1.2, the Refraction Limit to 10, and
the Reflect Limit to 4.
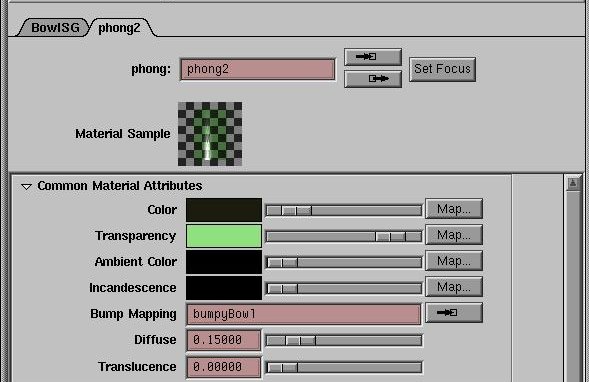
Add a bump map to the Bowl
1. A bump map has already been created, so the texture must
be imported into the Multilister.
From the Multilister, select
File->Import->Texture/Material/ShadingGroup.
2. In
the Import Dialog, type in the path
/home/cse458/Tutorials/Lesson11/texture/bumpyBowl and then press the
Import button.
3. Open the Attribute Editor for the BowlSG shading group
by
double-clicking the BowlSG
icon.
4. Under the Shading Group Attributes menu, type
bumpyBowl into the
textbox next
to Bump Mapping. This will place the bumpyBowl
texture as the bump map for the
bowl. You Attribute Editor should
now look like the following:
Solid Texture map the table
In this section ,
you give the table a solid Marble texture to the table.
Solid textures
differ from surface textures because they define a 3D texture
space in which
an object is located. In effect, objects are "carved" out of
the material of
the solid texture. In the following, you create a shader that
works almost
as if the table were chiseled out of a piece of marble. To achieve
a similar
effect with surface textures, you would have to distort the texture
perfectly around the corners following the objects surface. Since this is
very
difficult to do with a surface map, you use a solid texture.
Apply a solid texture to the table
1. In the Multilister, select the Table shader.
2. Click the Map... button next to Color in the Common
Material Attributes
section of the
editor.
3. Under the 3D textures section, select Marble.
4. Change the filler color to have a Hue value of 110,
Sat 0.5, and Value
0.2.
5. Change the vein color to have a value for Hue of 80,
Sat 0.5, and Value
0.4.
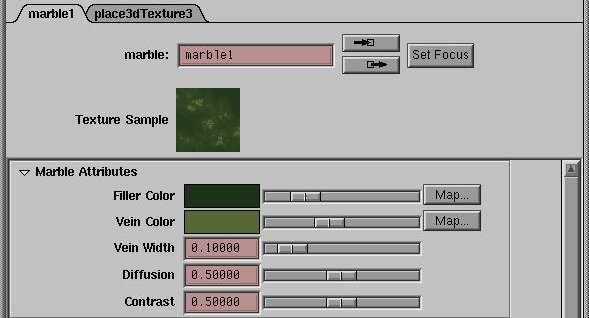
6. Under the noise attributes section, change the amplitude to 2.0.
Open Maya and Pick the Texture Placement object
1. Inside of Maya, select the texture placement object.
2. With the texture placement box selected, inside the
channel box, scale
the object by
3 in both the X, Y, and Z directions.
3. Now with the
texture placement object still selected, rotate the object
by 45 in both the X, Y, and Z,
directions. This creates an interesting
relationship between the
placement objects and the table top. Now the
veins of the marble texture
should flow along the table.
Render your scene
1. Press F5 to go to the Rendering menu set.
Select Render->Render into new window to see a finished render of your
texture mapped image.
Save the file
1. Close the Render window
and from the file menu,
select Save scene as. Save the scene as myfruitbowl3.