In this lesson, you create shaders for all parts of a fruitbowl model and assign these shaders to the objects. First, download the following files:
Initial Setup
A file has already been
prepared containing the fruitbowl model. Start by opening it and performing a
quick render.
Open Maya and creating and open the scene
1.
Select File->Open
2. From the Maya file
menu, select fruit.mb
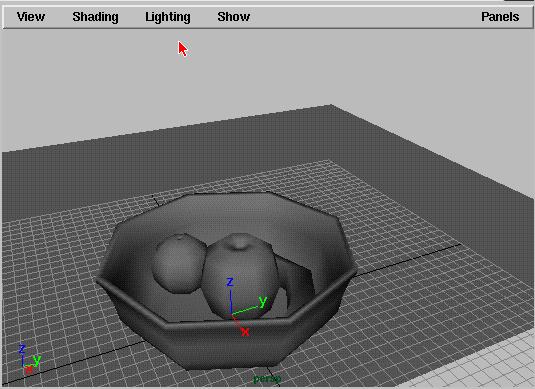
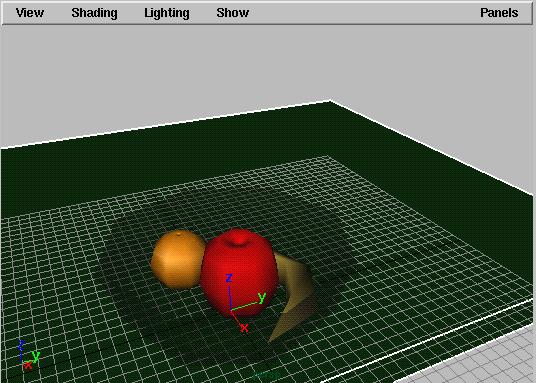
A perspective window is displayed showing a bowl on a tabletop containing an apple, a banana, and an orange.
Smooth Shade the Scene
3. Press and Hold the
space bar on you keyboard to bring up the marking menus.
4.
From the shading menu, select smooth shade all. All the objects are rendered in
gray to show that they are using the
Maya default shader.
Creating and assigning a new shader.
Next you create a shader for the apple.
1. Select the Rendering menu set from the drop down box in the upper left
corner of the Maya status bar.
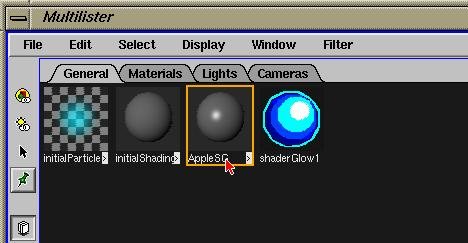
2. From the Windows menu, select Rendering Editor->Multilister. This will bring
up the
multilister. The Multilister contains
information about the shaders
textures,
lights, and cameras in you scene. The menus at the top contain
relevant shader functions.
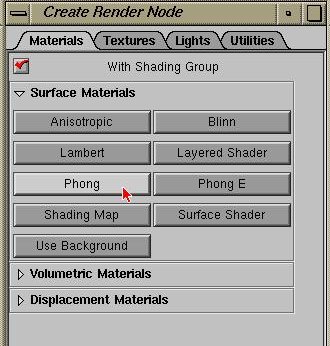
Make a new shader
3. Select Create from
the edit menu in the Multilister.
4. Select Phong from the
CreateRenderNode box, and then select the close
button to close the box.
Rename the new shader
4. double-click on
the default phong1SG shaders name and press the backspace
key to clear the existing text.
5. Type AppleSG and press enter.
Note: Both mixed case and lower case names are used for shaders in this series of lessons.
Pick the apple object
6. Make sure the
AppleSG shader icon has a orange border to indicate that it is
the only active shader.
7. Select the apple from the bowl of fruit. Once you select the
apple, you should
see the apple object
appear in the channel box.
Assign the shader to the object
8. With
both the AppleSG shader icon and the apple object active, select Edit->Assign
from the Multilister menu to
assign the shader to the apple.
Note: You can also create shaders and not assign them to
objects. However only assigned
shaders are displayed when you render the scene.
Editing Shader Parameters
You can edit
some of the shader parameters to create the look you want using the Shader and
Color editors.
Open the shader editor
1. Double-click
the AppleSG shader icon to open the shader editor.
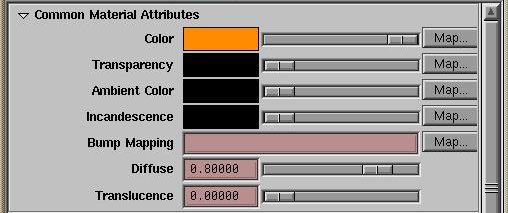
2. In the
Common Material Attributes section, click once on the gray color
sample next to the Color parameter to
open the Color editor.
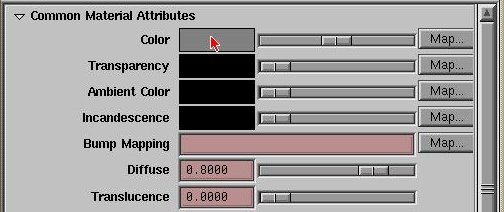
3. In the Color editor, drag the R slider to 1, and the G and B
sliders to
0. This changes the Red,
Green, and Blue values to define a new red
color.
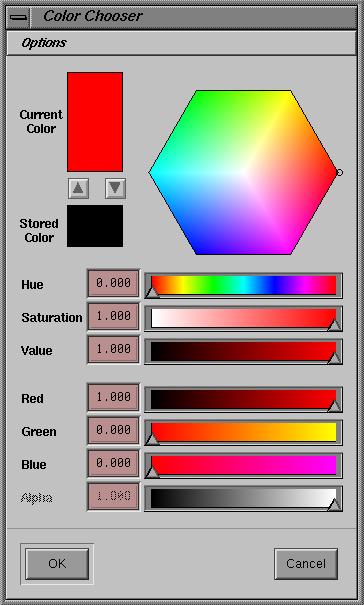
Notice that the Apple shader icon in the Multilister has
turned Red. In
another lesson, you will make this shader
even more realistic by adding
a texture map.
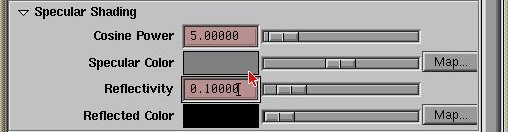
4. Expand the Specular Shading box and change the Cosine Power parameter to 5.0 .
Keep the two editors open while you proceed.
Copying a shader
1. With the
Apple shader active, select Edit->Duplicate->Shading Network
from the Multilister menu. This
creates a copy of the Apple Shader
Group.
2.
Double-click on the name AppleSG1, clear it, and type OrangeSG to
rename it.
Assign the orange shader
3.
With nothing picked, select in orange object located in the fruitbowl.
4. With both the OrangeSG shader and Orange object
active, select
Edit->Assign,
to assign the shader to the Orange.
Edit the Orange Shader's reflectivity and shininess
5. Double-click on the Cosine Power value in the shader
editor and change
it to 15, to
make it less shiny than the apple. Oranges are not as
reflective as apples, so change
the Reflectivity value to 0.1.
Edit the shader's color
6.
In the color editor, click on the value next to G and type 0.55 to
change the color to Orange.
Creating the Banana shader
Create and name a new shader
1. Select Edit->Create from the Multilister menu.
2.
Select Phong, and click the close button to close the CreateRenderNode
dialog.
3.
Rename the shader BananaSG.
4. In the BananaSG Color
editor, change the RBG values to 1, 0.843, 0.275
5. In
the BananaSG attribute editor, change the value of the Cosine Power
to be 5, and the value of the
Reflectivity to be 0.1.
6. Assign the shader to the
Banana.
Create the Table shader
Create and name a new shader
1. Make sure that all of the geometry in the scene has been deselected. Then
click on the
Apple shader in the
Multilister to select it.
2. Select
Edit->Duplicate->Shading Network
3. Double Click on
the AppleSG1 name and clear it. Type TableSG and press
enter.
Edit the shaders color
4.
Double click on the shader icon to bring up the shaders Attribute
Editor.
5.
In the TableSG color editor, change the Red value to 0, and the
green value to 0.2.
Assign the Shader
6. Make
sure the TableSG shader is highlighted with the orange box, and
then select the table from the
scene.
7. Select Edit->Assign to assign the shader to
the object.
Create the Bowl Shader
1.
Make sure that nothing is selected in your scene.
2.
Click on the Apple shader in the multilister to select it.
3. Select Edit->Duplicate->Shading Network
4. Rename the shader to BowlSG.
Edit the shader attributes
5. In the color editor, change the value of the color to 0.11 for Red,
0.11 for Green, and 0.055 for
Blue.
6. In the transparency editor, change the value to
0.56 for Red, 0.878 for
Green,
and 0.498 for Blue.
7. Adjust the diffuse value to 0.150.
8. Adjust the Specular color to 0.93 for both the Red,
Green, and Blue
components, and
adjust the reflectivity field to 0.148
Assign the Shader to the Bowl
9. With the BowlSG shader group selected, pick the bowl
inside of maya.
10. In the Multilister select
Edit->Assign to assign the shader to the
bowl.
There are now eight shader icons in the Multilister: AppleSG, BananaSG,
BowlSG, InitialParticle, InitialShader, InitialGlow, OrangeSG, TableSG.
If
there are more shaders listed than you can see, use the scroll bar at the left
of the Multilister window, or resize the window by dragging at the
corners.
You can also change the icon display to list by name or as columns by selecting
the display method you wish under Display->as List, or Display->as
Columns.
To see the objects and surfaces an active shader is assigned to, select Select->Select Assigned. Your perspective window should now look like the following:
Rendering your image:
You will now render your
completed fruit scene.
1. Change the menu set to
Rendering by pressing F5.
2. Select Window->Render
Globals.
3. Change the image format to
SGI.
4. Expand the Resolution
options, and change Resolution to 640x480.
5. Close the Render Globals window.
6. Render your scene by selecting
Render->Render into new Window.
Save the model
1. From the
File menu, select Save scene as. Save the scene as
myfruitbowl2.