Stationary Walk Cycle Tutorial
(Using "Adam")
In this tutorial, we'll go through the basic steps required to produce a stationary walk cycle. A stationary walk cycle is simpler than a walk cycle where the character actually moves forward in 3D space. However, most of the concepts in this tutorial can be applied to the latter type of walk cycle.
Make sure your animation units are set to NTSC (30fps). This tutorial is designed to create a walk cycle that is 1 second long.
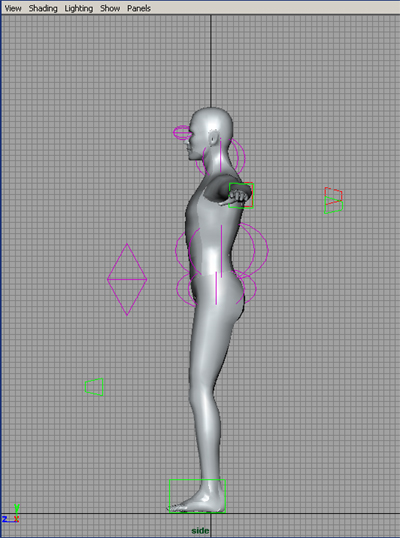
Let's start with a side view, since this is the easiest view to see the major parts of the walk cycle.
One iteration of the walk cycle will last one second. So, set the time slider from 1 to 30.
We'll start by moving the legs.
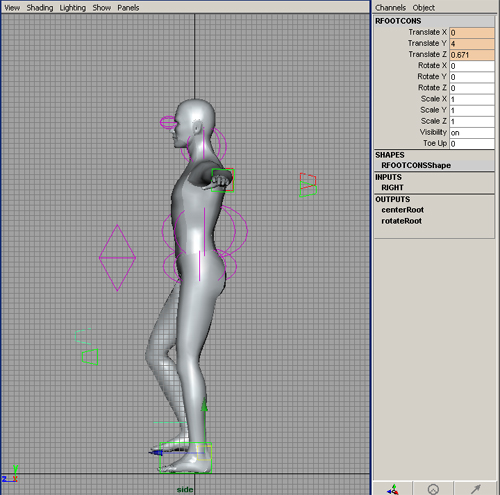
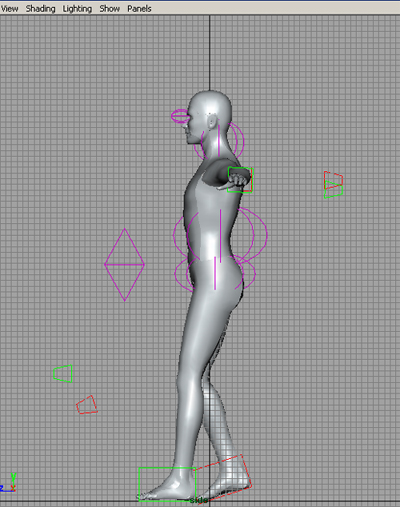
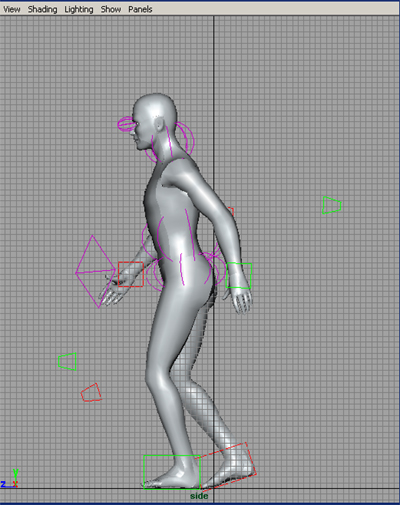
Starting pose:
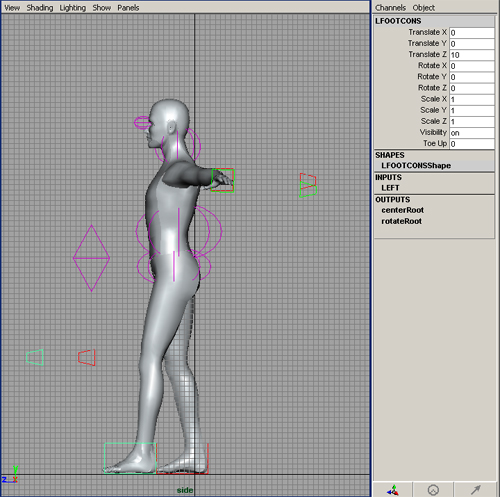
Move the left leg forward (along the Z-axis) about 10 units and set a keyframe on the translation at frame 1.
Move the right leg back about 10 units and set a keyframe on the translations at frame 1.
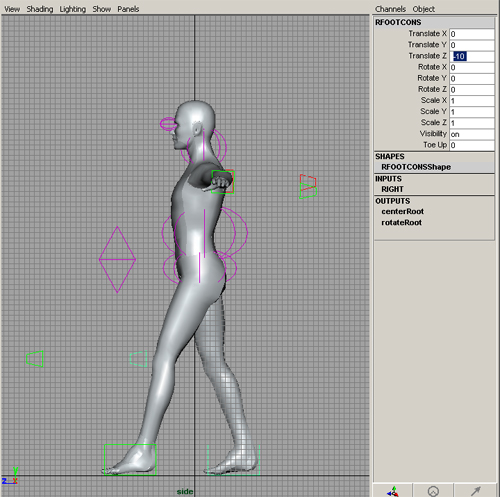
Since this is a cyclic animation, we want the first frame to be exactly the same as the last frame. So, we can set a keyframe for this exact position at frame 30 as well.
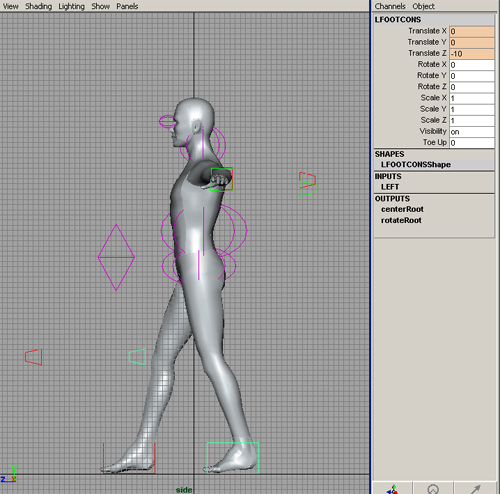
Second Step Forward:
Switch the feet positions and set a keyframe at frame 15.
Picking up the feet:
If you playback your animation, you'll see that the feet just slide back and forth (no surprise there). Now we'll add some Y-translation, so Adam picks up his feet.
Go to frame 7 and move the right foot up about 4 units. Set a keyframe on the Y translation.
Repeat this for the LFOOTCONS at frame 23.
If you playback your animation now, you can see we're getting closer. We've blocked out the basic translations for the feet. Now let's add some rotation.
Adding rotations to the feet:
Go to frame one, and rotate the left foot about -25 degrees about the X-axis. Set a keyframe on the x rotation.
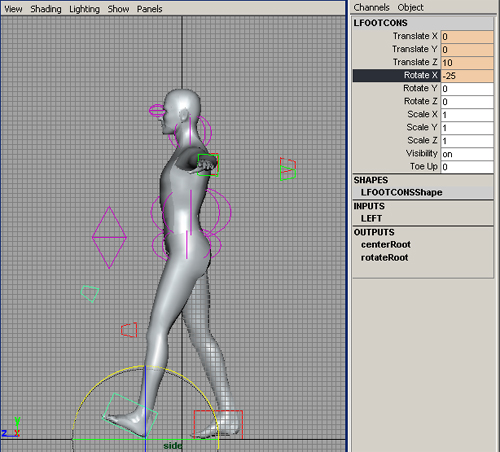
Remember that this inital pose is also our ending pose. Set an identical keyframe for the X rotation of the left foot at frame 30.
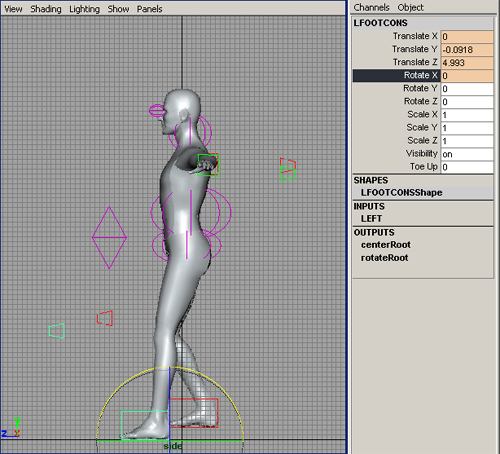
The foot should lay flat again as Adam moves "forward". Move to frame 4 and set the X rotation of the left foot to 0. Set a keyframe on the x rotation at frame 4.
Adam's left foot should stay flat while the right foot is in the air. Move to frame 15 and change the X rotation to 0. Set a keyframe.
If you playback the animation, you'll notice that the left foot is now rotating beneath the floor when it should be staying flat. This is because of the default interpolation of the keyframes. This is known as "overshoot". You can see what's happening by examining the graph editor.
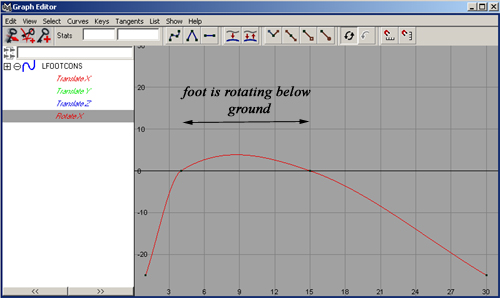
We want the foot rotation to be zero from frame 4 to frame 15. To do this, select the keys at 4 and 15 and set the tangents to "flat"
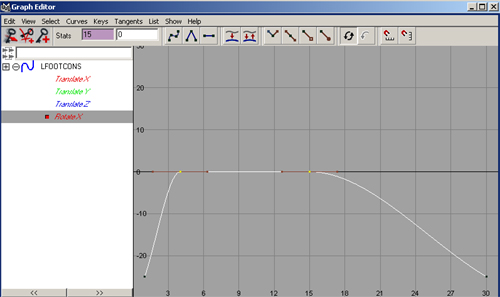
Now the foot will not rotate below the ground.
We also want the foot to "drag" a bit as it comes forward.
Go to frame 20 and rotate the left foot about the X axis 18 degrees. Set a rotational keyframe.
Repeat the above steps for the right foot rotation, from frames 15 to 30.
Other details you can make to the legs/feet:
At this point, your animation should look something like this. The basic rotations and translations for the legs and feet are done. Now is a good time to tweak timing and positioning. Take a look at your character from different angles. For example, when looking from the Front view, you might find that Adam's legs are a little too far apart. Adjust the positions to your liking.
Try using the "toeUp" attribute (on Earl and Adam) in combination with some X rotation to have your character's rear foot come up on its toes before stepping. Remember, this tutorial is just a guide, it's up to you to make your animation look and feel good. The values used are estimates, feel free to change them as you see fit. Also, experiment with the timing, so far, we have been animating with pretty even timing. The rest of this tutorial will refer to the above steps for timing issues. If you change anything, just remember what you have changed.
Animating the ROOTCONS
We've got the legs and feet moving, but they look like they are separate from the body. Our next step is to move the root joint via the ROOTCONS to begin showing a feeling of weight. During a walk, the body is usually forward, anticipating the direction of movement. We need to position Adam's body so that it has this characteristic.
Adding horizontal movement
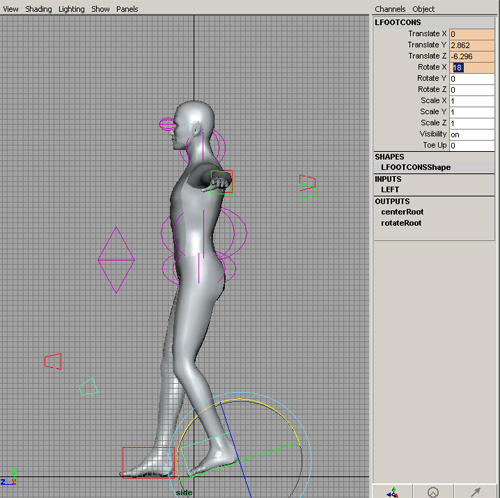
At this point, Adam's body position is very straight up and down, and too far behind his lead leg. This is especially apparent when Adam's lead foot comes into full contact with the ground.
You can see that Adam's weight is still centered between his feet. However, all his weight should be on his front foot. We'll fix this by repositioning the ROOTCONS.
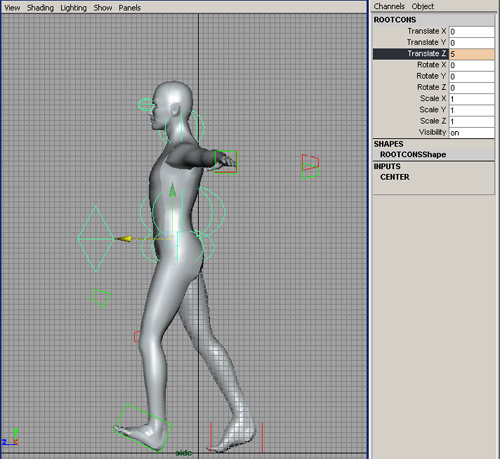
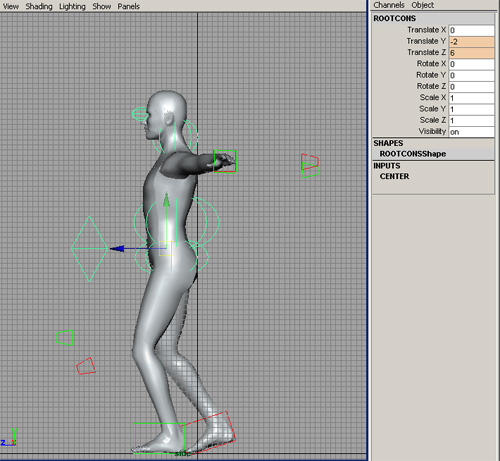
Translate the ROOTSCONS forward along the positive Z-axis by about 6 units.

Select the ROOTCONS and translate it forward (along the positive Z axis) about 6 units. Set a keyframe for the Z translation at frame 4.
Repeat the above steps for when the right foot hits the ground.
We can also give Adam a slight backwards movement as his feet pass each other. This (in addition to the upper body animation to be added later) will reduce the overall stiffness of the walk.
Go to frame 1 and move the ROOTCONS backward 1 unit (its Translate Z value will be 5). Set a keyframe for the Z translation at frame 1.
Repeat this for frames 15 and 30.
Here is a playblast of the animation up to this point.
Adding vertical movement
The lowest point in a walk is when the front foot makes complete contact with the ground. This happens first at frame 4 first for the left foot.
Go to frame 4 and translate the ROOTCONS -2 units in the Y direction. Set a keyframe for the Y-translation at frame 4.
Repeat this step for when the right foot comes into full contact with the ground.
The highest point in the walk is during the "passing position". This is the point when the rear feet pass each other as the front foot comes back and the rear foot comes forward. This happens first at around frame 7.
Go to frame 7 and translate the ROOTCONS to a value of 0 in Y. This will raise Adam's body up at the passing position.
Repeat this step for the next passing position (when the left foot is coming back to the front).
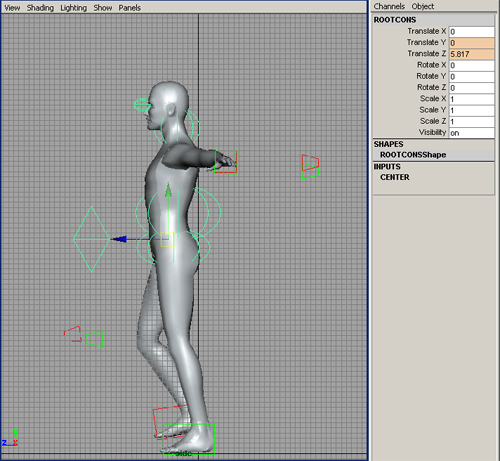
The first and last frames of our cycle aren't at either of these extremes, so we need to determine what the Y translation value of the root should be at those frames based on the "mirror" image of those frames, for us, that is at frame 15.
Go to frame 15 and examine the value of the ROOTCONS Y translation (it should be around -1.34). This is the value we want the Y translation of the ROOTCONS to be at frames 1 and 30.
![]()
Go to frame 1 and set a key on the ROOTCONS Y-translation with a value of -1.34 (or whatever the value was at frame 15). Repeat this for frame 30.
Here's an example of what the animation looks like at this point.
Now would be a good time to make any subtle adjustments to Adam's poses that you would like to make. Right now, Adam has incredibly good posture. Try rotating the ROOTCONS about the X axis a few degrees to have Adam lean forward a bit. Keep in mind that you will be animating the TORSOCONS and possibly some of the custom attributes contained within that constraint to produce more detailed movement.
Animating the Hips
The hips are a very important part of any walk cycle. Our next step will be to coordinate some hip rotation with the leg motion.
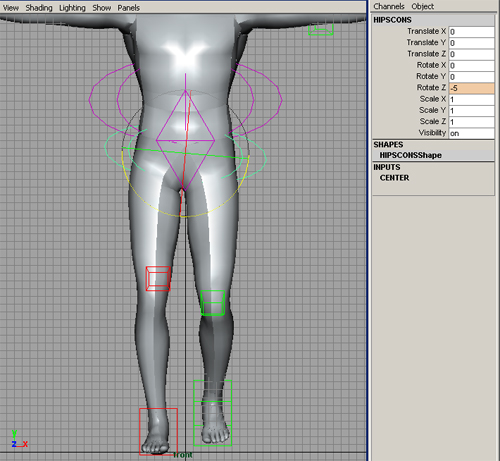
First we'll examine the rotation of the hips about the Z axis. Switch to a front view.
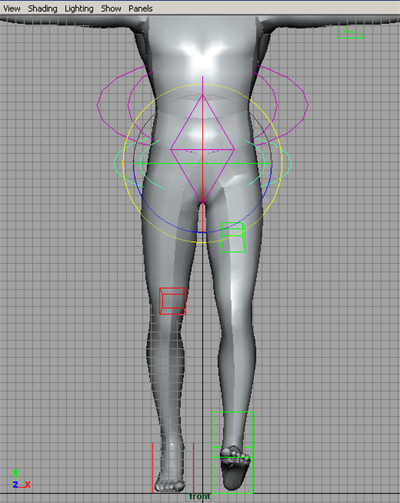
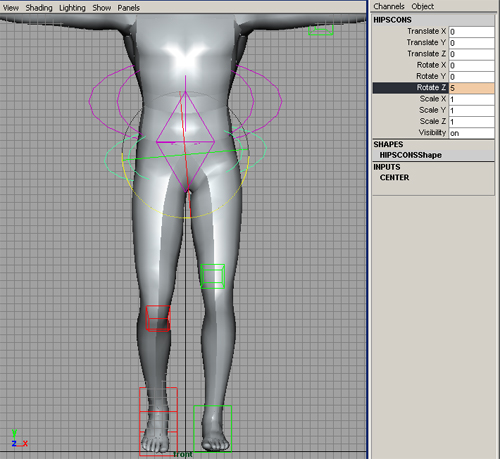
When one of Adam's feet lift off the ground, the corresponding hip "drops". We want this to happen when Adam's weight shifts to the planted foot. Again, this happens first at frame 4. Go to frame 4 and rotate the HIPSCONS about 5 degrees about Z. Set a keyframe for the Z rotation at frame 4.
Note: When animating a walk cycle for a female, this amount of rotation would typically be greater. This would add a more noticable "sway" to the hips.
We want the hips to stay this way until Adam's weight shifts onto his other foot (In our case the right foot). Go to frame 15 and set a keyframe on the Z rotation of the HIPSCONS with the same value (5).
When the right foot plants, we want the hips to rotate the opposite way. Go to the frame where Adam's right foot plants, and set a rotational keyframe with a value of -5 about the Z-axis. The hips should stay this way until frame 30.
There is also some hip rotation about the Y-axis that needs to be added. When one of Adam's feet moves forward, the corresponding hip should move forward as well.
Switch to a top view and go to frame 1. Adam's left foot is forward, so we'll rotate the HIPSCONS so that the left hip is pointing forward. Rotate the HIPSCONS about -10 degrees about the Y-axis and set a rotational keyframe at frame 1.
(In the following image, the joints have been made visible and the waist joint selected to illustrate)
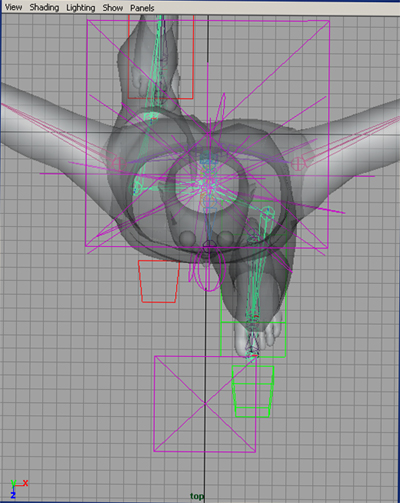
Repeat this step for when the right foot comes forward. Also, don't forget to set a keyframe on the HIPSCONS at frame 30 that is the same as frame 1.
Here's what the animation should look like at this point from the side and front.
That does it for the basic movements of the lower body.
Animating the Upper Body
Animating the Torso
In animating the torso, we want to use rotations similar to the hip rotations, just in the opposite direction. In doing this, we will be counter acting the motion of the hips with the upper body, which creates balance in the movement. We call this the "balance reaction".
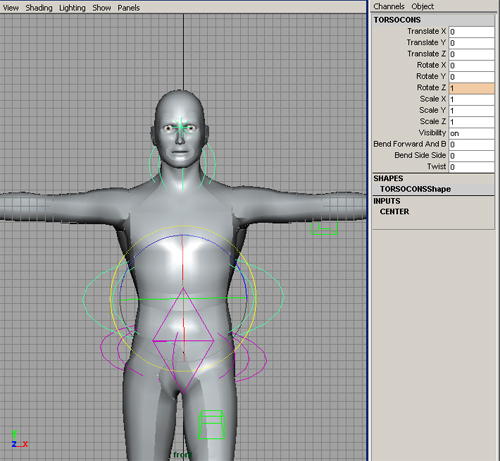
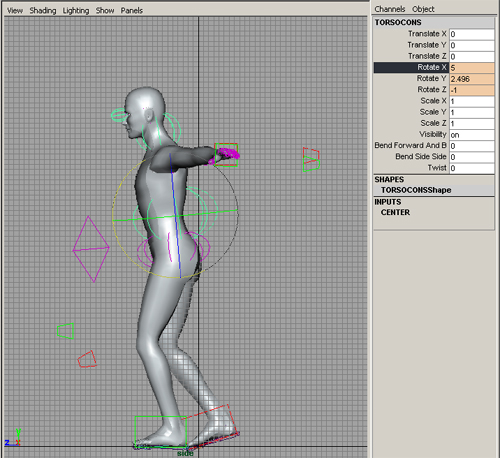
To start, let's animate the counter rotations about the Z-axis.
Go to frame 1 and rotate the TORSOCONS 1 degree about the Z-axis (this may not seem like much, but keep in mind that you may want to add to this by animating the "Bend Side Side" attribute to add detail, rotating the TORSOCONS and further could result in a walk cycle with a very stiff upper body). Set a keyframe on the Z rotation at frame 1.
Repeat this process to produce counter rotations for the other hip rotations about Z.
Now, we'll create the balance reactions for the rotations about the Y-axis.
Go to frame 1. We want to rotate the torso so that the shoulder opposite the forward pointing hip is rotated forward. i.e. If the left hip is pointing forward, we want the right shoulder pointing forward. Select the TORSOCONS and rotate it 5 degrees about the Y-axis (Again, this is a movement you may want to supplement with the "Twist" attribute). Set a keyframe on the Y rotation at frame 1.
(In the following image, the joints have been made visible and the sternum joint selected to illustrate)
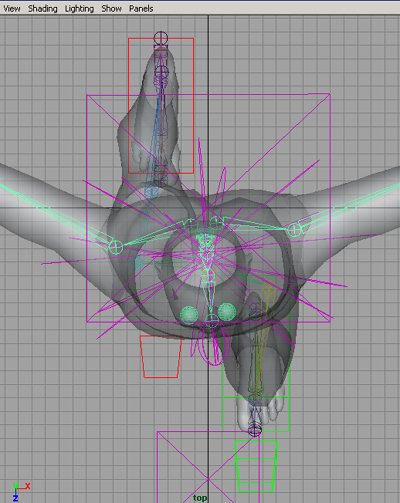
Repeat this process to produce counter rotations for the other hip rotations about Y.
At this point we have the balance reactions for the torso and hips animated. We can also add some more weight to Adam by rotating his torso about the X-axis as he "falls" onto his front foot.
Go to frame 4 and rotate the TORSOCONS about the X-axis about 5 degrees (you can supplement this movement with the "Bend Forward and B" attribute).
Repeat this step for the other foot plant.
Similar to when you animated the Y-translation of the ROOTCONS, the first and last frames of our cycle aren't at either of these extremes, so we need to determine what the X rotation value of the root should be at those frames based on the "mirror" image of those frames, for us, that is at frame 15.
Go to frame 15 and examine the value of the TORSOCONS X rotation (it should be around 2.84). This is the value we want the X rotation of the TORSOCONS to be at frames 1 and 30.
Go to frame 1 and set a keyframe for this rotational value. Repeat for frame 30.
Here's a playblast of the current animation from the top, and front.
Animating the Arms
We want the arms to be led by the shoulders. The arms should reach their extreme positions slightly after the shoulders do, this is an application of "follow-through" and "overlapping action". At frame 1, the left shoulder is at its forward-most position, and the right shoulder is at it's furthest back. We'll keep the arms about three frames behind.
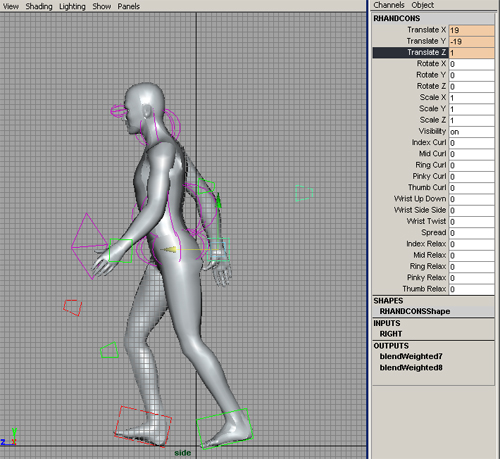
Go to frame 4, and position the RHANDCONS at its forward most position (in this example, it is at (19,-19,20)). Don't forget to position the RELBOWCONS so that the elbow is pointing in the correct direction. Set a keyframe on the translation values for the RHANDCONS and RELBOWCONS at frame 4.
In the same frame, position the LHANDCONS in its backward most position (in this example, it is at (-19,-19,1). Position the LELBOWCONS and set keyframes for both of the control's translation values at frame 4.
Frame 15 is when the shoulders meet their next extreme about the Y-axis. Go to frame 18 and position the arms in their proper extremes. Set a keyframe for the arm controls' translations at frame 18.
Again, you will have to determine what the positions of the arms are for the beginning and end frames of the cycle based on their positions at frame 15. Use the same method as before and set keyframes on the controls.
When the torso rotates about the Z-axis, one shoulder drops and the other raises, we want to coordinate the arms to these shoulder rotations as well. At frame 4, the torso is rotated such that the left shoulder is slightly dropped and the right shoulder is slightly raised.
Go to frame 6 and move the LHANDCONS control slightly down in the Y direction, and move the RHANDCONS slightly up. Set keyframes for these positions.
![]()
Repeat the same process for the next shoulder rotation extreme (right around frame 22).
Make sure that you set the proper Y-translation values for the beginning and end frames.
Here are some playblasts of the animation up until this point. Side, Front, and Top.
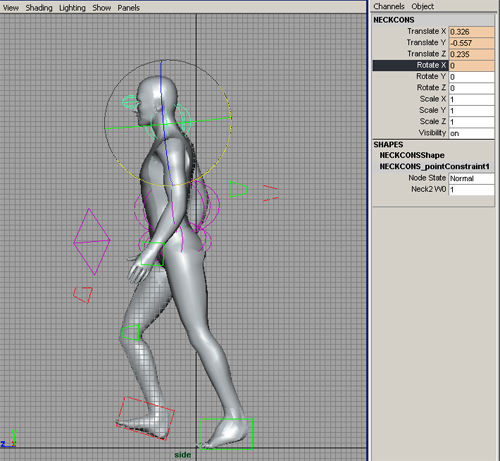
Head
We want to apply the principles of "follow-through" and "overlapping" to the head as well. Depending on the attitude of your character and how focused he/she is on it's destination, you'll want some head bob. This head movement should happen behind the torso X rotation as the front foot hits the ground.
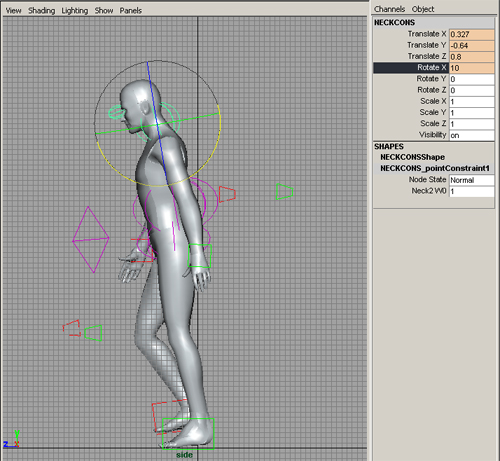
Go to frame 7 and rotate the NECKCONS about the X-axis roughly 10 degrees. Set a keyframe for the X-rotation value.
 v
v
Go to frame 12 and rotate the neck back to zero. Set a keyframe. This is about the time that the head should come back up.
Repeat this for the other foot plant.
Examples up until this point: Side, Front, and Top.
Things to keep in mind...
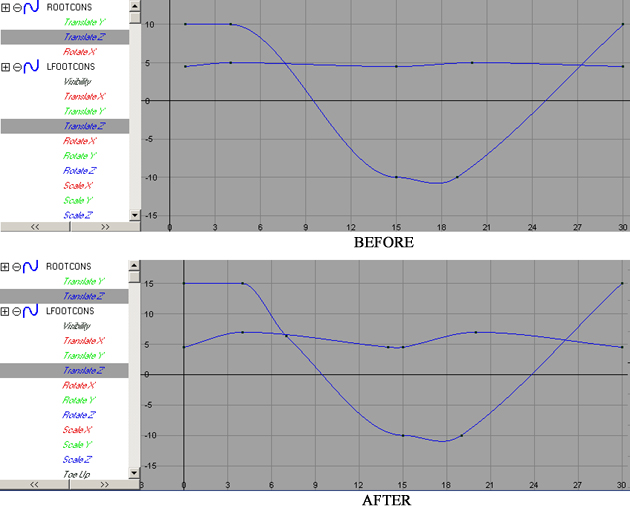
Again, this tutorial does not produce a "perfect" walk cycle. In fact, there are many problems with the animation that this tutorial produces if you follow it word for word. The following is an example of an animation that used this tutorial's result as a foundation to work off of, along with brief descriptions on what was changed to produce the final animation.
General First Comments
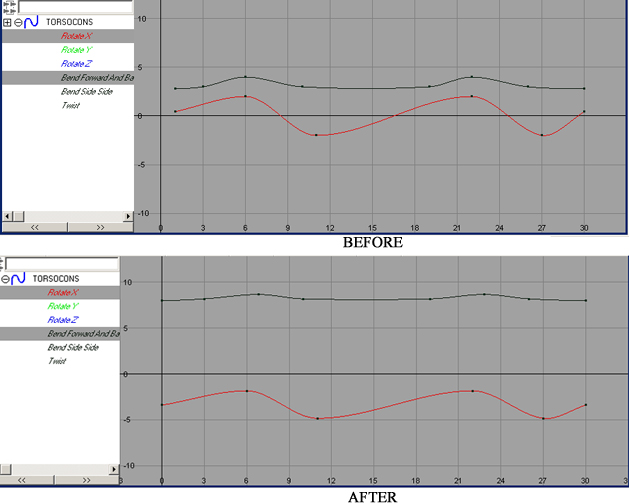
The animation looks stiff and robotic. Adam needs to be tweaked and refined to loosen him up and to help the walk look more natural. This is done by tweaking positions, values, and timing. This requires lots of iterations, lots of playblasts, and lots of patience. The changes made to achieve the final animation include the following:
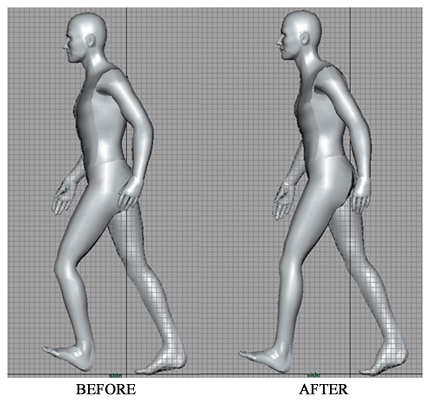
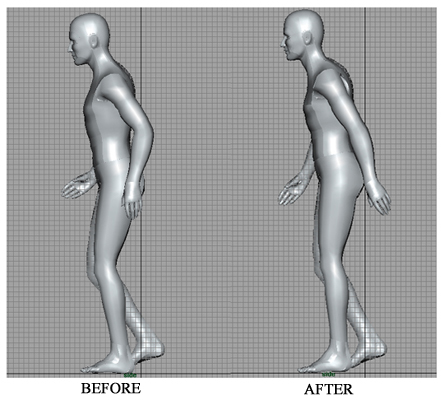
- Adam's posture. In general it needs to relax. If you look at his posture in his BEFORE stance above, his back is arched and his shoulders are pulled back making for a stiff gait. To fix this, the Rotate-X value was decreased and the "Bend Forward and Back" attribute was animated to create more of a slouch.
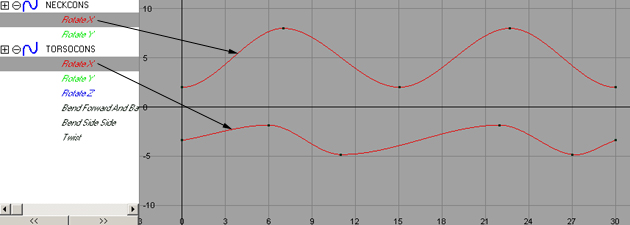
- NECKCONS and TORSOCONS. If you compare the Rotate-X curves, you can see that the Neck reaches its extreme after the Torso does. This creates follow-through. There was some of this in the original, but it was tweaked until it looked right.
- TORSOCONS. The custom attributes for the TORSOCONS were animated for this final version. If you examine the Rotate curves for the TORSOCONS and their respective attributes (Rotate-X with "Bend Forward and Back", Rotate-Y with "Twist", and Rotate-Z with "Bend Side Side") you can see that the custom attributes reach their extremes at a different time than their Rotation counterparts. Again, this is a use of follow-through and overlapping motion.

Adding the animation to these attributes also created more detailed and subtle rotations. The effect is that the shoulder's turns and rotations are emphasized, but are not as awkward as they would be if you had rotated the entire TORSOCONS to a further degree.
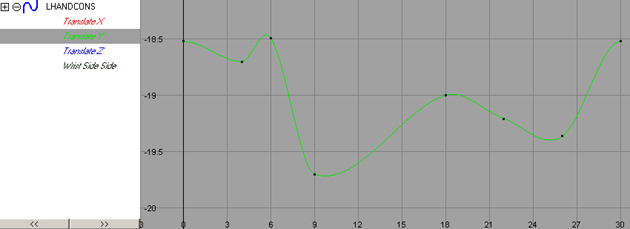
- Wrist attributes. The Wrist "Side Side" attributes were animated using follow-through and offsetting the extremes of the Wrists with the extreme positions of the Arms.

- Arms. A little more up-and-down motion was given to the arms. Most of the changes were made by tweaking and adding keyframes at points where the arms did not appear to be positioned correctly. The function curve doesn't look tidy, but the resulting motion works.
- Feet. The feet controls were adjusted to give Adam a larger step. In the older animation, Adam did not extend his legs far enough in front of him. This was changed by choosing the lead foot at the extreme forward position of the Translate-Z curve. The keyframes were then moved to a better position. Note: Keep in mind that when you move the feet, you have to adjust the torso to accommodate any changes.
- General. Keyframes were interactively moved and tangents were tweaked until the desired effect was achieved. This means that many of the keyframes no longer fall on exact values.
Tweaked walk cycle: Front, Side, Top, Persp. Below you can see snapshots comparing the walk before and after tweaking.
Cycling the animation and attaching the walk to a path
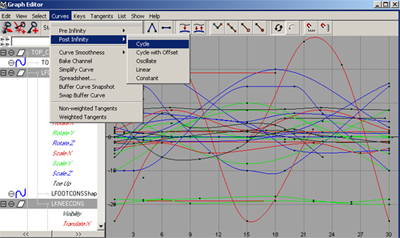
If you want your walk cycle to last for more than a second within your animation, you will have to cycle it. The easiest way to cycle the entire animation is to choose the TOP_CONS, open the Graph Editor and Shift-Left-Click the '+' in the box to the left of TOP_CONS label in the graph editor. This will expand the hierarchy of controls, selecting them and making the curves visible in the graph editor.

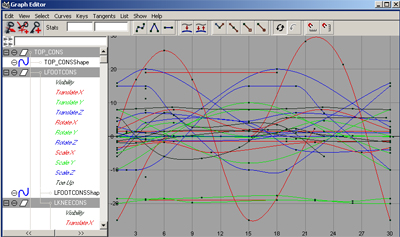
Now, select Curves->Post Iinfinity->Cycle. This will cycle your animation.
Here is an example of 4 seconds of the animation (4 cycles).
Attaching the walk to a path
We will be attaching the walk to a path curve so that Adam moves forward in 3D space. The first step is to draw a straight line using the curve creation tools. The length of the line is roughly chosen by the size steps that the character takes, this length is usually tweaked and altered as the positioning of the character on the path is altered. You can cycle your animation, then have your character move along any length of path. For the purposes of this tutorial, we will just do a path long enough to contain one second of animation (one cycle).
Draw your path. Then, select the TOP_CONS, then the path. Select Animate->Paths->Attach to Path. If you playback your animation, you'll see that the feet seem to slide along the ground. Below is an example of the function curve that defines Adam's position on the path before alteration.
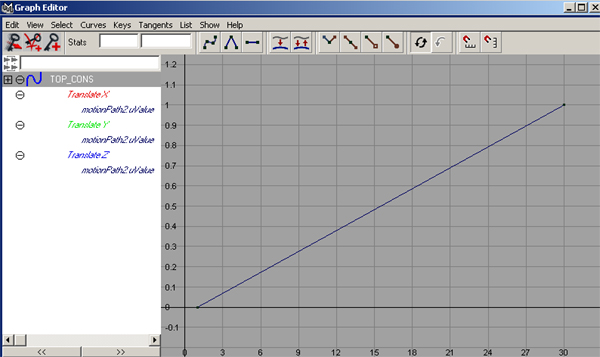
You can see that the TOP_CONS is moving along the path at a constant rate.
Here is an example of the resulting animation.
You need to alter the function curve to fix this. The process is more of a "change, check, change again, check again process" of adding and shifting keys until the animation looks correct. Below is an example of the function curve that determines Adam's position on the curve, followed by the animation produced.
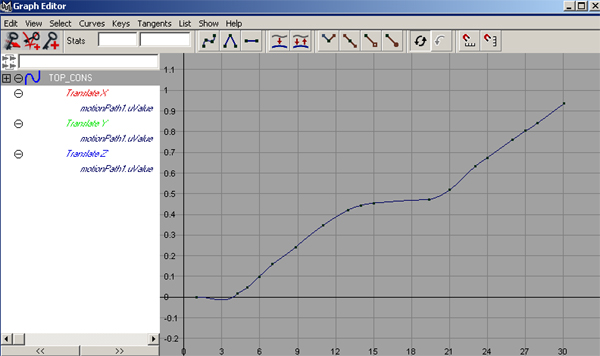
Example of walk attached to a path.
That ends this tutorial. Remember all the concepts you learned here, and apply them to your other animations.
Jason Ilano, 09/2000