|
|
|

|
|
Project 2
Out: Wednesday April 4
Due: Friday April 13 (midnight)
Turnin: Online
Teams: Pairs
Assignment Overview
This project is about layering, framing, and encoding of data. The class material and text have
addressed these,
but mostly at the physical and link layers. We'll be looking at the some of the
same issues, but at the application layer. The code base for this is the project 1
code.
Like project 1, this project is something of a warm-up. You'll write more code than before,
including code to actually send data over the network. You'll ease into writing Android-specific code,
in particular augmenting the UI of the Android client. As before, the server is fully implemented,
and the instance running on cse461.cs.washington.edu is ready to talk with completed
project 2 implementations.
This is the last warm-up project. In project 3 you'll be relieved of the burden of weaving
your code into a large, existing base. Instead, we'll start from basically nothing.
Application Functionality Overview
In project 1, the transmission rate of characters from server to client was determined by the
port to which the client connected. That's an unrealistic mechanism, as it's too inflexible.
In project 2, we allow the client to specify the desired sending rate. It does that by sending
a control message to the server as the first transmission over the connection. Having
received that control messsage, the server starts sending at the requested rate. The client
indicates that it wants to set the send rate by connecting to port 46100; when the server
receives a connection on that port, it waits for the control message before doing anything more.
In the code, I refer to this approach
as "negotiation," to introduce that commonly used term, but it's not quite negotiation.
In project 2 the server must simply accept the rate the client suggests. In full-blown negotiation,
the server gets at least a chance to approve or turn down client suggestions,
and possibly to make suggestions of its own. We're not doing that, to cut down on workload (there
are no control messages sent by the server that your client has to read), and because
our application doesn't really require it.
The control message introduces new complications, beyond the obvious. One is data encoding - what
bits does the client need to send to represent its desired rate? Our answer to that, elaborated
upon below, is to use JSON (Javascript Object Notation) to send
a map (key/value pairs). The keys name arguments; the values are the values of those arguments.
JSON encodes all data as a string. That presents another new issue: we need to be able to send
a string over a TCP connection. TCP is stream based, meaning that its data is just a sequence
of bytes. There are no indications in a TCP stream of what data was sent in a single write()
by the sender. If a read() from a TCP stream returns 200 bytes, that information
alone doesn't tell you if the sender did 200 1-byte write()'s, or ten 20-bytes ones (or even
one 16,000 byte one).
So, our second problem is to send messages.
A message is a unit of transmission that can be identified as such by the receiver: it knows when
it has it all.
In project 2, our messages contain
just one thing, a JSON-encoded string representation of an object. Messages are a kind of application-layer
framing.
The concept of "message over TCP" is not specific to our application; it's generally useful.
We therefore cleanly separate that concept from the application, introducing it as a new layer
implemented by re-usable code.
Our network stack thus looks like this:
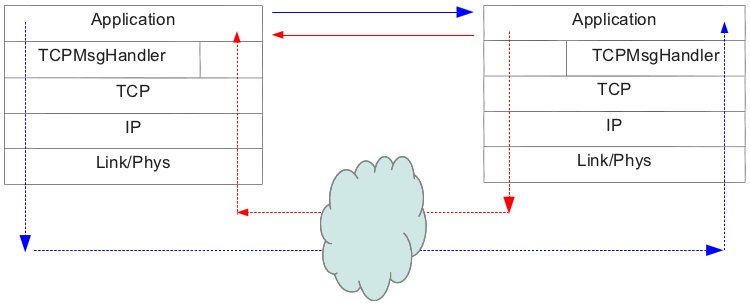
The solid blue line represents the logical communication of the control message from the client to
the server. Physically, it follows the path shown by the dotted blue line, but it's an
application-level protocol: that it's needed, and how it's encoded, are defined by the application,
and are irrelevant to all lower layers.
The red lines shown the logical and physical communication of data bytes sent by the server.
They are still just a stream, and so bypass the new messaging layer. (The blue blob is the Internet.)
Implementation Details (and Requirements)
Specific code changes are noted in red below. There are four of
them.
There are two kinds of code changes required: those needed to implement the new functionality,
and updates to UI code to let the user specify a sending rate.
Functionality Changes
Code changes are required in files TCPMesssageHandler.java and Client.java.
Places where the code needs to be completed are marked by comments that include the string "Project 2".
TCPMessageHandler.java
This class handles sending messages over a TCP stream. It accepts data from its client, prefixes it with
a 4 byte header containing an integer length, and then sends that over the TCP connection:
The integer is sent in little endian order.
All required methods of TCPMessageHandler are defined, but some are missing implementations.
In particular, (1) none of the send() methods are implemented. They differ by the type of data
the caller may pass in to them. In the end, though, all send a message that looks like the diagram above,
where the payload is the data bytes passed into the send method by the caller.
TCPMessageHandler also defines methods to convert between a Java int
and a byte array representing the int in little endian order.
The (2) intToByte() method isn't implemented, but needs to be.
The methods you need to implement are used by the client only. The sender is fully implemented.
If you find this description inadequate to determine exactly what an implementation should do, you
should be able to look at the corresponding server-side routine to see exactly what is expected.
For instance, you need to fill in sendMessage(JSONArray jsArray), but readMessageAsJSONArray()
is fully implemented.
Client.java
There is code in method connect() that detects that the server send rate
should be negotated, but (3) no code to implement the needed client to server control message.
You should implement that code.
The control message sends a JSONObject that maps the key intersymboltime to an integer specifying
the time between consecutively sent characters, measured in milliseconds.
The server does not reply to this message, except to start sending characters at the paced rate the client requested.
The client therefore just assumes the server has received the message, and continues on to trying to read paced characters.
UI Changes
The ConsoleClient already fully supports the negotiated rate scheme; the -i argument
lets the user specify the inter-symbol time, and forces the server port used to be 46100.
The (4) Android client requires updating to give the user a way to specify the inter-symbol time.
The Android client is implemented by file TimingFramingAndroidActivity.java.
There are no comments in that code indicating where you should make changes. You should achieve the functionality
described below, but all the details of how to carry that out are up to you. Just how and where you augment the
code depends on the decisions you make about how the UI should behave, so there are no comments in the code indicating
where your changes should be made.
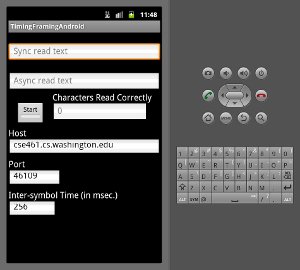
The UI changes present a new text box where the user can specify the inter-symbol time, then use the value
in that text box when the Start button is pushed. There is a small issue when both the port and inter-symbol time are
user specified: which one do you believe if what the user has specified isn't possible (e.g., port 46109 and inter-symbol
time of 10 msec.)? I leave that decision to you. As a default, though, you could try to emulate what the ConsoleClient does.
(Alternatively, you could do something better, this being a GUI after all.
For example, set the inter-symbol time if the user updates
the port (even before Start is pushed), and set the port if the user updates the inter-symbol time.)
The resulting interface should look something like this (noting
that we're totally unconcerned with details like how big the new text box is, whether it's left or right justified,
etc.):
The interface implemented in the code you have includes very similar things, so with any luck you can
examine it to figure out most of what you need to do. There are a few things not immediately
evident from the code, though, so we discuss those a bit next. Very good, but complete, documentation is
available at the Android developer site.
Android Programming
Creating UI Widgets
A widget is a UI component like a button or a text box.
While they can be created in code, project 2 uses the simpler mechanism of creating them through
the Eclipse UI. Using Eclipse, you can create widgets, arrange them on the screen, and set
some of their properties (e.g., the initially displayed "hint" text for textboxes). An XML file is written
that describes the screen layout. Android uses that XML file to create the screen when the
application is launched.
To do all that, you manipulate a layout resource in Eclipse.
Expand project timingFramingAndroid,
then res, then layout. Double-click on main.xml, the file that
defines the UI.
Two views are available (as tabs at the bottom of the view of the file). "Graphical Layout"
is just that. It shows you the UI as it will appear on the phone. You can drop new widgets onto the UI from the
palettes on the left. Having added an element, you can right-click on it to set its id.
Code that obtains a references to existing UI elements by searching for them by their id's, and then manipulates them,
is in TimingFramingAndroidActivity.java. You want to do similar things to manipulate your new UI element.
The other view of the UI is the XML view. This shows the XML encoding of the UI that is actually stored in the main.xml.
It can be helpful to look at it to understand how the Java code and this UI layout file are connected, but it's not usually
intended that you try to edit the XML directly - use the Graphical Layout view instead.
If you really want to know how the UI works, or how to do things beyond what project 2 illustrates,
full documentation is available online.
If you're interested just in UI aspects, I suggest
starting here.
If you really want to know about Android programming, you should
start at the beginning.
It is not the intention of this assignment that you should have to read this documentation. Looking at what is already implemented
in the project code you have,
plus a little experimenting, should let you implement the new UI element. On the other hand, our Android needs will become a bit broader
as we go through the quarter, so reading now may prove helpful later. (Plus, the documentation is surprisingly well written and informative;
you could read it for fun.)
Control Flow: UI Related
The Android application framework associates a block of code, known as an activity, with a screen.
The association is maintained in file AndroidManifest.xml.
Our application has only one screen, and only one activity. When the program launches, the
onCreate() method of the main activity is invoked.
Thus, execution of our code begins in onCreate() of
TimingFramingAndroidActivity.
Unlike your typical main() method, you return from onCreate() long
before program execution is over. Your code is structured as a set of callbacks, calls from
the Android infrastructure to your code.
The actual main() method is supplied by the Android infrastructure. It consists primarily of
a loop that waits for an event (something interesting) to happen. When it does, it invokes
your code.
This callback scheme is virtually the same in all GUI systems. If you've used any of them
(and the course assumes you haven't), it will be familiar.
If not, you're learning about how they all work now.
You generally tell the infrastructure what code to invoke (if any) when some specific event
occurs by registering a handler (a callback method) for it.
When the infrastructure's main loop sees an event, it checks if
any handlers have been registered. If so, it invokes them. If not, it goes back to waiting
for interesting events.
onCreate() is a handler associated with the create event. The association in this case is implicit:
the main activity is registered in AndroidManifest.xml, and all activities are required
to implement an onCreate() handler.
For widgets, you need to explicitly register handlers for the events you're interested in.
Each kind of widget defines its own set of events.
For instance, there are events corresponding to the user
typing in a text box, and events corresponding to clicking on a button (and many, many more).
You can register handlers in code or as part of building the layout object
in Eclipse. The project takes the latter approach. For instance, if you look at the XML view
of the layout object, you'll be able to see that the method onToggleClicked is
registered as a handler for the Start button (a ToggleButton widget) click event.
Control Flow: The Main and Worker Threads
Unlike the previous two sections on Android programming, the code in your solution
will not require any of the mechanism described here. I'm explaining it only because
it seems likely that you might read existing code that employs it. This section is,
hopefully, enough to get what you need from reading the code.
A thread of control is an execution context. It's basically a pointer to a line of code where it's executing now and a stack
containing the method call history that got it to that line of code and the values of all local variables
created by those calls. The programs you wrote in your introductory programming course (and likely beyond)
had a single thread of control. A multi-threaded program has many, each acting just like that one you're used to,
and all executing at the same time.
The thread of control that runs the actual main() loop, and that called onCreate(),
is called the main, or UI, thread. Your code cannot "hijack" the main thread to do something that might take
a long time. If you do, the main loop isn't being executed, and if it doesn't execute the UI doesn't
respond to user events (like touches).
The project code needs to have its own loop that reads characters sent by the server. Each time that code
invokes read(), the thread executing it blocks (stops executing) until a character arrives.
The main thread therefore cannot be used to execute the read loop.
If you look at method TimingFramingAndroidActivity.onToggleClicked() you'll see that it creates and
starts a Thread object (Java's implementation of a thread).
onToggleClicked() is itself an event handler, and so is executed by the main thread.
The main thread returns from the call to Thread.start() almost immediately, and then returns
from onToggleClicked() back to the main loop.
The newly created, just started, thread begins executing in its run() method.
There it enters the loop that reads characters from the server.
Control Flow: Summary
- Your code starts running in
TimingFramingAndroidActivity.onCreate(). That method initializes the
state of your application, and then returns to the main loop. At that point, your code runs only in response to events
like the user typing in a textbox.
- The main functionality of the application (the project 1 functionality) begins only when the user clicks on the
Start button. The code path for it starts in TimingFramingAndroidActivity.onToggleClicked(),
which launches a thread that uses a Client object to read characters from the server. At that point, the code
is exactly like the project 1 console code. (In fact, it's exactly the same code.)
- There isn't anywhere in the code where your application terminates, and no UI element provided to the user to terminate it.
Android apps don't terminate, exactly. (There is an
onStop() handler that is invoked when the application is
stopped, which is as close as Android gets to termination.)
Debugging
Because your code has to format and send data to the server, it can be useful to run your own instance of the server,
since that gives you an easy way to see what it receives. Your final code must work with the server running on
cse461.cs.washington.edu, though.
To run your own server, navigate to the lib subdirectory and say ./run.sh server.
For debugging purposes, you can run the server on any host, including the one on which you're running Eclipse.
You must point the client at your server instance, though. Especially for a personal machine, it may not
be easy to figure out what the machine's name is. You can use an IP address instead of a string name.
On Linux, the command ifconfig will show you the IP address, for example:
eth2      Link encap:Ethernet  HWaddr 00:29:e7:32:f8:3e
          inet addr:192.168.1.10  Bcast:192.168.1.255  Mask:255.255.255.0
eth2 is the Ethernet adapter (so the wired connection). inet addr is the IP address,
192.168.1.10.
On Windows, the command is ipconfig. The output is formatted differently. Look for IPv4 Address.
(I know there are probably many Macs, but I don't have access to one, so can't give reliable directions. I'd try ifconfig,
then search the Web.)
What to Hand In
- Source Files
Hand in (only) the source files in which you've changed. Normally that will be just Client.java,
TCPMessageHandler.java, and TimingFramingAndroidActivity.java, but you're not prohibitied from
changing other files, or even creating new ones.
- Names+
Hand in a text file naming the members of your team. IF you've done anything different from or in addition to the
requirements as described on this page, briefly describe what, including both what functionality changes they involve
and how they are implemented (and where to find the code implementing them).
|
