In this example, I'm going to assume that you'll be using Visual Interdev and Microsoft ADO because that's what we have in 232 and what we have support for. If you're doing this on some other platform, these docs wont help, but feel free to email me. Please keep in mind that at the moment this must be done in 232; due to the way Internet Explorer was installed, they don't work in 231 or 329. As well, be aware that it will probably not be able to be viewed correctly in Netscape.
There are a lot of permissions that need to be set, so if you get some weird error especially of the type "Permission denied" or "Connection Error 800a0bb9" and you can't figure it out in 17 minutes, send me mail with a full description of what happened and we'll see what's going on.
An important note. Currently you all have access to each other's project folders. Do not abuse this please.
But enough of the caveats.
There are a few things you will need to do to configure your machine to allow Interdev to work. You should only need to do this once, when you first open the project. Even if someone else has added an ODBC connection, you should still map the drive, simply for convenience.
In order to talk to the database, you'll need to put an ODBC connection on the machine that you're working on. To do this, do Start-> Settings -> Control Panel, then choose "ODBC Data Sources".
You'll want to add a "System DSN". User DSN means that only you will be able to access this data source, and System DSN means that anyone who is on the machine should be able to access the data source (though only if they provide the necessary NT credentials). A User DSN (which seems like it would be what you want) won't work, so make sure that you choose a System DSN.
So choose System DSN and click on "Add"

At this point, it'll ask you for which driver you want to use. Since you'll be connecting to your project database, you'll want to choose SQL Server. So select "SQL Server", and click finish (no, of course that doesn't mean that you're done). Next you'll want to specify which database you want to talk to. You'll see a dialogue box with three boxes for you to fill in. Pretending that I'm a member of the group "entities", I'd fill them in appropriately:
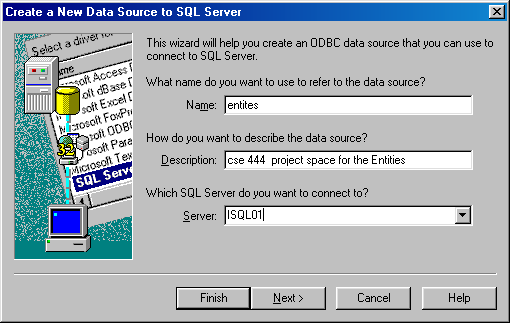
Click next and choose that you want to connect with SQL Server authentication as given to you by the administrator. This is very important, because otherwise you'll be the only ones able to access the database.
You should know your group's login and password already, they are listed here. Note that it's important to create this entry with exactly the same database name, login id and password that we gave you, otherwise when you try to connect on the server, it will not work.
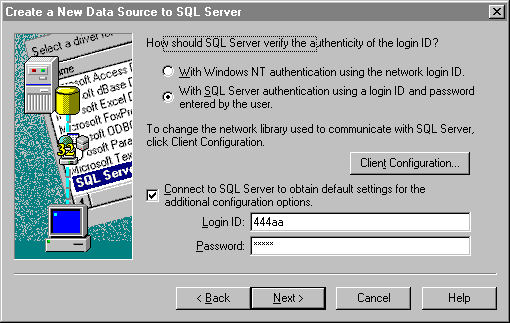
Now click "Next" again, and it will contact the database to make sure that you have the appropriate permissions. Make sure that you have your group's database selected as the default database (it shouldn't be a problem for you, because you have permissions for one database on ISQL01, so it should figure that out automatically, but check it just in case).
Click next again, then finish, and finally, click "Test Data Source" to make sure that everything ran properly. If it did, click close, and finally OK to get out of the ODBC Data Sources control panel.
If the tests failed, then perhaps you made an error in your login or password. Back up and try again.
Note that this step should only have to be done once (when you actually create the Interdev project), but if you run into problems, it may need to be done again.
Now you need to map a network drive to where your internet project space will be. If you skip this step, you will not be able to create or access the project in Interdev. You may be able to avoid mapping the directory if you're not the one who has to create the project, but you'll be accessing the files often enough that it will probably be worth your while anyway.
The project spaces are in the share at \\iinetsrv\win00. So right click on "Network Neighborhood", click on "Map Network Drive", pick some drive that's not currently occupied, and then for the path type in "\\iinetsrv\win00". Make sure that you've checked yes for reconnect at login, or you'll have to reconnect it the next time that you log in.
First, start up Visual Interdev using the start, programs, where ever Visual Interdev is; either at that level, under Visual Studio 6.0, or somewhere more cryptic.
I have already created the projects for each group to use. When you start Interdev, you may be presented with a dialogue box asking you to either create a new project or open an existing one. Click the tab for existing. If you are not prompted, choose "Open project" from the file menu.
To find your project, let's assume that you've mapped \\iinetsrv\win00 to the I drive. Your project space will be in the folder i:\cse444\[iinetsrv space name]. The project file name should match the folder name, except the spaces have been removed. You can find your group's iinetsrv space name at the project groups page, but it should be very similar to your group name. So, for example, if you were on the DB2000 team, your iinetsrv space name would be DB2000 and so would your project file.
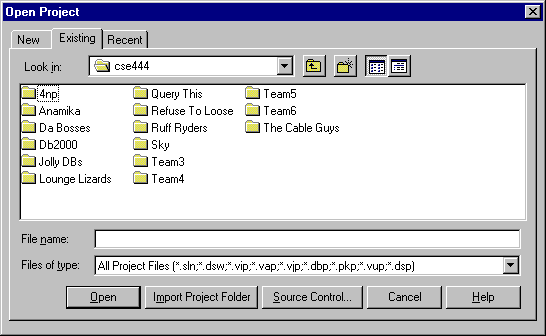
Click open to open your project.
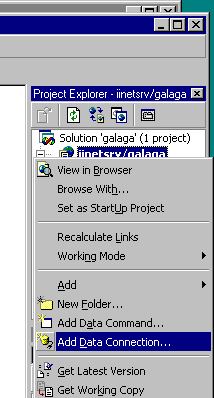
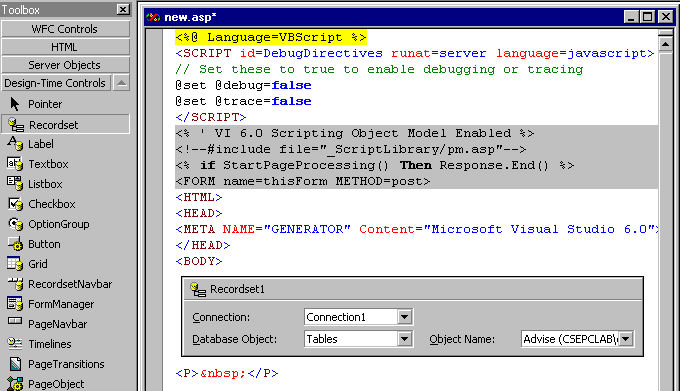
At this point you've gotten the project open. If I did my job correctly, it now knows what web server it's running on. When I built the projects I added a data connection. This tells the web server to look for the database. However that data connection will not work for you. You will need to add your own connection...
Under project explorer, there will be a line with "iinetsrv/[your project name here]", which represents the root of your project. Right click on it and choose "Add Data Connection"
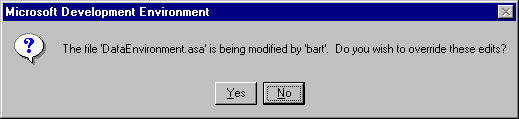
You may well get an error as shown below. Ignore it, just click Yes.
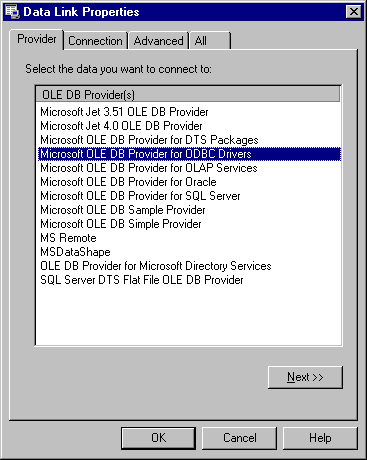
Next a window entitled "Data Link Properties" will come up. You want to choose "Microsoft OLE DB Provider for SQL Server". Don't mess with the other stuff until you have at least one connection working, okay? Click "Ok"
A window will ask you what DSN you want to use; choose the one you created above (under System DSN, remember?) which will be listed under Machine Data Source. Click Ok, and it'll prompt you for a SQL Server login and password. Provide them (your group's), and click okay again.
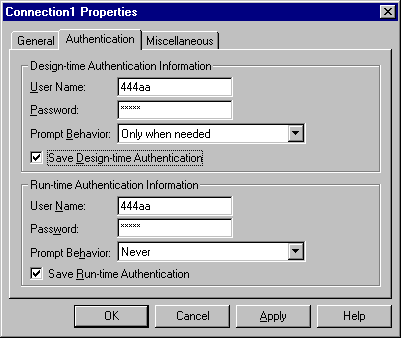
A new window will pop up asking you what properties you want. All of the general and Miscellaneous properties should be fine. Click on "Authentication" and make sure that the passwords are there (there should be little x's) and then make sure that both "Save Design-time Authentication" and "Save Run-time Authentication" are checked. This will save you from having to fill in the password each time you re open Interdev.
Click on Ok.
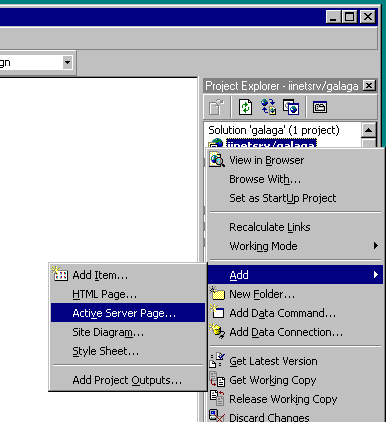
Congrats! You're almost there! Now add a new ASP page to check to see if it worked:
Next, add a Recordset by clicking on the Toolbox tab in the lower left, then choosing "Design Time Controls" and then dragging a recordset into the ASP page (between the beginning and ending of the body). A recordset is how ASP pages get their data.... if you play with the properties, you'll see that you can either take a whole table or the results of a sql statement. For the moment, just pick a table.
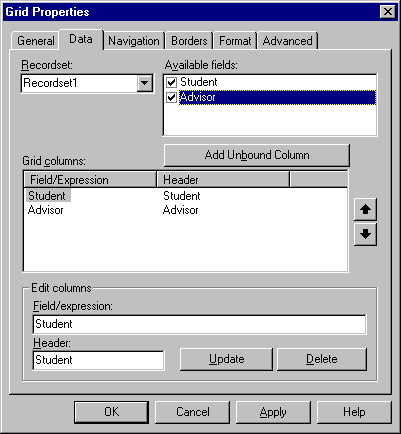
Next, add a Grid (drag it over from the Design Time Controls menu again) below the recordset. Right click on the grid and choose properties. Under the Data tab, you should see choices for which recordset to use (use the one created above), and then once you've selected that, to the right you'll see attributes that you can use. Select some, and click okay. (this is just to test and make sure that all of the connections worked; it doesn't matter what it is).
Now, right click on the ASP page, choose view in browser, say okay to anything that it asks, and hopefully, you'll see a page with data!
If you dont and can not figure out why within the magic 17 minutes, send me mail
From there on in, you're on your own. Enjoy your hacking!
For those of you who are bored, or just really want to know, I have included some details about how Interdev works. It might help when you are debugging.
When you create a project using Interdev and locate it in some folder (e.g. \\iinetsrv\win00\cse444\DB2000\RockinProject) a second folder is created that you have no access to. This second folder is where the files are actually served from. It is located at the root of the directory hierarchy used to serve pages. When you save your project, the data (pages) are copied over to this secondary folder.
http://support.microsoft.com/support/kb/articles/Q220/1/66.ASP