|
|
|
 |
|
Project 2: Concurrency - Threads, Tasks, Events
| Out: | Monday, May 2, 2010 |
| Due Dates: | Part A: Thursday, May 12, 11:59pm |
| | Part B: Monday, May 23, 11:59pm |
| Teams: | 1, 2, or 3 people
|
Solution .o Files
A tar file of the .o files from the sample solution:
solutionDotOhs.tar.gz
Table of Contents
- Assignment Goals
- Project Introduction
- What-to-do Introduction
- Part A Step-By-Step
- Part B Step-By-Step
- Other Tools
- factory.h
- Project Distribution
- Project Code Size
- Part B Report
- What to Turn In
- Appendix: Suggested Extensions
Assignment Goals
- Understand "thread safe" vs. "threaded."
- Layering: The good, the bad, ...
- C: the ugly
- Experience with threaded programming.
- Experience with task queue programming.
- Experience with event-based programming.
- Exposure to some useful tools: pthreads, gtk+, valgrind, helgrind,
thread debugging with gdb, and the possibilities
afforded by the C preprocessor
Chapter 1: Project Introduction
First of all, as always, don't be confused by the distinction between
the software artifacts this project asks you to build and the mastery
of the concepts and techniques building them involves. The point is
the latter. The former serves as way to achieve the latter (and to
demonstrate that achievement).
Keeping that distinction in mind is particularly important in this
project because the program that is at the pinnacle of the effort, a
"Windows desktop" (which is just a shell with a GUI), could much more
easily be built without all the other stuff this project entails. If
what we wanted was the Windows desktop app, we'd be much better off
not building the other pieces, and using already available libraries
instead.
Here's a slightly incomplete picture of the project:
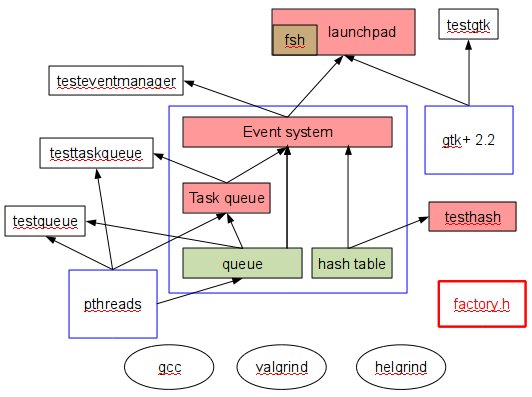 The rectangles are code. White-filled rectangles are code we give you;
colored rectangles are code you write. (Green(ish) boxes are code
from previous projects, but requiring some modification for use here.
Red boxes are new code. Brown is what you get when you put a green box
inside a red box.) Blue rectangles represent libraries. (Some of
your code will be packaged into a single library, for convenience.)
The red-alert red rectangle is a .h file we provide that
generates code. (It's red-alert red for a reason.) The ovals are
tools you'll use.
The rectangles are code. White-filled rectangles are code we give you;
colored rectangles are code you write. (Green(ish) boxes are code
from previous projects, but requiring some modification for use here.
Red boxes are new code. Brown is what you get when you put a green box
inside a red box.) Blue rectangles represent libraries. (Some of
your code will be packaged into a single library, for convenience.)
The red-alert red rectangle is a .h file we provide that
generates code. (It's red-alert red for a reason.) The ovals are
tools you'll use.
(All packages used in this project claim to be portable across
Linux, Windows, and OS X, including (I believe) the build
infrastructure (the gnu compiler and make), for a reasonably loose
definition of "portable." I have no experience trying to build the
code other than on Linux, but I'd guess it isn't very hard to get that
working, and was a consideration in constructing the project. Despite
that, Step 6 (alone) might not be doable on Windows.)
It should be clear from that picture that this is a very layered
system. You MUST implement the code in clean layers. No layer can
use anything from a layer above. Moreover, each layer must be
designed and implemented to support a whole array of potential
"clients" - next layers up. You're not building one application,
you're building three general purpose layers (the data structures, the
task queue and the event system) and one instance of an application
(launchpad). To help keep that straight, we're
distributing .h files (not shown in the figure) that define
the interfaces exported by each layer you build. You should build to
those interface specifications. (If you feel you need to deviate from
them, including simply augmenting them with new methods, contact the
course staff.)
At the top of this layering is the launchpad application. It provides
"the essential functionality of the Windows desktop," meaning it
displays areas on the screen where clicking will cause an application
launch. It doesn't try to do anything beyond the essential, though
(like be visually appealing) - you'd have to invest another day or
decade or so to recreate the full Windows desktop, but it should be
clear that you could do it once you've built launchpad.
Here's a screenshot of the sample launchpad solution. It's
minimalist, except that I made the background blue (instead of default
grey) so it'd look more Windows-y, and added tool tips to the buttons
to tell you exactly what will be launched.
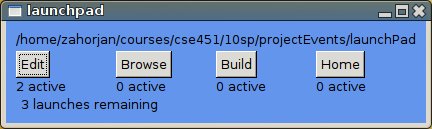
This "desktop" is configurable (just like the real one). In the
distributed configuration (which you can/will change), clicking on the
Edit "icon" launches an instance of Emacs. Browse brings up Firefox
(or adds a tab to an already running instance). Build tries to run
make to build launchpad in the directory where I keep it, which
probably doesn't exist on the system you're running on. Home lists
the files in the directory whose path is the path to my home directory
on my development machine.
Note that the launchpad desktop has some features not found in the
original; for instance, it shows how many instances of each "app" are
already running. It also imposes a small limit on the number of
simultaneously executing launched applications, and tells you how many
launches are remaining. Finally, it shows the default directory in
which new application launches will find themselves running by
default.
Chapter 2: What-to-do Introduction
First of all, it's imperative that you read all the way through this
first thing. There is information that comes towards the end you need
to even start step 0, for instance. (It's at the end because it has
to do with the details of writing and debugging code, but for that to
make sense we need first to understand the higher level objectives.)
Next, the think-code-test-repeat approach to writing and debugging is
going to have an even greater advantage over the code-test-repeat
approach than usual. There are a few reasons for that. One is that
the code is multi-threaded, meaning that its execution is
non-deterministic. So, you might see it fail one out of 10 times.
Debugging is difficult. Second, the code might work every time you
run it, but still be completely broken. That's because our definition
of "correct code" includes no memory leaks. Depending on how fast
you're leaking memory, you might have to run a very, very long time
before you noticed anything was wrong through simple testing.
Finally, the control flow is all very indirect (lots of function
pointers). That means that even looking at stack traces in the
debugger you often can't tell just what is going on.
correct implementation: An implementation having no
garden variety bugs, no memory leaks, and no race conditions.
There are tools to help with each criterion: gdb,
valgrind, and helgrind.
The fastest way to finish this assignment is to be as sure as possible
that what you're about to write will work, before you ever run it.
Each piece of this project has a clear, important, new concept/skill
associated with it. Additionally, the parts are cummulative: by and large each piece adds to the
concepts/skills of the previous parts.
To me that means that if you're working in a
team, it would be a lot better to do something more pair
programming-like (which I'll warp into the exterme idea that everyone
on the team sits together and works on the same piece of code whenever
anyone is working) than to partition the project among the team
members and never have anything to do with code that isn't your piece.
Finally, while all pieces have some new component, my guess is that
they're not anywhere near equally hard. In particular, I think the
event system is much harder than the others. Unfortunately, that
isn't because it involves spectacularly subtle but important concepts,
it has more to do with the notion of an event system and the C
language not getting along together so very well. That and the fact
that the control flow for that piece is very far from the CSE 142
control flow we all grew up with.
Last, there is a LOT new here. You're going to have to figure out a
lot of things. If you haven't already figured it out, figuring out
how to figure things out quickly is an extremely valuable skill. This
project provides practice[1, 2].
Chapter 3: Part A Step-By-Step
Step 1: Hash Table (Re)Implementation
You built a hash table in Project 0. You'll need a hash table to complete
this project. The obvious thing to do is to use the Project 0 code, after
making some modifications.
The interface for the hash table implementation is in var/include/hashTable.h.
It's basically the Project 0 hash table interface with some calls we don't need
removed and with some new calls we do need added.
This step is to implement the new interface.
The major additions in the new interface have to do with memory
allocation in C. You, the programmer, are responsible for freeing
memory, as there is no automatic garbage collection (as in Java, and
any number of other languages). The new interface has a method to
destroy a hash table. That causes the hash table to free all memory
it has allocated for its own use. But, what should it do if there is
data in the hash table when it's asked to destroy itself? Whether or
not that data needs to be freed depends on how it was allocated, and
the hash table has no idea how it was allocated. So the hash table
needs to defer to the code that supplied the data in the first place,
i.e., the hash table's "client." It defers by providing an interface
for its destroy operation that includes pointer arguments to
functions to be called to destroy a key and to destroy a value. If
those function pointers are non-null, the hash table calls them for
each key/value it still contains when destroy is called. Once done,
it frees the memory it itself allocated, and at that point it is
destroyed.
In addition to those interface changes,
abstractly, we should also make the hash table implementation thread-safe. (See the next
step for more details on thread safety.) However:
- it turns out that we won't need a thread-safe hash table for this particular project, and
- you'll be learning about thread safety in the (re)implementation of the queue, and so
- to keep the project size manageable, we won't bother actually making the hash table thread-safe.
Resources:
- Interface specification file: var/include/hashTable.h.
- Your code: var/src/hashTable.c.
- factory.h
- make hashTable.o
To compile your code while in the project main directory.
hashTable.o will be in var/src.
Note that this has compiled the code, but not linked it.
- make lib
That will try to compile all the .c files in var/src/
and then produce var/lib/libcse451p2.a.
-
There is no test code driver for the hash table. You should write one: testHash.c
in the main project directory.
- gcc -Ivar/include testHash.c var/src/hashTable.o -o testhash
will compile your driver and link it with the hash table, producing executable testhash.
- make testhash
Executing the build line just given will get tiring; the make line above would be handy,
but it's not implemented. Modifying the makefile to
implement it should be easy: just
follow the obvious examples already there.
The resulting build commands used by the makefile will be equivalent to:
gcc -Wall -O0 -g -Ivar/include testHash.c -Lvar/lib -lcse451p2 -lpthreads -lrt
- gdb
- Other tools
Step 2: Thread-Safe Queue Implementation
As with the hash table, this step is based on code you wrote for
Project 0. We've once again modified the interface, though, removing
methods we won't use (to reduce the total workload), and adding a
destroy method (which has a callback argument of the sort discussed for
the hash table).
The main task here is to make the queue implementation thread safe.
That means that all critical sections must be protected, and that
there cannot be any (non-benign) data races. You achieve thread
safety by adding synchronization to the code. We're
using pthreads for threading, so you should use
the pthreads synchronization primitives (man -k
pthread).
While a pre-eminent requirement is that the code operate correctly
when called from multiple threads, we also want it to be fast - it's
likely the queue's "client" is multi-threaded at least in part for
performance reasons. That means that you shouldn't have too much
synchronization. The goal is to have "just enough" - enough to assure
correct operation, but not precluding concurrent execution of parts of
the queue code that can safely run concurrently without synchronization.
As an example, turning the queue code into a monitor (by acquiring a single
lock on entry to every method, and releasing it only on exit) is probably
excessive.
There are difficult performance trade-offs involved in deciding on the granularity of
synchronization, and we won't be too concerned about them. For instance, you
could build an implementation based on locking the entire queue, or you could
instead lock individual elements of the queue one-by-one. The tradeoff is
the amount of concurrency of queue code execution that is allowed versus the
number of times locks must be acquired and released (i.e., overhead).
Which is faster depends on many things, including the behavior of the queue's client
and the number of physical processors (cores) available. There is no clearly
right choice, and so you're free to choose.
Resources:
- var/include/queue.h
- var/src/queue.c
- factory.h
- pthreads documentation
man -k pthreads for a general list, then man specific topics.
pthreads information is all over the web.
- testqueue.c
A complete, multi-threaded test program.
- make testqueue | lib | clean | cleanall
Executed in the main project directory, builds the test program,
or just the library (var/lib/libcse451p2.a), or cleans up
files in the main project directory, or cleans that directory plus
library directories.
- makefile
If you don't like make and want to use some other build system, you should look
in the makefile to find the compiler and linker switches needed to build the code.
- gdb, including
this section on debugging threaded programs.
- Other tools
Step 3: Partial launchpad Implementation
The partial implementation of the launchpad is to bring up a window, roughly like the one
shown above, and to have your code print a "Got here" message when a button is clicked.
You won't actually launch any applications.
The goal is to master what's needed to construct the GUI and display, and to connect your
code (event handlers) to events (clicks, etc.).
The GUI you build should have the main window, the current working directory
string shown at the top, two or more buttons, and a string label under each button.
The string label should just be of the form "2 clicks," rather than what is shown
in the picture above. Each click should update the label by adding one to the count.
To be clear, you're not actually launching applications here. (gtk+ makes doing that
a little bit hard, for obscure (i.e., unknown to me) reasons. It looks trivial to
implement the code that would do so, but then it doesn't work.)
Applications like launchpad usually read a configuration file at startup.
That file tells them what buttons to display, and what they do (i.e., launch).
Reading a configuration file is the right way to do this, but is a lot of non-OS work, so we're
going to cheat. File launchpadData.c provides the data that would ordinarily come from
parsing the configuration file, i.e., button descriptions.
The file was designed to be as easy to edit as possible, given the many restrictions imposed by the
fact that it has to be in C.
File launchpadData.h describes what the data means, and comparing the data file to the picture
above (which was generated from it) should make any lingering questions clear. Basically, though,
your code calls getNButtons() to find out how many buttons there will be, then calls
getButtons() to get an array of structs, each of which gives the information needed to create
a single button (and, eventually, to launch an application when it is clicked).
The main project directory contains a sample gtk+ program, testgtk.c. It is a copy
of the hello world application in the excellent
gtk+ Tutorial. Your launchpad can be built by modifying the sample program.
Commands to build gtk+ applications involve arcane shell syntax to provide the required include files and
libraries. The makefile has this set up for the sample program already: make testgtk.
Resources:
- gtk+ Tutorial
- gtk+ home page
- ./launchpad/
Directory for all launchpad-specific files.
- launchpad/launchpadData.[c,h]
- launchpad/launchpad.[c,h]
- launchpad/testgtk.c,
- make launchpad | testgtk | all | clean | cleanall
- gdb
- Other tools
Chapter 4: Part B Step-By-Step
Step 4: Task Queue Implementation
The task queue interface is in var/include/taskQueue.h. It
provides methods to create and destroy task queues, and to add tasks
to created task queues.
A task is a "deferred procedure call." A task descriptor has a
pointer to a method and the arguments for invoking the method. The
worker threads sit in a loop, taking a descriptor off the queue,
invoking the method it points to with the arguments it contains, and
then executing an optional callback to indicate that the task has
completed and to return any result it may have produced. Tasks are
guaranteed to be started in the order they are added to the queue, but
there is no other ordering guarantee (e.g., the order in which they
finish).
The task queue uses a "blocking queue" - instead of simply returning
FALSE immediately when a thread tries to remove a task descriptor from
an empty queue, the thread is blocked until a descriptor has been
added to the queue. That is, the queue used by the task queue object
is a bounded-buffer (in terminology used by the book), except that it's
based on a queue rather than an array (and so its only
bound is whatever fits in memory).
The number of worker threads servicing a task queue is set by an argument
to the task queue creation method. If the number is 0 or less, no worker
threads are started. Instead, the thread executing the addTask()
method directly (and immediately) executes that task. (This feature
requires almost no code to support. It's in the spec because it
might help make initial, basic debugging of the task queue code easier.
Once that's done, you can start running multi-threaded. Note that
the task queue implementation must be thread-safe, even when running
without worker threads.)
A complete, multi-threaded test program that uses the task queue is provided.
Resources:
Step 5: Event Manager Implementation
Event systems turn normal control flow on its head. Instead of the
caller deciding it wants to invoke the callee, the callee decides it
wants to be invoked by the caller. Event systems are an integral part
of every GUI, as well as of many embedded applications. They are also
related to plug-in architectures, like those of Eclipse and Firefox.
Finally, internally large parts of the OS are event-based.
Event systems provide two primary methods. In this project they're
called onEvent() and
fireEvent(). onEvent() registers a handler (a
procedure) to be called whenever a particular event is "fired,"
and fireEvent() fires an event. Events are named by
(case-sensitive) character strings. Registering a handler for a
previously unhandled event creates it - that is, there is no
pre-defined list of events. Any number of handlers can be registered
for an event. When the event fires, all registered handlers are
invoked. It is not an error to fire an event for which there are no
handlers. Handlers are invoked once per fire. Pending invocations of
handlers are queued.
When some code registers a handler for an event (onEvent()),
it also (optionally) provides arguments to be provided to the handler
each time it is invoked. When some code fires an event, it too
provides arguments to be provided to each handler invoked because of
that fire. The event manager does not try to make copies of any of
these arguments - it simply passes on whatever was provided to the
handlers.
Unlike most event systems, the one you're building in this project supports
parallel execution of event handlers - more than one can be in execution
at a time. In terms of implementation, this is achieve by layering
on top of a task queue.
The event system makes only a very weak guarantee about the order in
which handler execution occurs: all handlers invoked because of a
single fireEvent() call are started in the order in which
they were registered (by onEvent calls).
The event system for this project provides no mechanism to unregister
a handler. That's unrealistic, but is a feature we won't use, so is
omitted for workload reasons.
The fireEvent() method takes three, optional function pointer arguments,
corresponding to pre-, post-, and allDone-event callbacks.
If a pre-event callback is provided, it is invoked immediately
before the handler function (the one registered using onEvent()).
If that callback returns 0, the handler is invoked, as normal.
Any other return value results in that handler not being invoked (this one
time, for this particular fireEvent() event)[3].
Whether or not the handler itself ended up being invoked. If a post-event callback was provided
with the fireEvent() call, it is invoked next.
Finally, when all the handlers "awoken" by a single fireEvent() have finished,
the allDone callback is invoked, if one was provided.
Resources:
Step 6: Final Launchpad Implementation
We're now ready to complete the launchpad. In step 3 you used gtk+'s
event system to invoke handlers that respond to "hardware generated"
events (e.g., mouse clicks). In this part you'll use your own
parallel event system to register handlers and fire events that
trigger them.
One step is to integrate the heart of your fsh shell code from Project
1 into launchpad, to introduce the ability to fork/exec an application
from a handler[4].
You connect that capability to the launchpad buttons
by creating new events (in your event system) and registering handlers
for them: when a button is clicked, you fire a "launch" event. The
handler for that uses the transplanted fsh code to launch the
application represented by the button clicked, and waits for that
application to terminate.
You also need to create a few other events, and register handlers for
them. The handlers are going to update the label on the button
(showing how many currently executing instances there are) and the
message at the bottom, showing how many launches remain. That number
is derived from the number of worker threads you created in the task
queue that's the layer below the event system. Because your code waits
for a forked child process to terminate, it consumes a worker thread
per executing application, so only so many apps can run at once before
the launchpad becomes unresponsive -- no app seems to be launched when
you click on a button.) By creating handlers for what are
essentially "process started" and "process ended" events, and firing
those events at appropriate places in the code, it's easy to update those
labels.
Note that you (meaning you the person) know what the entire set of labels in
the launchpad window are. You could therefore easily write code that updates
everything that needs updating as basically a single handler. That handler would
know about both button labels and the summary label at the bottom.
That's not really in the spirit of event-based programming, though.
Instead of doing that, you should think of each GUI element having code that is basically
completely isolated from the code for all othe GUI elements. I should be able to
change the placement of elements in the window, for instance, or add new elements or
remove existing ones, with only minimal, localized code changes. Changing the format or
content of button labels shouldn't affect the code that handles the summary message at all.
Deleting the summary message shouldn't change anything about the button code.
Eliminating the button labels shouldn't change the button-click code.
Basically, handlers should handle one logical entity. You want more handlers, not a handler
that does more things.
This is different from the way you think about more traditional programs,
like all the ones you've probably written to now. For those programs, we're very focused on the
sequence in which operations take place. For the event system, it's all about the set of independent
things that have to happen, not about sequencing at all.
gtk+ and Multi-threading
gtk+ interfaces can be called from multiple threads, but
only when using the X11 backend. (It's unclear whether the documentation intends to include running Reflection
on Windows. I'd doubt it, but I haven't tried it.)
For that to work reliably, even on Linux, you must make these calls before the call to gtk_init():
    g_thread_init (NULL);
    gdk_threads_init ();
Additionally, threads other than the main thread (the one executing gtkmain())
must "wrap" calls to gtk+ methods with enter/leave calls, like this:
  gdk_threads_enter ();
  gtk_label_set_text(GTK_LABEL(label), msg);
  gdk_threads_leave ();
Resources:
Chapter 5: Other Tools
Additional tools of use are:
factory.h is complicated enough that it gets its own section.
One choice you'll have is between blocking locks (pthread_mutex_t) and
spin locks (pthread_spin_t). To make it easy to evaluate their relative performance,
file var/include/lockDef.h defines macros that let you choose one or the other,
without modifying your source code. Instead of embedding the pthread calls in your code,
you use these macros: LOCK_t, LOCK_INIT(&x), LOCK_DESTROY(&x), LOCK(&x), and UNLOCK(&x).
The generate either spin locks or mutexes depending on whether symbol USE_SPINLOCK
is defined during the compile.
For example, the macros LOCK_t, LOCK(&x), and UNLOCK(&x)
expand to pthread_spinlock_t / pthread_spin_lock(&x) / pthread_spin_unlock(&x) respectively
if USE_SPINLOCK is defined, and to
pthread_mutex_t / pthread_mutex_lock(&x) / pthread_mutex_unlock(&x) if not.
The makefile defines USE_SPINLOCK by default. It's easy to figure out how to delete it, to get
mutexes instead. (You might have to do a make cleanall if you edit the makefile.)
If you're using the makefile, you can just say #include "lockDef.h" in your code, i.e.,
you don't have to give a full path.
An "atomic integer" class is commonly used in parallel and concurrent applications.
It makes unsafe statements like total++; safe, by writing them instead as
post_increment(total);. I built an emaciated atomic integer package early
on, anticipating using it widely. I ended up using it, but not widely. You can
implement it or not. (It's tiny.) The .h file gives the interface I built,
which was more than sufficient for what I needed, but is less than what a full atomic
int package would typically have -- e.g., there's no subtraction, or even assignment.
valgrind is a tool that detects memory leaks.
To use it, compile your program using the -g -O0 switches to gcc
(the makefile does this by default), then say:
valgrind ./myexe
It will run your program, then print some diagnostics, and some information about how to
get even more detailed information. (If you have leaks, switch --leak-check=full
will give you statement numbers where un-freed allocations were made.)
This tool is reliable and robust. It's something you should definitely know about, if you
might ever do C/C++ programming again.
Note: The distributed solution has no memory leaks reported by valgrind,
except that gtk+ leaves all sorts of memory un-freed
when the process terminates. That's a pretty common thing to do --
what's the point of freeing memory in an address space that is about
to be destroyed[5]? But, it makes
verifying that your code has no leaks hard,
because valgrind's output is page after page of complaints
about things gtk+ has done. Using --leak-check=full
you can verify that you haven't left any memory un-freed, though, by
examining the stack trace information that is printed and seeing
who is responsible for the reported leak.
Resources:
valgrind's demented cousin is helgrind, a
race condition checking tool.
(The valgrind suite actually has two race detection tools, or maybe three.)
To use it, you say
valgrind --tool=helgrind ./myexe
Then you read two or three chapters of the text while helgrind simulates your
program's execution, tracking every memory read and write.
Besides requiring a while to run, helgrind's other drawback is that its
criteria for detecting races may produce false positives: complaints about things that
aren't actually bugs. (All race detection tools face a trade-off between the number
of false positives and false negatives they report. None can be perfect.)
You have to look at the code it points you to, and then decide for yourself if
it's actually a race.
Finally, helgrind detects only those races that are visible given the actual,
dynamic execution it just performed. It may report different sets of races on
repeated runs (e.g., because different data caused different code paths to be exercised).
Resources:
Chapter 6: factory.h
factory.h provides limited, class-like functionality, to the
extent that's possible in C. You can "new up objects." You can
also delete them (a C++ concept with no real Java analog, but
basically C's free()). All objects obtained
using factory.h are "derived from a base class" that provides
common, core functionality. Methods on objects, like new and destroy,
are typed - no casting in and out of void* to evade the
compiler's type system.
Or at least that's the goal. C doesn't make it easy to do any of
this. A more complete job than what factory.h provides is
possible, but roughly the more complete the job the more unforgiving
it is to any mistakes using it. factory.h tries to
achieve a balance between functionality and hair-tearing fragility.
What factory.h does is produce customized C code - it creates
the code that implements a class. In that sense, it's (mostly) not
what you think of as a .h file at all. It consists of a
few macros that work together to generate the code for "a class,"
which is automatically subtyped from a standard base class.
The standard base class provides two things.
First, malloc() and free() are pretty slow. If you
expect your application to do a lot of them, a common practice is to
not free() some memory you no longer need, but rather to
cache it - place it on a queue, and use it to satisfy the next "new"
(malloc()). Because this project is full of moving
descriptors onto and off of queues, it naturally leads to a lot of
allocating and releasing small structures. The base class tries to
make that efficient.
Second, C requires that the programmer figure out where in the code
to free() something that has been malloc()'ed.
When the code gets complicated, that becomes hard. factory.h
implements referencing counting and "automatic" garbage collection.
Referencing counting means that each new'ed object has a counter, initially
set to one. Each time a pointer is set to point to the object,
the reference count must be incremented. Each time a pointer to the object is
discarded, the reference count must be decremented. If the count reaches 0, the
objected is freed (i.e., put on the free list of cached objects).
File factorydemo.c shows a use of factory.h,
but here is a more general overview.
To create some class demoType_t, you use factory.h like this:
EXPOSETYPE( demoType_t )
That goes in a .h file (e.g., demoType.h). It
makes a public declaration of the type, as was done in the .h
files for Project 0. You type this into your .h file:
EXPOSETYPE( demoType_t )
and it's exactly as if you had typed this:
typedef struct demoType_t* demoType_t;

extern int demoType_t_ref( demoType_t foo );

extern demoType_t demoType_t_acquire();

extern int demoType_t_release(demoType_t, void (*destructor)(demoType_t));
In your code using the class, you have access to the three extern functions
just declared. To see how to use them, look at the demo program, factorydemo.c.
INSTANTIATETYPE( demoType_t, <instance variable declarations> )
That goes in each .c file that has code implementing the class.
(In Java, there can be only one such file. In C++, there can be any number of such files. Normally,
though, there's just one.)
It defines the fields of a struct representing objects in the class.
For example, if demo_t's have an integer and a link to another demo_t,
you'd say this:
INSTANTIATETYPE( demoType_t, int someInt;
                             demoType_t next;
               )
It looks weird, but it works.
CREATEMANAGER( demoType_t )
You type that into exactly one .c file. It expands into the
code required to create and manage the demoType_t class,
including the three "public" (extern) methods declared by
EXPOSETYPE.
There are some downsides to using the preprocessor to generate code, having to do
mainly with difficulty in debugging compile-time syntax errors and run-time execution
errors.
The tools for both won't report the lines of code that the macros expand into.
So, for example, while CREATEMANAGER results in 30 or so lines of executable
C code, if you make a mistake invoking a function and the code in the function blows up,
gdb will say you're at line 14 in foo.c. When you look at line 14,
it'll be the CREATEMANAGER macro, and that's all. You won't be able to see
exactly what line of generated code went wrong. You won't be able to step through the
lines of expanded code.
A similar problem arises at compile time if you make a mistake invoking the macros.
A mistake you might make is to somehow get a comma into the text that is supposed to
be the list of object instance variables. That will cause all sorts of trouble, and
the error messages won't be very useful. (Semi-colons in there are no problem. Commas
are the end of the world.)
Finally, the preprocessor is a region of C where things are maybe not-so-completely-standardized.
I'm not sure whether or not I'm using gnu-specific extensions. If I am, portability
to non-gnu compilers could be "impeded."
Resources:
- A much more detailed explanation of the design and use of factory.h is
provided here.
You should not have to read it to use factory.h. It's additional information,
if needed.
- factorydemo.c
- make factorydemo | all
- factorytypeerr.c (another factory.h demo program)
- make factorytypeerr | all
- The gnu C Preprocessor
Chapter 7: Project Distribution
Fetch this: Project2.tar.gz.
When you expand it you'll find subdirectories solution/ and project2/.
The solution directory has the compiled version of all the sample solution code,
as individual applications, .o files, and the library.
The project2 directory is where you should do your work. (It is the "root project
directory" mentioned throughout this writeup.)
The solution directory lets you do a couple of things. One is you can run
the sample solution code. Another is that you can link against the .o files
from it. For example, suppose you're working on the event system, but the task queue isn't
exactly 100% stable yet. You could link against the solution's taskqueue.o file
to build the test application.
(There are too many possible ways to do this to try to enumerate here. If you have trouble
finding one that works for you, ask.)
Chapter 8: Project Code Size
There isn't a huge amount of code to write. My sample solution has about 450 semicolons in the code
that we haven't given you, covering all six parts.
On the other hand, finishing requires learning to think in what are
probably unfamiliar ways. First, and most obviously, you have to
think about concurrent executions. It takes a while to get used to
that. Typically, spreading your work out over more time is a big
plus. (I think the acclimation process to the new way of thinking
keeps moving ahead while you're asleep. Seriously.) Second, you have
to acclimate to new, and complicated, methods of control flow - you
don't just call a procedure, you create a descriptor and hand it to
some object that hands back a new descriptor that you put in a queue
that eventually some thread finds and executes and then somehow
returns a value. Or something like that. Finally, you have to use
new tools, and old tools and methodologies (e.g., for debugging)
aren't as effective as they used to be.
Try to work out all the little details, and verify that they should
work, before you start coding. The basic concepts (queues, task
queues, and event systems) aren't all that complicated. Their
implementations can be surprisingly resistant to correctness, though.
Chapter 9: Part B Report
Reports should be prepared individually.
- List your name.
- List all members of your team.
- We adopted an extreme architecture in this project: a strictly layered system. Traditional wisdom
is that strict layering can be slow.
What inefficiencies, if any, arise from strictly separating the task queue and
queue implementations? That is, how could the implementation be faster if they were implemented as one big piece of code?
Be specific. Make sure to mention the most significant contributors to the inefficiency.
- The same question, but applied to the event system and task queue layers.
- Using threads always imposes overheads, compared to unthreaded implementations.
What are the major overheads of this sort in your implementation, taken as a whole?
- One always hopes that the overheads of threading will be compensated for by the ability to use more cores
simultaneously. The ability of the code to exploit more physical resource is called its scalability.
Evaluate the scalability of your implementation quantitatively, using tasks/second as the measure, where
the task is an empty procedure.
Make repeated runs of testtaskqueue, varying the number of task queue worker threads available and examine
the task throughput. (The time command might be helpful in doing this without having to write any measurement
code.) Describe how you did this, and what your results are.
Does capacity increase up to the number of cores on the machine, or does it peak at some smaller number?
Try to explain what you observe. (Note that it's possible, in the abstract, for the bottleneck to be
the threads in testtaskqueue itself that generate tasks.)
Helpful tip: On Linux systems, cat /proc/cpuinfo will tell you what the system thinks the processor looks like,
including how many cores it has. The attu's have the equivalent of 4, but are shared machines on which the
over load is uncontrollable. forkbomb also has four, but might have lower (or higher!) extraneous load.
I'm not sure about the machines in the CSE lab: there are probably of at least two varieties, with varying numbers of cores.
- Repeat the scalability evaluation, but this time with a task that takes a long time to run. You could simply set
it into a loop, counting to some high number. (Be careful that the compiler doesn't optimize the loop away, though,
which is a danger if it can figure out that you never use any result of the loop instructions.)
Are you conclusions different now? Briefly contrast with the earlier results, and briefly discuss why they're the same
or different, whichever it turns out they are.
- If you did any extensions, tell us about them.
Chapter 10: What to Turn In
Part A: Thursday, May 12
Make a single submission for your team that is a tar.gz of your project2 directory,
after doing a make cleanall.
Part B: Monday, May 23
- You, individually: your report.
- Your team: A single submission of a tar.gz of your project2 directory,
after doing a make cleanall
in that directory and in the launchpad subdirectory.
- Your team: Submit valgrind output showing that there are no memory leaks
running testeventmanager when linked with your event system implementation.
Appendix: Suggested Extensions
If you've finished the project, and it was so great you want more, then...
Task Queue Implementation
Augment the code so that the number of threads in the worker pool can be changed during execution
(without destroying the task queue and creating a new one). Changing the number of threads should
not stop service, even briefly, and should not cause any running task to be terminated abnormally.
Now implement code that lets the user increment or decrement the number of worker threads by sending an
application (that uses the task queue) a signal.
From the shell, this is done using the kill command (man bash).
For what to do in your code, start with man pthread_sigmask.
launchpad
Replace the display of launchpad's current working directory (the first line in the window) with
a UI element that lets the user change that directory while launchpad is running.
You should design whatever you think would be most useful.
One possibility is a GtkFileChooser.
It could be some form of combobox (e.g., GtkComboBoxEntry)
that you populate with a "history" of what the user has selected.
(You'd store the history in a file, say $HOME/.launchpad/fileHistory, between launchpad runs.)
Could be whatever seems best to you.
Note that there is already a directory associated with each button, giving the default start directory of the
command launched by that button. In some cases, you want that directory to be '.' (for example, if you had a button
that does an 'ls' command). Other applications might need to be launched from
a particular directory (e.g., launchpad itself, if you haven't put its directory on your $PATH).
The directory we're talking about in this extension is the one launchpad itself is running in,
and so affects individual buttons only if their startup directory is given as a relative path.
launchpad
Replace the grey buttons with icons.
Footnotes
- [1]
- This brings up a "societal impact of technology" issue.
Is "post a question on a bboard" a completely valid way to
figure things out, on a par with, say, reading the man page?
There's a lot of debate about this among the people in charge
of universities, who all went through university before there
were bboards. (Do we wonder if "Is looking in the textbook
a valid way to figure something out" was a raging debate
in the late 1400's, once the printing press was invented?)
Our answer: if figuring it out would have lasting value, then
that's the thing to do. If the problem is some irrelevant issue you'll
never confront again, but is wasting a lot of your time to
overcome, then post.
That answer shares a lot of qualities with
directions of the form "Turn left 1 mile before you get to the
Safeway store," so you'll have to use your judgement.
- [2]
-
"Alliteration is a characteristic of much Old
English verse (such as Beowulf, which includes
verses like "feasceaft funden; he
þæs frofre gebad, / weox under wolcnum,
weorþ-myndum þah," alliterating "f" in the first line
and "w" in the second) and some Middle
English (such as Sir Gawain and the Green Knight,
which begins, "Siþen þe sege and þe assaut watz
sesed at Troye / The borgh brittened and brent to brondez and
askez, / The tulk þat þe trammes of tresoun þer
wroght," alliterating "s," "b," and "t" respectively). In verse
since the Renaissance it tends to
be used less systematically, but it's still common."
Guide to Literary Terms, Jack Lynch.
- [3]
-
The pre-event callback return value does not affect any other handler invocations
beyond the one it is pre- to; that is,
the pre-event callback is a way to skip a particular handler invocation, not a way to stop
further processing of the handlers scheduled by the same fireEvent() call.
- [4]
-
In the description of Step 3 I mentioned that gtk+ didn't seem to like the code that
fork's a child process. The problem seems to be that the main thread (the one running
gtkmain(), the event loop) isn't allowed to fork, or maybe (and more likely) isn't allowed
to do a wait(). It's not just a mistake to try to do that in terms of application functionality,
gtk+ actually complains when you try.
That problem doesn't arise in step 6, because you're doing the fork/exec in a handler, and handlers are
not executed by the main thread. That is, the problem you would have had in Step 3 just disappears
all on its own in Step 6.
- [5]
-
A web search will turn up many, many complaints about gtk+ not cleaning up after itself,
exactly because it makes using valgrind to check for memory leaks in a gtk+-application
so hard. valgrind provides a facility to try to make the situation somewhat better,
called "suppression files," which are a way to tell it to ignore certain leaks. People have posted
supression files for gtk+. I haven't tried them.
|
