Production Rendering
Once you have finished all your motion for a shot, then you are now ready to light and render it out. While you can think of lighting as its own stage in the pipeline, in reality it tends to be intimately linked to rendering. There are four phases for end of the pipeline. First, in Maya, doing lighting for the shot and decomposing it into render layers. Second, using the renderfarm, sending shots to be rendered. Third, in After Effects, compositing the layers and doing post-production on the images as necessary. Lastly, in Premiere, taking the individual shot movie clips and editing them together into your final film. This guide will be concerned
mostly with the first two steps.
File Structure
Keeping your files organized in a logical way is imperative for the success of your film and the maintenance of your sanity. Nobody on your team should ever have to ask where any file is because there should only be one place where it should be. Below is the structure we will be using in production, so it would benefit you to adopt it now.
- shots - This is your top-level folder for all the shots in your film.
- seq_01_intro - Each file below the top-level will be a folder representing a sequence in your film.
- seq_01_intro_100 - Down one more level is another folder represent a specific shot in the sequence.
- iterations - A folder for storing old versions of files. Name them using a versioning system so that you always know what the last file is.
- project - This is a folder that the renderfarm will write to.
- seq_01_intro_100.ma - The Maya file for the shot. Notice that none of these file have versions as these files are assumed to be the latest.
- seq_01_intro_100.aep - The After Effects composition for this shot.
- seq_01_intro_100.mov - The rendered shot from the above file.
- seq_01_intro_100.avi - A playblast file from Maya of the shot's most recent motion so that you can see what is in the shot if no render exists.
- seq_01_intro_200
- seq_01_intro_300
- etc…
- seq_02_prologue
- seq_03_forward
- etc…
Please note that none of the files above have any capital letters or spaces in them. This is very important and is a convention you should follow for any file you have on the network. Failure to do this will result in failed renders when sending them to the renderfarm and generally headaches for everyone.
Render Layers
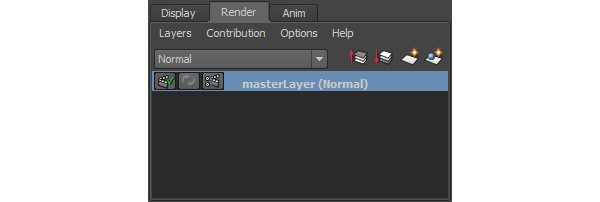
Render Layers are created in the Layer Editor. You may be familiar with this from rigging since Display Layers are used to color different types of anims.
You can find the Layer Editor below the Channel Editor (click  at the top right of the screen if it does not appear). Click the Render tab to switch to Render Layers.
You can create an empty layer by clicking ![]() or create a layer containing objects you have selected by clicking
or create a layer containing objects you have selected by clicking  . Simply left click a layer in the list to select it and make it the active layer. Everything displayed in the scene is based on what is contained in the active render layer. To add objects to or remove them from an existing layer select the objects, right click the layer, and choose the appropriate option. These layers not only have the ability to contain differing objects, but they can also override material assignments and render settings. Note that the master layer contains all objects in the scene and their base materials, uses global render settings, and does not allow overrides.
New layers will have some default name such as "layer1." Double click the layer
to rename it something more relevant. At this point you should also click the rightmost grayed-out button on the layer ( ). This will bring up your render settings.
All the attributes you see are global render settings, however they can be indiviually overidden on a given layer. For example, right-click the "File name prefix:" setting and select "Create Layer Override." This should turn the field name orange to indicate that this particular setting is overridden. Now change the name to the same name you made for the layer.
This will make it easier to recognize which rendered files are which.
). This will bring up your render settings.
All the attributes you see are global render settings, however they can be indiviually overidden on a given layer. For example, right-click the "File name prefix:" setting and select "Create Layer Override." This should turn the field name orange to indicate that this particular setting is overridden. Now change the name to the same name you made for the layer.
This will make it easier to recognize which rendered files are which.

Layers are very important tools for rendering, but they are not without their problems. Here are some things to keep in mind:
Pros- Reduces the complexity of what needs to be rendered and so can get around out-of-memory problems in Maya.
- Reduces the amount of work that needs to be done when the scene is inevitably re-rendered.
- Allows a greater amount of flexibility in post-production for color-correction and effects.
- Greatly reduces the amount of light-linking you have to do in Maya.
- Well suited for a setup where the characters and set are lit independently (As is typical).
- Adds a small, but non-trivial amount of work to each shot.
- Having layers interact in a logical way can be tedious to set up.
- Casting shadows between layers is possible, but particularly annoying.
Preparing to Render
After everything is in layers and lit, the next step toward rendering is making sure your Render Settings are correct. Always be sure to check that these settings are correct before rendering, as you are just wasting time if they're not.
First, under the Common tab there are several settings you will need to change:
- File name prefix - If you are using layers, this should have been overriden per layer. If not, name it after your shot.
- Frame/Animation ext - Set this to "name_#.ext"
- Image format - Set this to "PNG (png)"
- Frame Padding - 3 for 999 or less frames, 4 for 9999 or less frames, etc. (should be at least 3)
- Renderable Camera - If there is more than one of these delete them. This should be set to your shot's camera. Do not use persp.
- Alpha channel (Mask) - If you are using layers, make sure this is checked. It should be by default.
- Width and Height - These will be determined by whatever aspect ratio the group decides on. The default of 640x480 is a 4:3 aspect ratio, but it is more likely that you will use a 16:9 (widescreen) or greater aspect ratio because of high definition scalability. Widescreen resolutions are 640x360 for normal renders and 1280x720 or 1920x1080 for HD renders. Whatever you choose, it must be consistent across your entire film.
- Enable Default Light - Turn this off.
Second, you need to specify the renderer you will be using through the Render Using setting. There are two renderers primarily used in the capstone: "Maya Software" (the default renderer) and "mental ray". There are several advantages and disadvantages for both. Maya Software's primary advantage is speed, while mental ray has more features and can output higher quality renders. For the Mousetrap project you will want to utilize Maya Software for simplicity and faster render turnaround, while Mental Ray is recommended for the main production.
Once you have the renderer set you should make sure the quality is set pretty high, particularly for final renders. To set high quality for Maya Software, navigate to the Maya Software tab and set Quality to "Production". To set high quality for Mental Ray, navigate to the Quality tab and set Quality Presets to "Production".
The next step is to smooth all of the objects in your scene. This differs slightly depending on the type of renderer you're using:
- Maya Software - Apply smooth nodes to all of your geometry before rendering. You only need to do this once, as they can be turned on or off by setting the division level. Just don't delete history after this point. A division level of 0 essentially disables the smooth node, while 2 or 3 is pretty good for rendering depending on the initial density of your objects' geometry (never go much higher!). Also, if you're using references, add smooth nodes ONLY in referenced source files and NOT per shot. The render farm has the potential to do weird things if referenced objects have smooth nodes added to them.
Note: Be sure to select all of your objects and hit '1' to undo any smooth previews before upping the division levels. Otherwise the smooth previews will try to smooth the already smoothed objects, resulting in Maya crashing.
- Mental Ray - Luckily this is fairly easy using Mental Ray, as you just need to select all of the geometry and hit '3' for smooth preview. Actual smooth nodes don't need to be added.
Finally, you want to make sure that the file paths of all texture nodes, references, and effects caches use lowercase letters, have no spaces, and start with "//ntdfs/cs" instead of "O:/" (more on why later). Though this is more of a concern for when you are using the render farm, since you will most likely be using the farm for most of your rendering needs it's good to always conform to these conventions.
If you are
using layers, you may have noticed the  to the left of each layer. Only layers with this green check mark next to them will
be rendered, so be sure to set these correctly before intiating your render (left click to toggle).
to the left of each layer. Only layers with this green check mark next to them will
be rendered, so be sure to set these correctly before intiating your render (left click to toggle).
Batch Rendering
As an alternative to using the renderfarm, you can render using your local machine. This is not ideal since it will swamp the CPU and you won't be able to do any meaningful work on the computer. However, if the renderfarm is not available or there are many people using it, batch rendering is a good alternative. When batch rendering, the first step is to set your project. Go to File → Project → Set... and select the "project" folder for your shot (See File Structure above).
To start the batch render, select the Rendering menu set and go to Render → Batch Render. To monitor the rendering process, go to the Script Editor (Window → General Editors → Script Editor or click  at the bottom right corner of Maya's interface).
You can find the rendered frames in the project folder separated by layer.
at the bottom right corner of Maya's interface).
You can find the rendered frames in the project folder separated by layer.
Using the Renderfarm
If you want to render something fast, the renderfarm is what you want. If you are not familiar with the concept of a renderfarm in general, it is basically a bunch of computers whose only job is to render Maya files. It is not without its problems, but it is a tool you will need to know how to use.
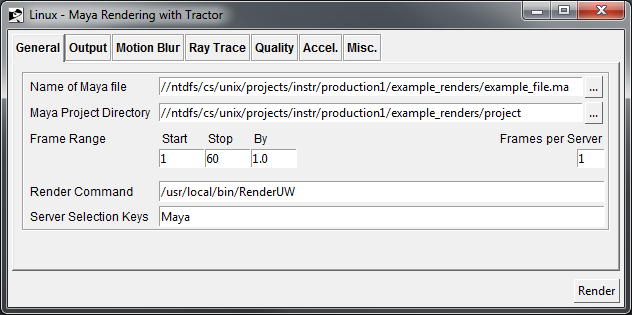
Once you have finished lighting and setting your layers and render settings correctly, you can submit a shot to the renderfarm. You do this by running the "TractorForMaya" script, which can be found on your computer at Start → All Programs → TractorForMaya (it should be towards the top of the list). This will bring up a UI for selecting the shot.
Click the first "..." button for "Name of Maya file" and navigate to the shot you want rendered. This should place the file path in the corresponding text field. This is a good time to double-check that you don't have any capital letters or spaces. Also make sure the file path is not relative to the "O:/" drive. The "O:/" drive is basically a local drive that points to the network, something the render farm will not be able to recognize. Simply replace "O:/" with "//ntdfs/cs/" to give the farm a direct path to the network.
You will notice that the next field down, "Maya Project Directory", has been set to the folder containing your Maya file. We don't want the files to be rendered there and so add "project" to the end of the directory path to send the renders to the correct location (this is assuming a project folder exists - if not then create one).
Make sure you remember the frames you need to render for the shot because you will need to enter them in the frame range. After that check that these settings are correct:
- Frames per Server: The number of frames a render node will render at a time. Though this defaults to 1, if your scene isn't overly complicated it is usually better to set this value to a higher number like 5 or 6.
- Render Command:
- /usr/local/bin/RenderUW (for rendering with Maya Software)
- /usr/local/bin/RenderUW -r mr (for rendering with Mental Ray)
- Server Selection Keys: Maya
After you're done, the UI should look something like this:
Click the "Render" button to submit the job to the renderfarm. Like batch rendering you will find rendered frames in the project folder separated by layer. To view and manage your render jobs' progress, you need to pull up the Tractor web interface.
Tractor Web Interface
To see how your render jobs are progressing you will want to pull up the Tractor web interface. This can be accessed through any of the lab machines by going to this URL:
After the welcome screen loads enter your CS account name and click "Login". You will be brought to a screen like the one below.
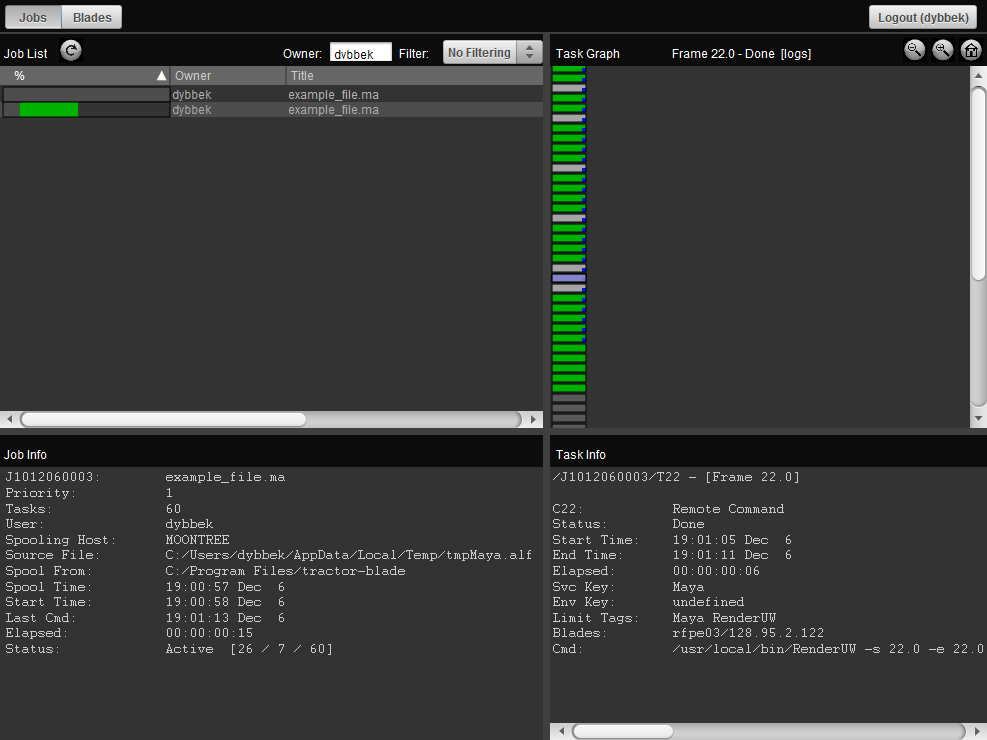
The list of all your render jobs, both finished and currently active, is found in the left panel labeled Job List. Left click a job to pull up more information on it.
You can set a job's priority, which dictates how often its frames are sent to machines when multiple jobs are on the farm, by right-clicking the job and choosing "Edit Jobs". As a general rule keep the priority at the default value. If you have a particularly long or intensive job, you may want to set it to a bit lower priority (~.5-.7) as a courtesy to others who need to use the farm as well.
Each box in the list on the right panel labeled Task Graph represents a single frame from the selected job. Green frames are in the process of being rendered, light gray frames are finished, and dark gray frames haven't been assigned to render nodes yet (a render node is just a machine on the farm, each of which contains several render slots for frames). Red frames, though not pictured above, are something you will inevitably see at some point - this means that the frame errored out.
There are a multitude of reasons a frame could error out. Here's a brief list to help in debugging errors:
- If all of your frames are turning red, it's most commonly an issue of file paths pointing to the wrong place in the TractorForMaya UI, so check there first. Make sure the paths are lowercase, use no spaces, and that "//ntdfs/cs" is used instead of "O:/". Additionally, make sure all files are on the network. The renderfarm can't see your Desktop.
- For a single errored frame, try re-rendering it by right clicking the frame and choosing "Restart This Task". You can also right click the job and choose "Retry Errors" if it's more than a few frames. If that doesn't work, you can get a better idea of the error's source by double clicking a frame to open up its render logs.
- Sometimes certain nodes on the renderfarm will get "tired" and refuse to render anything. If frames are randomly erroring out every now and then, left click to select the red frames and take a look at the Task Info panel. The Blades attribute tells you which render node tried to render the frame. If the errored frames are consistently showing the same node[s], you might have to disable the machine from rendering (see below).
- If the farm indicates a frame is rendering correctly but textures are showing up black and sets/characters are missing, go into the Maya file and double check that your references and texture file paths are pointing to the network.
In addition to viewing your jobs with Tractor, you can also see a summary of the render farm as a whole by clicking on "Blades" at the top left of the interface. Here you will see a list of all of the farm's render nodes. Take a look at the Slots list. This is a good place to look to get an idea of how busy the farm is. Each machine should have four slots, with each slot able to render a frame or set of frames (specified by "Frames per Server" in the TractorForMaya UI).
If you click on a render node and scroll down in the Server Info panel you can see which users have jobs assigned to the machine (check Active Cmds and see each listed id).
To disable a problematic machine from recieving jobs, right click it and choose "NIMBY Restriction ON". However, BEWARE: this will disable the machine for everybody using the farm! So make absolutely sure before doing this that other people are having problems with it as well, and let the staff know that you have done so. Disabled machines can be re-enabled by choosing "NIMBY Restriction OFF". Additionally, if the farm is crippled to the point of hindering everybody's renders, send an e-mail to support@cs.washington.edu saying that so and so machines need to be rebooted on the render farm (just use the machine names, for example rfpe09, rfpe10, etc). Be sure to cc the staff list when you do this as well.