-
STEP 1: Joint duplication
					The spine rig still calls for three joint chains, a bind, FK and IK chain.  Lets start by creating those chain.
					Select the cen_root_bind_joint.
					Again using the group rename script in the rigging shelf.
					Search for "_bind_", replace with "_fk_", duplicate then rename is checked.
					Duplicate the bind chain again but replace "bind" with "ik" this time.
					Now that we should have 3 chains.
					Unparent the FK and IK chains to the world.
					Hide the skeletons grp, anims grp and fk spine chain.
					You should only see the IK spine chain.

-
STEP 2: create anims
Lets create the anims for the ik spine.
The spine will be an ik spline, this means the top and the bottom of the ik can have anims.
What I want is to be able to grab move the hips anywhere I want easily and keep the top of the spine in the same place,
while also being able to move the top of the spine and keeping the legs in place.
Import two circleArrows.mb from the rigging files given.
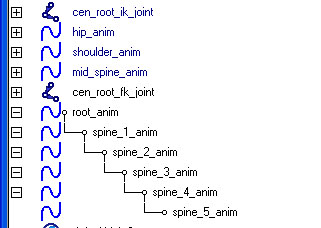
Rename them hip_anim and shoulder_anim.
Snap the hip_anim to the root joint and the shoulder anim to the top of the spine collumn.
Also create a new circle, rename it mid_spine_anim. Snap it to a joint in the middle of the spine.
Freeze transforms on all of the new anims.

-
STEP 3: create spline IK
					In the animation menuset, skeleton -> ik spline handle.
					Select the root joint, then the top of the spine.(don't worry if your geo is messed up.)
					In your outliner a few things were created.
					We should have a curve and a Ik handle, and an effector.
					Rename the curve, "spine_ik_curve".
					Rename the IK handle "spine_ik"
					So in a spline Ik, it creates a curve that trys to weave throught your joints.
					This curve then controls the postiion of your joints.
					So if you were to move the CV's of the spine you would notice the joints following.
					This also causes the geometry to get moved around sometimes.
					If it does, Undo the spline IK, unparent all the geometry under the IK joints, redo the spline ik, then parent the geometry again.
					Don't forget to rename your curve and ik handle again.
					The offset of the joints won't hurt us in this setup but you should be aware that it can offset joints.
-
STEP 4: create curve bind joints
					There are many ways of easily controling the curve for animation.
					You could use a cluster system like what we did for the knee pointer but I have another method.
					I prefer to use joints that I skin to the curve much like skinning the main geo to the bind joints.
					Create 3 seperate joints, they all are roots of their own heirarchy.
					Rename the joints hips_ik_curve_joint, mid_spine_ik_curve_joint, shoulders_ik_curve_joint
					And snap the joint to the same joint you snapped the correspoding anim.
					Now we can bind them to the curve.
					Select all three joints, then the spine_ik_curve, go to skin -> bind skin -> smooth bind.
					Make sure bind to: is selected joints, press bind skin.
					Now if you move the joints the curve and therefore the spine follows.
					Finally parent the joints under their corresponding spine anim.

-
STEP 5: Advanced Twist
Rotate the hip_anim and the shoulder anim.
There is the problem, it doesn't rotate the way it should. The chest and hip don't follow with the rotation.
Lets fix this.
Select the root joint of the spine, turn on local rotation axis and see which direction is towards the character's back(mine is the +Y direction).
Now select your hip_anim, look at which direct is pointing back(mine is a -Z direction).
These two values will help us in creating a advanced twist.
Select the spine IK handle.
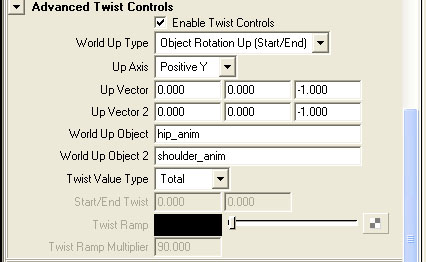
In the attribute editor go to Ik solver Attributes -> Advanced twist controls and enable advanced twist.
Don't worry if it screws up the geometry we are about to fix this.
In the options turn on:
world up type: object Rotation up
axis up to: positiveY (mine is +Y)
up vector: 0 0 -1 (mine was -z)
up vector 2: 0 0 -1 (mine was -z)
world up object: hip_anim
world up object 2: shoulder_anim
Now your spine should look normal and when you twist the anims the spine follows as predicted.
-
STEP 6: create FK anims
					Hide the ik joint chain and unhide the fk chain.
					We are now starting on the fk spine joint chain.
					Place the spine IK handle and the ik curve in the do_not_touch_grp.
					Now create and place a square curve on each fk joint except the top, makeing sure it doesn't overlap a ik anim, as shown below.
					Hide the IK anims.
					Make sure all the anims pivots are on the fk_joints, and the transforms are frozen.
					Rename the root fk anim, root_anim
					Rename the other anims, spine_#_anim, corresponding to their joint name.
					Parent each of the fk anims under each other like the fk joints.

-
STEP 7: orient and point constraint the anims
					Select the root_anim, select the root_fk_joint.
					Create a parent constraint.
					The root has control over the whole spine.
					We are again going to point and orient constrain the spine anims.
					The position of the joint will drive the anim.
					For each of the fk spine anims, select the joint then the anim and create a point constraint.
					The rotation of the spine anim will drive the joint.
					For each of the fk spine anims, select the anim then the joint and create a orient constraint.
-
STEP 8: parenting anims under each other
					No we are going to parent the ik spine anims underneath the fk anims.
					This will let us embed an ik spine under the fk. So we can control the spine as both ik and fk.
					Lets start with a simple ik fix.
					Parent the mid_spine anim under the shoulder anim.
					This allows for more arch when we rotate the shoulder anim.
					Now we should parent the ik under the fk.
					Parent the hip_anim under the root anim.
					Parent the shoulder_anim under the last spine fk anim.
					This lets the animator use the fk if they want which will ultimately move the ik spine.
					They could also just use the IK spine.
					Unhide the spine ik anims.

-
STEP 9: blend bind spine to ik spine
					We are not going to bind both the ik spine and the fk spine to the bind skeleton like we did for the legs.
					It doesn't require it, because the fk and ik spine work together in this setup.
					For each ik spine joint, then its corresponding bind joint, and create an orient constraint.
					Do it again but create a point constraint.
					Now the ik spine moves the bind spine.
-
STEP 10: outliner cleanup
					Delete all the geometry under both the ik spine joints and the fk spine joints.
					Parent the fk, ik and bind spine joints together.
					Place the group under the skeleton_grp.
					Rename the group, "spine_skeleton_grp".
					Hide the fk and ik spine chains.
					Group the root_anim to itself.
					Rename the grp, spine_anim_grp
					Parent grp under the anim_grp
-
STEP 11: Fix attributes for spine anims
					For the root_anim, lock and hide the scale and visibility.
					For all the other fk anims, lock and hide all attrs but the rotates
					For the ik spine anims, lock and hide the scales and visibility.
