We separate them out because the wrist and fore_arm don't need to change as the IK/FK change. This saves time but it becomes a little more complex.
-
STEP 1: Create IK joints and FK joints
Select the left clavicle bind joint.
Using the group rename, search for "_bind_" replace with "_ik_", duplicate and rename is checked, go.
Rename left_wrist_pos_joint in the ik chain left_wrist_ik_joint.
Duplicate the bind joints again, search for "_bind_" replace with "_fk_".
Unparent both new joint chains.
Hide everything but the FK chain.

-
STEP 2: Fk arm shapes
We are going to create the fk arms just like we did with the legs by creating shapes as the joints.
Create 3 circles.
Rotate to match the axis of the upper_arm joint. Move them to the origin and freeze transforms.
Select one of the circles. Then select the upper_arm joint. Press the shape button on the rigging shelf.
Delete the original circle.
Do the same for the lower_arm and wrist fk joints.
Then move the CV's of the shape and place them around where the geometry should be, like the picture below.

-
STEP 3: Create Clavicle anim and do some fk touchups
Create a circle. Snap it to the clavicle joint.
Rename the circle "left_clavicle_anim".
Rotate the circle, so it can be easily selectable.
Freeze transforms.
Select the clavicle_anim, then the left fk clavicle joint, and create a parent constraint.
Select the clavicle lock and hide the translate, scale and visibility attrs.
Select the other fk anims.
Lock and hide the translate, scale and visibilty attrs.
On the lower_arm joint lock and hide the rotate X and Z also, because it is a hinge joint.
Rename upper_arm joint as left_upper_arm_anim
Rename the lower_arm joint as left_lower_arm_anim
Rename the wrist joint as left_wrist_fk_anim

-
STEP 4: Create the IK anims
Hide the fk arm and unhide the ik arm.
Import a circleArrowThree.mb for the rigging_files.
Snap the curve to the ik wrist joint.
Rotate and scale the curve to place as shown.
Rename the curve left_wrist_ik_anim.
Freeze transforms
Import a square anim.
Rename it left_elbow_anim
Snap it to the left lower_arm joint.
Freeze transforms.
Move it back in the Z behind the arm.
Freeze transforms again.
The Ik arm doesn't need a clavicle joint because we can use the fk clavicle anim.
Unparent the left_upper_arm_ik_joint, then delete the left_clavicle_ik_joint.
-
STEP 5: Create the IK arm
In the animation menu set, skeleton -> Ik handle tool -> options.
Make sure the RPSolver is choosen.
Select the upper_arm joint, then the wrist joint.
If the white line on the handle is not point toward the characters back, undo and make sure preferred angle is set correctly.
Rename the ik handle, left_arm_ik.
Parent the ik handle under the left wrist ik anim.
-
STEP 6: Create the elbow pointer.
Create a linear curve.
Create a cluster for each of the CV's.
Rename the curve, left_elbow_pointer_curve.
Rename the clusters, left_elbow_pointer_start, left_elbow_pointer_end.
Point Constrain the start cluster to the lower arm ik joint, and the end to the elbow anim, make sure maintain offset is off.
Group the curve and both clusters together.
Rename the group left_elbow_pointer_grp.
Select the curve and template it.
Hide the clusters.
Select the elbow anim, then the arm ik.
Create a poleVector constraint.

-
STEP 7: Create the hands
Hide the ik arm, the anims and the pointer group.
Unparent the left_wrist_bind_joint.
I am going to create the hand anims directly on the bind joints.
You shouldn't directly animate a bind joints to keep things clean, but I figure this rig is big enought for a tutorial.
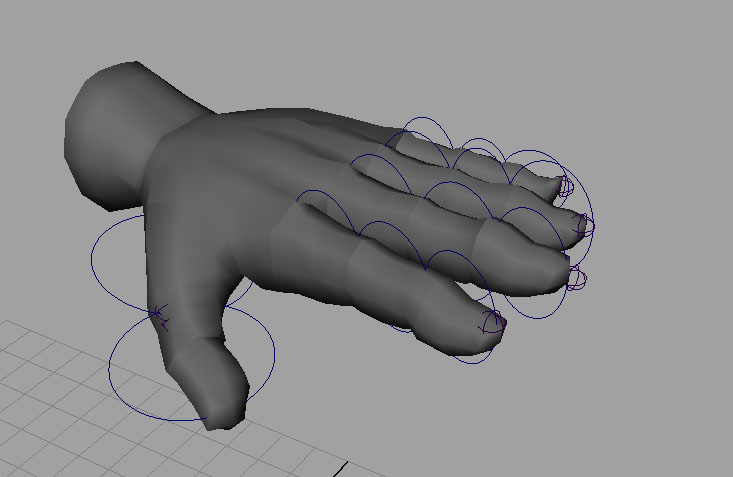
To create the hand anims, we are just going to create a shape node for each of the finger joints.
Create a nurbs circle, orient like the joint, move it to the origin, freeze transforms.
Select the cicle, then a finger joint, and use the shape node in the rigging shelf.
Move the Cv's of the new shape node.
Delete the orginal circle.
Rinse and repeat for all the finger joints. Don't do the end joints, or the left_wrist_bind_joint.
Once done with all the fingers lock the translate, scales, and visibility on the joints.
select all the joints that are anim.
Using group rename, search for "_bind_joint" and replace with "_anim"
-
STEP 8: create orient constraint blends
Group the wrist, elbow anims, and the elbow pointer grp together.
Rename it left_arm_ik_anim_grp.
Group left_arm_ik_anim_grp and left_clavicle_anim
Rename the group left_arm_anim_grp.
Group the the ik upper_arm, fk clavicle, bind_clavicle and wrist joints together.
Rename group left_arm_skeleton_grp.
Select the clavicle fk joint then the clavicle bind joint, create a point and orient constraint.
Select the left fk upper_arm joint, then the left ik upper_arm_joint, then the bind upper_arm joint and create a orient constraint.
Select the left fk lower_arm joint, then the left ik lower_arm joint, then the bind lower_arm joint and create a orient constraint.
Select the left fk wrist joint, then the left ik wrist joint, then the bind wrist joint and create a orient constraint.
Select the left_wrist_ik_anim, then the left_wrist_ik_joint, and create an orient constraint.
-
STEP 9: create blend
Select the top con.
Add an attribute to the top con. Name the attr "leftArmFkIk", it should be an enum with the first "FK" and the second "IK".
Open up the hypergraph.
Connect the .leftArmFkIk to the .weight1 of the left arm bind orient constraints, not the clavicle orient constraint.
Create an reverse node.
Rename the reverse node, "left_arm_blend_rev".
Connect the .leftArmFkIk to the inputX of the reverse.
Connect the .outputX of the reverse to the .weight0 of the orient constraints, again not the clavicle orient constraint.
Connect the .leftArmFkIk to the .visibility to the left_arm_ik_anim_grp.
Connect the .outputX of the reverse to the .visibility of the left_upper_arm_anim.
Parent constrain the left_wrist_bind_joint to left_wrist_bind_pos.
Delete the geomety under the ik and fk joints.
-
STEP 10: ForeArm twist ik.
We are going to use another spine Ik handle for the forearm.
We aren't going to move the joints but rather take advantage of the advanced twist for the forearm twist.
Create a linear curve from the lower_arm joint to the wrist joint.
Rename the curve, left_fore_arm_ik_curve.
From the animation menu set -> skeleton -> Ik spline handle tool -> options.
Uncheck auto create curve.
Select left_fore_arm_1_bind_joint, left_fore_arm_5_bind_joint, left_fore_arm_ik_curve.
Rename the ik handle left_fore_arm_ik.
-
STEP 11: ForeArm advance twist.
Create two locators.
Rename them left_fore_arm_twist_start, left_fore_arm_twist_end.
Snap the start locator to the lower_arm joint.
Snap the end locator to the wrist joint.
Freeze transforms on both locators.
Move them out in the +Z direction and freeze transforms again.
Move the pivot of the start locator to the lower_arm, and the end locator to the wrist joint.
Select the ik handle.
In the attribute edit, ik solver attrs -> advanced twist controls, check enable advanced twist.
Set the world up type: object up(start/end).
Set the up Axis to -Y.
Set the world up object to left_fore_arm_twist_start.
set the world up object 2 to left_fore_arm_twist_end.


-
STEP 11: ForeArm finish and outliner cleanup
Parent the fore_arm_ik_curve under the lower_arm bind joint.
Parent Constrain the fore_arm_1 joint to the lower_arm_bind_joint.
Parent the ik handle under the do_not_touch_grp.
Parent the fore_arm end locator under the wrist pos joint.
Hide the fore_arm locators.
Parent the fore_arm start locator under the lower_arm bind joint.
Parent the fore_arm joints under the left_arm_skeleton_grp
Parent the left_arm_skeleton_grp under the skeleton_grp
Parent the left_arm_anim_grp under the anim_grp
Lock and hide scale and vis on the wrist ik anim.
Lock and hide everything but translate on the elbow anim.