Ofir Lavi
CSEP576 – Computer Vision
Project 4
Overview of my solution
I started by going over all the pixels in the picture and for each one of them I called isFace() function. The results were good but the performance was not so good. I improved it by only looking into faces that completely inside the image, the results were better.
Finally I looked only into pixels that correspond to the color of the skin. In order to determine the RGB values for skin color I sampled about 50 skin pixels from our examples and I found out that there are two ranges, one for dark skin and one for bright skin. It depends on the light and the color of the skin which one is which. In order to consider all the different skin variation in each range (Dark or Bright), I calculate the average for each range and then added a threshold parameter in the code for final tuning.
The final values were: Red_Skin = 150, Red_Skin_Dark = 100, Green_Skin = 100, Green_Skin_Dark=50, Blue_Skin = 50
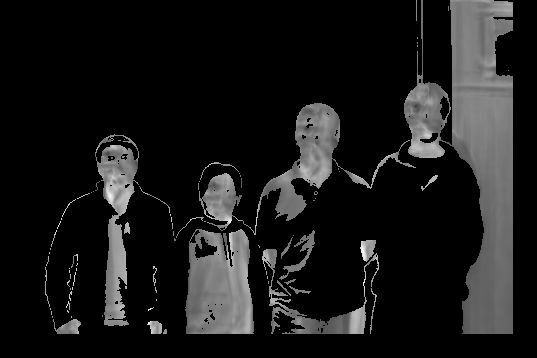
Bellow you can see the debug image that I got for group/ IMG_8270.tga in scale of 0.7. Black pixel indicating that the pixel is not a face and therefore we will ignore it, and white/gray colors indicates that it’s a face. The shade of white/gray pixel indicates the value of the MSE Þ The darker it’s the lower the MSE is and therefore better.
When I am cropping the images out of the scaled image in order to send it to isFace(), I used an offset of 2 pixels up and 2 pixels to the left in order to crop the face with some hear and not only the center of the face.
For example:
|
Without the offset |
With the offset |
|
|
|
This technique improved my false negative results.
Find Face General Algorithm
Resample the image to the right scale
Loop over all the pixels in the scaled image
For each pixel check if it’s a skin pixel, if it’s:
Call to isFace(), if mse < max_reconstructed_mse
Check overlapping with existing FacePosition in
best_face_list
If there is overlapping break from the loop.
If new FacePosition mse is better than the current
one
Remove old one
Add new one
Else
If num of elements in the
list < n
If last element mse > new
mse
Remove last element
Add new element
Sort list
Else
Add new Element
Sort list
If crop
Crop
image
Else
Mark
images
Experiments
Procedure
1. Cropped, non-smiling students with 10 eigenfaces
Average Face

10 Eigenfaces

2. I computed the userbase from the same set of images.
3. Number of faces correctly recognized versus the number of eigenfaces:

Questions
1. The trend that we can see from the plot is that up until 7 eigenfaces the results are keep on improving, but when we got to 7 faces the results were not improving. So the more eigenfaces we used up until 7 eigefaces the more accurate the results, but the tradeoff is in the size of the vector => space.
The right amount of eigenfaces depends on the implementation. For example, to identify the student in our class it enough to use 10 eigenfaces, but in order to identify all the students of UW it will require more eigenfaces and there for more disk space.
2. I looked at my picture smiling_cropped/s14.tga with 7 eigenfaces – The recognition algorithm matches me with nonsmiling_cropped/11 image with MSE of 35585.8.
I used main --recognizeface smiling_cropped/s14.tga base7.user eig7.face 4 to check how close was my real picture and the results were very close, the correct answer appear in second place:
0: nonsmiling_cropped/13; MSE: 27015
1: nonsmiling_cropped/14; MSE: 27956.3
2: nonsmiling_cropped/28; MSE: 34063.4
3: nonsmiling_cropped/09; MSE: 41244.5
Then I used projectface to view the
actual face projection:
|
|
Smiling_cropped/s14.tga |
Nonsmiling_cropped/14.tga |
Nonsmiling_cropped/13.tga |
|
Original Picture |
|
|
|
|
Projectface with 7 eigenfaces |
|
|
|


The mistake was very reasonable, it seems that by curving my eyebrows, the projecting reconstruction matches better to picture 13 than to picture 14.
Cropping and finding faces
1. I am using the 10 eigenfaces from previous step.
2.
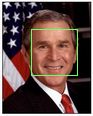
I cropped Bush face with min_scale,max_scale, step parameters
of .25, .55, .01 successfully:
|
|
|
3.
I used my program to crop my picture with the 10 eigenfaces from
above.
|
|
Cropped Image |
|
|
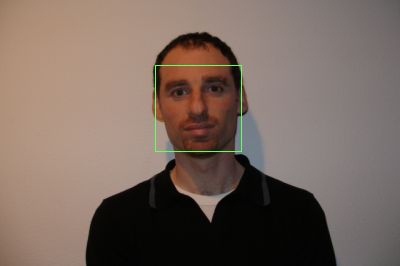

4. I experimented with different min_scale, max_scale, and step parameters to find ones that work robustly and accurately. I used min=0.25, max=0.4, and step=0.01 and the best image was found.
5. I found faces in two different photos
5.1 IMG_8270.tga image with min_scale, max_scale, and step of 0.2, 0.7 and 0.1:

My attempt to find faces didn’t result in any false positives and/or false negatives in the above picture.
5.2 Another picture of a group of people:
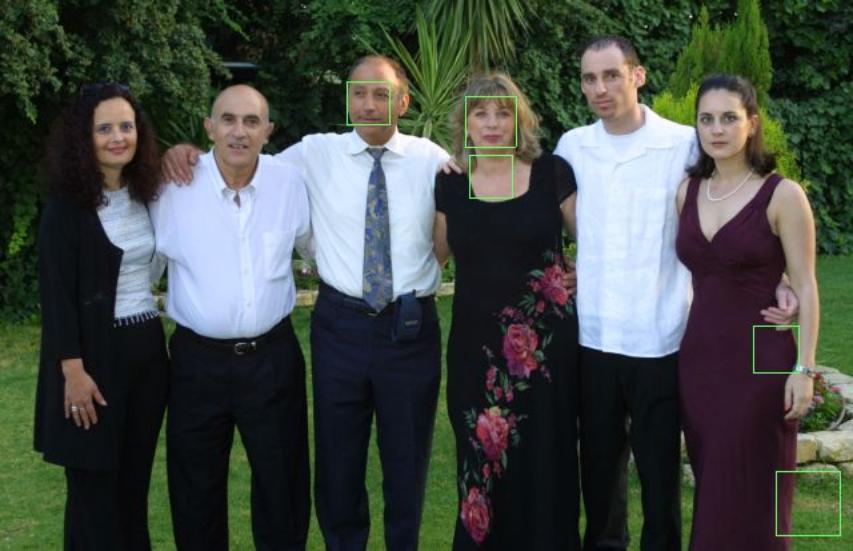
My attempt to find faces in my family picture did result in false positives and false negatives. In the above example my face (Second from the right) is in different angels then the cropped images and this is why I was not able to recognize my face. The woman’s in the picture has longer faces so the 25X25 will not match to it as well, also our DB did not include variety of different female faces. The second person from the left has an older person features, our group of people did not include any older people features and this is why we are not recognizing him. The false positive result that I got is as a result of running from a very low scale of 0.2 and above, at this scale the resolution is very low and black and white noise can look like a face.
Questions
1.
I used
min_scale, max_scale, and scale step of 0.2, 0.7 and step of 0.1 for the above
pictures.
2.
My attempt to find faces in my family picture did
result in false positives and false negatives. The explanation is under each
picture section 5.1 and 5.2.
Extra Credit
1. Implementation of speedup
The implementation of the speed up is in a separate file faces_speedup.cpp
2. Implementation of verifyFace
Verifying each face against his own smiling face
and against someone else smiling faces gave the following results:
|
|
SME |
Paces Verified |
False Pos |
False Neg |
|
Own smiling picture |
1000 |
0/31 |
0 |
31 |
|
Own smiling picture |
100,000 |
24/31 |
0 |
7 |
|
Someone else smiling picture |
100,000 |
9/31 |
9 |
0 |
|
Someone else smiling picture |
50,000 |
3/31 |
3 |
0 |
|
Own smiling picture |
50,000 |
18/31 |
0 |
13 |
|
Own smiling picture |
55,000 |
21/31 |
0 |
10 |
|
Someone else smiling picture |
55,000 |
4/31 |
4 |
0 |
I experimented with different SME thresholds from a 1,000 to 100,000. With MSE of 1,000 none of the faces were recognized => 100% false negative. With MSE of 100,000 – 24 pictures were recognized properly (77%) with 7 false negative (22%), but when I tested each picture against someone else smiling picture I got 9 false positive (29%). Then I reduced the MSE to 50,000 - I was able to find only 18 faces (58%) with 13 false negative (42%) and 3 false positive (10%). Finally I used MSE of 55,000 – I recognized 21 pictures (67%) with 10 false negative (33%) and 4 false positive (13%).
For the best MSE threshold of 55,000 the false negative rate was 10 (33%) and the false positive rate was 4 (13%).