 |
 |
 |
 |
 |
 |
 |
 |
 |
 |
= |
 |
EigenFaces: Who Are You?
Peter P. Gengler
Project Overview:
For Project 4 we were required to add code to create a
set of EigenFaces (think eigenvectors) that represented a training set of faces in
a virtual "face space." Using these base component faces we could project
other face images onto the face space and then try to recognize them according
to a trained database of users. In addition we could scan a picture and
choose the best faces in the image and mark them or crop to the best. This required several
steps:
Generate EigenFaces -- Given a set of user faces, use Principle Component Analysis (PCA) to compute a number of EigenFaces as well as the average face (for use in reconstruction).
Project a face -- Given a face and a set of EigenFaces project the given face into face space and compute the coefficients for the EigenFaces.
Construct a face -- Given the coefficients for a face (such as from #2), construct a face using the average face and the weighted EigenFaces.
Check if something is a face -- Given an image and a Mean Squared Error (MSE) threshold, calculate the MSE against being in the "face space" and return true/false depending on the threshold and the MSE.
Verify a face from coefficients -- given the coefficients to a face and a MSE threshold, determine if the coefficients represent a face.
Recognize a face -- given a database of coefficients for faces and a face, order the database in likelihood that each set of coefficients in the database represent the face.
Find a face(s) in an image -- given an image and various search parameters find the best choices for faces in the picture.
The matrix math was implemented for us and we were required to implement the underlying algorithms and construct the matrices for the above operations.
Testing recognition with
cropped class images:
We trained ten (10) EigenFaces on a set of 32 non-smiling
people people's cropped images and calculated a userbase given these images.
Here are the EigenFaces and the resulting average face:
|
|
|
|
|
|
|
|
|
|
|
= |
|
Then we were required to do recognition on the same people, but in smiling photos, to see the accuracy we could achieve and where the sweet spot was for the number of EigenFaces . The following graph is the plot of # of EigenFaces vs. the accuracy in recognition:
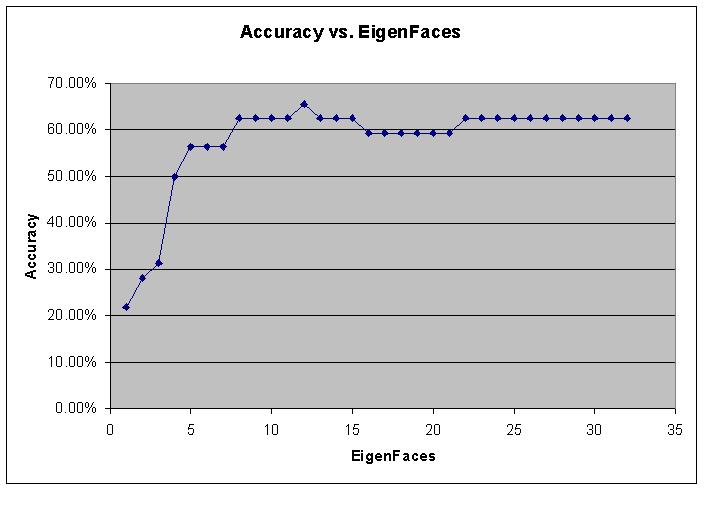
The plot clearly shows that increasing EigenFaces increases accuracy. However, its easy to see that the increases in EigenFaces have a larger effect when there are few of them and a much smaller effect when there are many. Therefore there is a sweet spot where we achieve a balance between good recognition and quick execution. This point with our system seems to be right around 10, what a coincidence.
There were a couple images that the system had a hard time recognizing no matter how many EigenFaces were used. In general these images varied greatly from our training set, such as very large smiles, heads tilted some, tongues sticking out, and that is what likely caused problems for the recognition system. Here are some examples of original faces and how our 10 EigenFaces reconstructed them, which explains why they were never recognized as the original image:
| Original | Recontructed |
 |
 |
 |
 |
 |
 |
Finally, it is notable that the plot is non-monotonic. That is to say a step every once in a while actually reduced the accuracy. This is odd, but can be explained if two images are very similar then the EigenFace components of them may have a hard time distinguishing one way or the other and become overshadowed by the other EigenFaces, thus allowing the false identification.
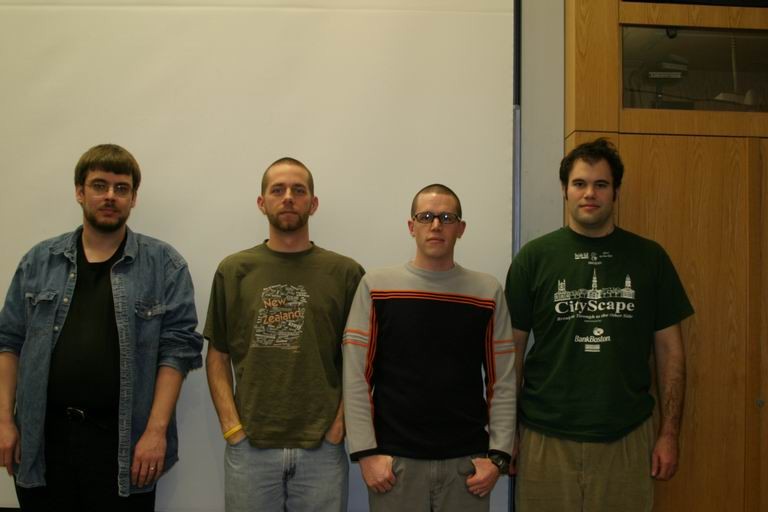
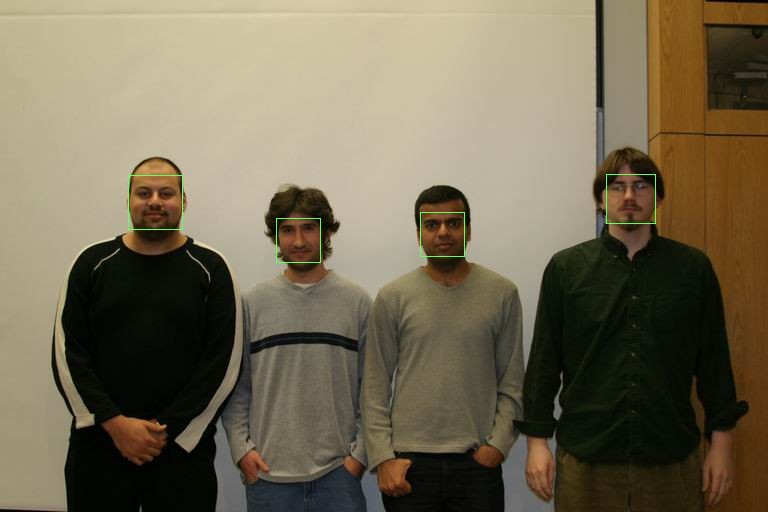
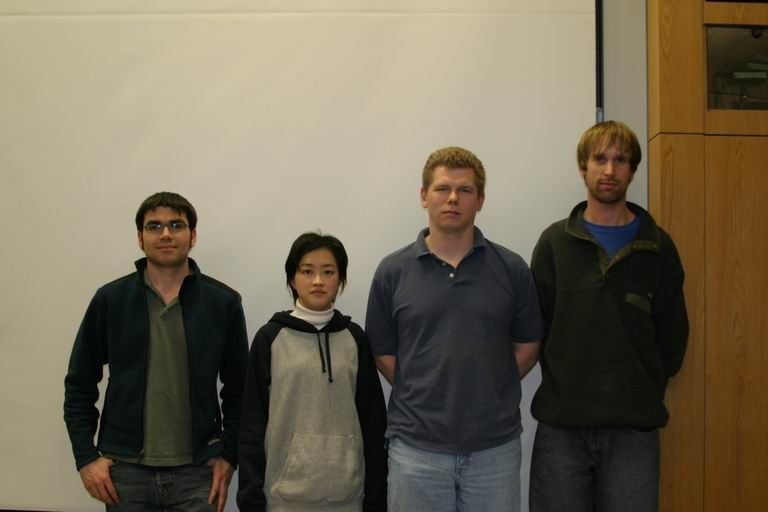
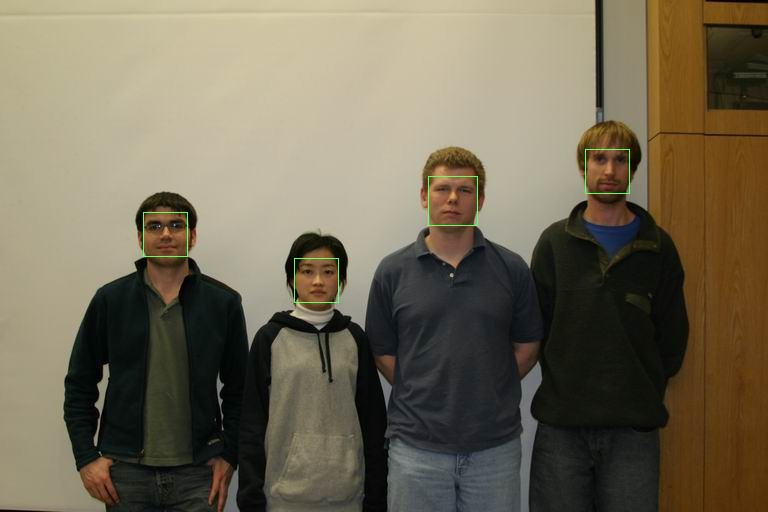
Cropping and finding faces:
Next we used our set of 10 EigenFaces to search
through several pictures for faces. We had a couple portraits where we
searched for and cropped the person's face (one provided and one of our own).
We also had images of our class in groups of four which we searched for faces
and marked them with green boxes (several were provided and at least one was
required to be our own). During these procedures we were to experiment
with the min_scale, max_scale and step settings to find optimal settings and
results.
In general the provided photos were easier to search as the settings that were suggested were pretty accurate. One deviation from the suggested text was that I never used a step size smaller than 0.05 as I found it too slow and the results didn't improve. The provided portrait photo was concentrated around the 0.25 mark, so I searched faces from 0.15 to 0.35 to be safe (and because small scales run fast :) and easily found and cropped the face. The provided group photos were all concentrated around the 0.5 mark, so I searched faces from 0.45 to 0.55 (I missed some when trying just 0.5) and successfully marked all photos. Because of the simplicity these photos are all presented here without further explanation:
| Original | Cropped/Marked |
 |
|
 |
 |
 |
 |
 |
 |
 |
 |
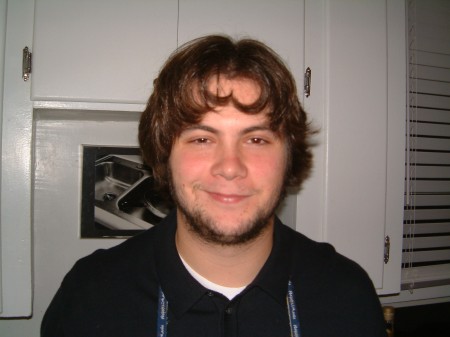
Next I moved onto using my own artifacts. The main challenge here was identifying which scale settings to use as doing too many was slow and doing the wrong ones produce bad results. I eyeballed the picture of myself and figured since my head was bigger, I better try 0.55 to 0.80. This was somewhat slow, but produced a nicely cropped face:
 |
 |
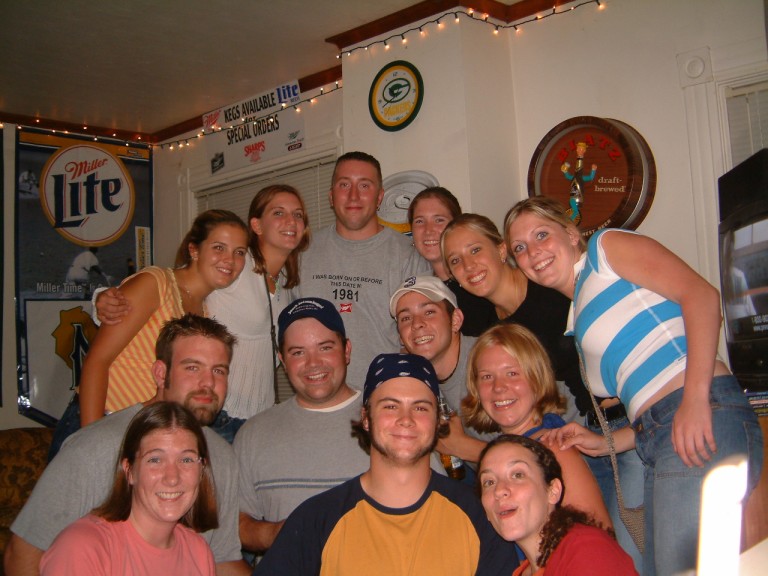
Next I moved onto the fun part, identifying faces in my own images. I started with a picture from a party in college of 13 people. Because of the depths of field the sizes of faces varied a fair amount so I had to use a wide range of scales. Some faces were smaller than in our group images, so I decided to start at 0.35. There were also some larger ones so I went all the way up to 0.80 after some experimentation. (My first try of 0.45 to 0.60 was too small). Here's the result:
 |
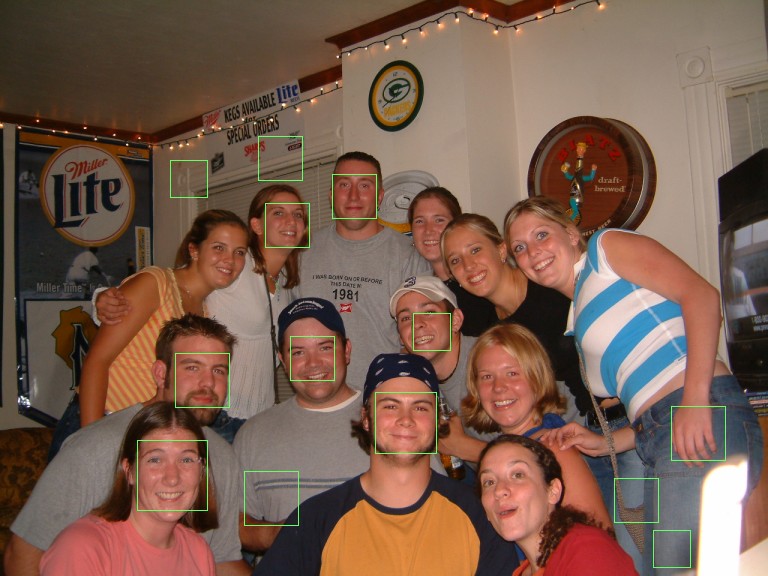 |
I can tell that my range of faces was okay since I have marked faces that are as small as the smallest faces and as large as the largest faces, but I do have some mis-identifications. This is due to a couple reasons. First, because of the success of my face finding against the class's group photos, I did not implement any more sophisticated weighting functions; it is purely the MSE value that determines the best face choices. Implementing something like skin detection, or area voting from one scale to another may have helped results some, but I think the next two issues were more pressing. Second, I didn't train with any of the faces in this picture. I realize often you can't train with all the subjects, but in this case I think the variance in our class was small (i.e. very few females) where as the group above was larger. Finally, because of the way the picture was being taken, and because we were all wasted, a lot of the people are tilting their heads inwards. My algorithm has absolutely no way to deal with rotated faces, so once they get to far off rotation (I'm guessing 5 degrees would do it) I think all bets are off. Most of the missed faces fit in this category.
Extra Credit and Notes:
[Extra Credit] I implemented the ATA matrix transform, and in fact I skipped AAT completely. I found it more confusing to think about and I heard it took 4 minutes to calculate with jacboi, ATA never took longer than one second or two. Note in the eigenFaces function I also did a nifty speed up when populating ATA by only stepping the lower diagonal of the matrix since the upper diagonal was identical just mirrored. This sped the walk of that matrix up by a factor of ~2.
[Extra Credit] I implemented the verifyFace because it was simple, and in my way, and almost required for recognizeFace.
[Note] For FindFaces I went through a lot of algorithms here, mostly because it sucks that you can't iterate through an STL list and delete items at the same time. I finally settled on an algorithm where I first insert items in their place with no deletion at all regardless of whether they overlap or what not. Then I check to see if I've exceeded my buffer size; for final this was merely the number of faces, but for debug I set this to 2x that, and then I could draw the un-chosen faces at the end to see how close I was to selecting them (i.e. if I asked for 4 faces, were they all within the top 8 at least). When my buffer size was surpassed (which it had to be every n pixels or less) I pruned my list. This meant I went through the list from most important to least important. At every item I searched a new list I was adding them to in order to make sure I didn't overlap any of them. If I didn't then I added the item to the new list and moved on. This meant that I always had popular faces around, and after pruning I also had only non-overlapped faces (and further more the best of any that did overlap, since I walked my prune best to worst) left in the buffer. I did a final check to make sure I was below 2x, because if all the faces were non-overlapping I had to remove the ones that didn't make the cut.