
Project 4 - EigenFaces
By Ryan Kaminsky
Description
The purpose of this project is to create a face recognition system which is created in two parts. In the first part, a data set of images from the class is analyzed to create our data store. This is essentially the training data for the recognition system. Next, a second set of images from the class is run through the system and the system attempts to identify the individuals in each of the images. Because these images are different from the training set, it is unlikely to get 100% accuracy. In the second part of the project, an image with one or more unknown faces is input to the system and it decides on the most likely N candidates that are faces in the images. It annotates each of these best guesses with a green square or the image can be cropped if there is only one face.
Techniques
The main technique used in this project is Principle Component Analysis (PCA). This process involves representing each face as a vector in space. However each of these vectors has many dimensions (one for each pixel) and these would be far too many dimensions to be useful if we did not reduce this somehow. By taking advantage of the fact that the vectors represented by faces lie in only a small portion of the available area, we can reduce the complexity of the problem significantly. We create an average face from all of the training data, and then using this we compute Eigenfaces, which are just eigenvectors. Now any face can be represented by the sum of the average face, plus each Eigenface multiplied by a coefficient. To determine if something is a face, we just project it to get new coefficients for the face, then subtract this representation from the original face. If its error is below some threshold then we can say that it is a face. In the recognize face phase, we can just find the error in the coefficients between the given image and the training images in the user base, and we predict the one with the lowest error.
Extra Credit:
1. speedup
2. Morphing (below)
3. VerifyFace and the experiments (below)
Experiment 1: Testing recognition with cropped class images
Here all of the 32 images in the data set were used to compute the average face (25 x 25):
EigenFaces (25 x25):


Next, face recognition was tried using 1-32 EigenFaces in steps of 2. The results are plotted below:

As can be seen from the graph, initially as we use more EigenFaces, the number of correct matches improves until we reach a plateau. This plateau seems to occur around 10 EigenFaces. Using more than this doesn't seem to improve accuracy significantly. In fact, it just appears that there is fluctuation after the initial 10. The tradeoff here is that using more EigenFaces will require more computation time when testing for matches. It also appears that introducing more EigenFaces can actually slightly reduce accuracy as each EigenFaces allows for slightly more variation. In deciding how many to use we should do some experiments and attempt to find the plateau. This will be a good balance between variation and computation time.
Using 10 EigenFaces of 25x25 pixels resulted in 20/32 = 62.5% accuracy. Some errors were reasonable as the actual face was high in the list, however other errors did not have the actual face appearing in the top 10. One of each is shown below.
The
image s10  was recognized as being 19
  instead of 10
  . However 10 was the
second estimate in the list, so this error was veyr reasonable.
. However 10 was the
second estimate in the list, so this error was veyr reasonable.
The
image s01  was recognized as being 25
  instead of 01
  . The 01 image was not even
in the top 10. I suspect the error here is due to the elongation of the
face in the smiling image s01 versus the condensed version of 01. I
believe this error is reasonable due to this factor, although the correct face
should probably have been in the top 10.
. The 01 image was not even
in the top 10. I suspect the error here is due to the elongation of the
face in the smiling image s01 versus the condensed version of 01. I
believe this error is reasonable due to this factor, although the correct face
should probably have been in the top 10.
Experiment 2: Cropping and finding faces
The find faces function does an exhaustive search to find the best face matches at the various scales specified. This can take quite a long time especially as the scaling gets closer to 1.0 (the original size of the image). It was very tricky to get the list of the top N matches to work correctly because we have to deal with overlaps between matches. In addition, I implemented the optimize function as described in the project description so the low-texture areas on the image would not be counted as a face when it is clearly very far from face space.
bush_george_w_portrait.tga
My code was able to successfully crop the image as shown below using the parameters of scale from .25 to .55 using steps of .01.
Before:  After:
Who is that stud-miffin?
My code was able to crop the image of myself successfully. I tested a wide range of parameters and settled on .10 to .35 by steps of .02. I'm sure this could have been limited to a small range once I found out the best cropping parameters.
Original Image (scaled down a bit)
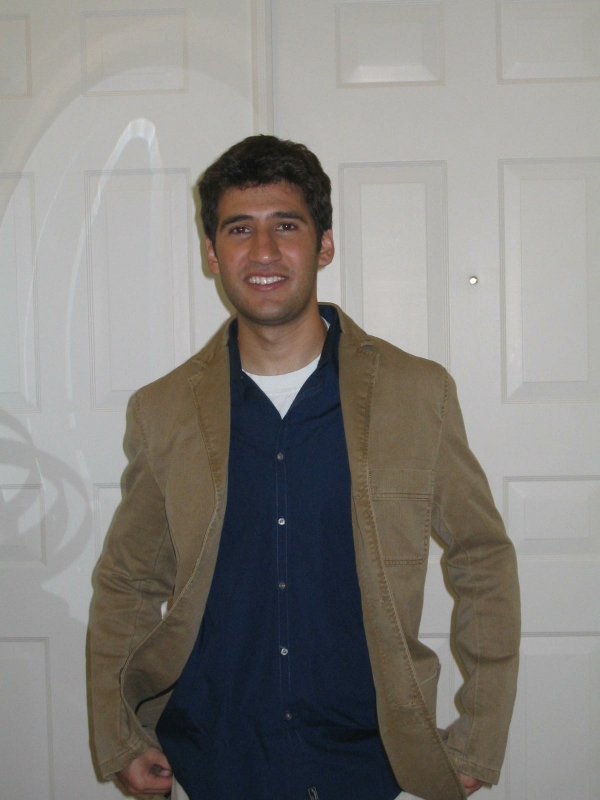
Cropped Image:

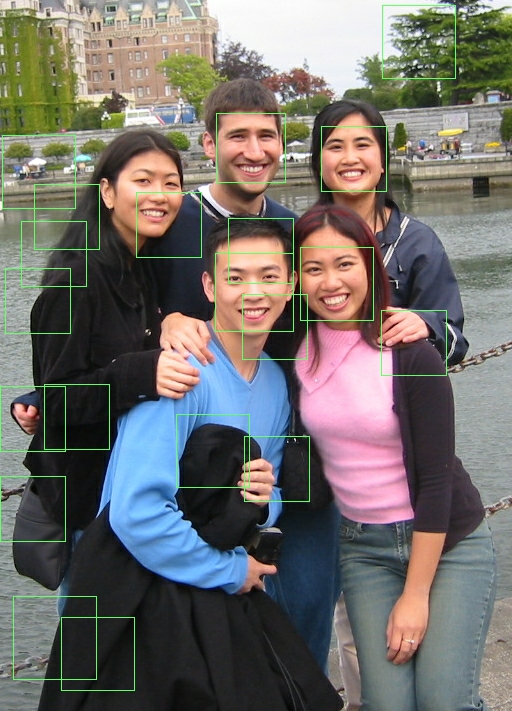
IMG_8720.tga
My code was able to successfully mark all the faces on this image. The scale used was .44 to .54 using .02 steps. Using a higher step size resulted in faster computation for this extermely slow case.

Other Image
I was very disappointed with how this turned out. It only recognized two of the faces. However when I run it at different scales it is able to recognize the other faces. I think this is because the faces are very close together and because my overlap function may be a little overzealous, it will see these faces as overlapping and just pick the best one. I tried many different scales for this image but finally settled on .34 to .42 in steps of .02.

Here are two more attempts at this image with varying the number of faces marked and the strictness of the overlap function. As can be seen, the overlap strictness should be adjusted depending on the picture being marked. If the faces are close together a relaxed overlap should be used. This will increase computation time, but be more accurate.
| .34, .50, .02 step: In this image I have included the top 20 faces. It finds an additional face and parts of the other faces, however these faces didn't score high enough to make the top 5. This is due to the variability of these faces compared with the training set. | .30, .40, .02 step: In this image I relaxed the overlap rule for the faces. Here, it identifies an additional face perfectly that it did not find the original image. Because the overlap rule was very stringent in the original run the face in the middle was seen to overlap the face to the right. Again this is the top 20 faces. |
 |
 |
These values are listed by each image.
In many trials my find faces function would have false positives and false negatives. Usually the cases were because I didn't start my scale in the correct range, so when the scaling was done, it would already be past (or before) the correct face size. When this happened it usually identified a low texture area as a face. Another problem I ran into was where multiple faces in the same image were at different depths. Often it would identify faces at a small scale only to have these faces wiped out by better matches that overlapped it, but were not actually faces themselves. I believe that overlap detecting at small scales is much too liberal because the scale factors are so great. This probably results in excessive overlapping at these small scales.
Morphing Extra Credit: Steve into Jiun-Hung
| -1 | -0.5 | 0 | .25 | .50 | .75 | 1.0 | 1.5 | 2.0 |
 |
 |
 |
 |
 |
 |
 |
 |
 |
VerifyFace Extra Credit:
The following table lists the thresholds I tried along with the # of correct, false negative rate and false positive rate:
| Threshold | # correct | false positive | false negative |
| 150000 | 29 | 18 | 3 |
| 100000 | 25 | 11 | 7 |
| 75000 | 23 | 3 | 9 |
| 60000 | 21 | 1 | 11 |
In picking the thresolds to try, I looked at the MSE values for each of the
various runs. I then tried to pick a threshold the would give me a good
balance of correct findings while minimizing false positives. The higher
the MSE the more accurate the verify function will be, but the possibility
of false positives will also increase in this case. This can be seen in
the table above. The reduction in correctness from 100000 to 75000 is
only two faces, but the number of false positives is reduced
by eight. This seems like a good trade off. I then
tried an MSE of 60000. As can be seen the number of correct dropped
by two and the number of false positives also dropped by
two. It is up to the application whether this is an acceptable trade
off.