ADVANCED RENDERING AND COMPOSITING TUTORIAL
Part A: Rendering
Rendering in Layers
Once you have a scene lit and ready to render, you can break up all the objects in your scene into different render layers. This increases efficiency during rendering, and allows greater freedom when it comes to adjusting separate elements within the scene. The four most commonly used layers are background, foreground, character, and effects. In this tutorial we will mostly focus on background and foreground, because those layers will relate more to your rendering assignment.
A background layer is especially handy when you have a shot where the camera doesn’t move at all during the duration of the shot. In this case, you can save a lot of time and processing power by rendering just one still frame of the background, and then later compositing that image into every frame of the shot along with the animated frames. These are called “held layers.” Another added bonus is that you can retouch and add detail to held layers in Photoshop or other 2D paint programs to until you are completely satisfied with the product!
Foreground layers are pretty much the same thing, and can also be rendered as held layers depending on the shot. Again, if there are no animated elements in the foreground objects, you can simply render one still image and proceed to composite it exactly like a held background layer. The easiest way to break down a scene into layers is to start with the farthest back, and work your way to the front of the scene. Of course, there will be times when objects won’t fall directly in front of or behind another object,
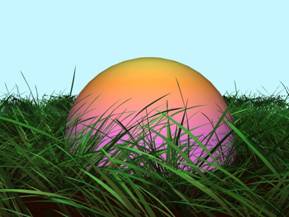
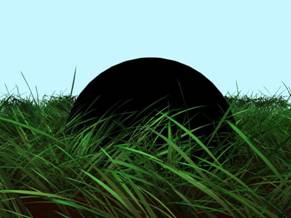
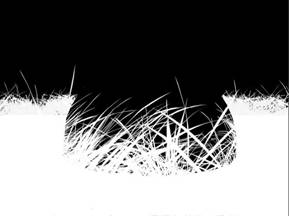
and in this case, you can use a rendering technique called matte objects. Basically, a matte object is an object that will render completely black in a color render as well as in the alpha channel. In Maya, you can find a shader option that allows you to assign an alpha or matte opacity setting that can be turned down to pure black for a black alpha. This setting can be found under the shader’s Attribute Editor, under Matte Opacity, Matte Opacity Mode>Black Hole (the default is Opacity Gain.) To give an example of a matte objects, imagine a ball sitting in a clump of grass. Since the grass is surrounding the ball, some of the grass will be in front of it, and some will be behind it. In this case, you could make the ball a matte object in the grass layer. This will result in a render of the grass with a black hole cut out of it where the ball is supposed to be, with a corresponding alpha channel. You can then render a separate layer for the ball and composite the grass layer on top, so that the color layer of the ball shows through. Note: Not all image formats will store transparency information! Save in TIFF, TGA, or PNG to preserve alpha info.
Why Render in Layers?
· Makes large, complicated scenes possible. Without layers, you could never be able to render a really huge scene file, because either it would slow down your computer to a ridiculously slow speed, or just crash the file.
· Creates the option of rendering held layers, which are static images that only need to be rendered once, therefore saving a lot of rendering time!
· Makes it possible to rerender specific aspects of a scene. For example, if you want to make adjustments to character motion, you can just rerender the character layer instead of rerendering all the elements within the scene.
· Makes it possible to reuse certain elements from completely different shots. For instance, if there is a particle cloud in one shot that is rendered on a separate layer, you can composite the same cloud into another shot.
· Creates more control when it comes to tweaking separate elements in your scene. Its easier to adjust color, brightness, saturation, etc in a compositing program with multiple layers.
Rendering in Passes
Rendering passes is rendering the different attributes found in a scene, such as shadows, separately, while rendering layers is just rendering objects separately. Listed below are some of the more common types of passes that you can render:
· Diffuse
· Specular
· Shadow
· Occlusion
· Depth (Luminance Depth)
Other passes include reflection, ambient, beauty, global illumination, and mask…but those will not be covered in this tutorial.
Render Layer Presets
Towards the bottom of the Channel Box, you should find a render layer editor. This is where you will set up all your separate layers and passes. You can do this by first selecting all the objects you want in a layer, then hit Layers>Create Layer from Selected. This will create a layer for you that contains all the selected objects. Alternately, you can go to Layers>Create Empty Layer. After naming your new layer, right click on it and Add Selected Objects to add all the objects you want. Similarly, you can delete objects from a layer, etc.
To use a layer preset, simply right click on a layer and go to Presets>Name of Preset.
Below is a general explanation of what each of these presets do:
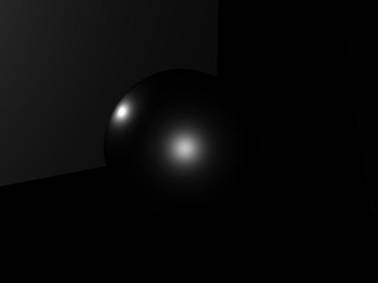
A diffuse pass is basically a color rendered of your subject that includes diffuse illumination, color, and texture, but does NOT include reflections, highlights, or shadows. Since this pass includes illumination information, surfaces are shaded brighter where they face a light source and darker where they face away from it. Luckily in Maya there are presets for all the aforementioned passes; however there are ways to set these passes up by hand too! For a diffuse pass, simply turn off “emit specular” on all lights.
A specular pass
(sometimes also called a “highlight pass”) is specifically for rendering out
the highlights in a scene. These passes allow you tweak your highlights until
you are completely satisfied with how they look. For instance, on a specular
pass, you can change the position of the lights from their actual positions in
the diffuse pass to create better highlights, or add a bump map to give your
highlights variations that are not present on the diffuse pass. Visual effects
like glow can also be simulated by blurring a specular pass in compositing, instead
of taking the time to render glow with Maya which is much slower. Additionally,
just like any other pass you can adjust the color and brightness to match with
other passes in the scene. For this pass, simply turn off “emit diffuse” on all
lights. Note: Not all shaders have specular capabilities, so if you use a
Lambert, you won’t be able to render a specular pass.
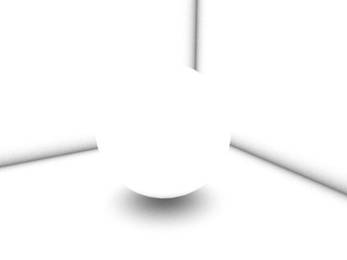
A shadow pass is
exactly what it sounds like; a pass that will render all the shadows in your
scene. You can find this preset in Maya, too. Typically, a shadow pass is split
into two types; cast shadows (shadows an object casts onto other objects), and
self-shadows (shadows an object casts onto itself.) These two should generally
be rendered as different passes so they can be adjusted separately.When you
render a shadow pass, don’t be alarmed to find yourself looking a pitch black
render-simply toggle to your alpha channel to see the locations of the shadows,
which will be shown in white, or shades of grey. (It’s the button on your
render panel that’s right next to the little multi-colored ball.) If you have a
lot of lights in one scene, you can even consider rendering more than one
shadow pass for different sets of lights, to avoid shadows that overlap
strangely. When compositing more than one shadow pass together, watch out for
shadows that overlap each other unrealistically; if two objects are being lit
from the same light, having two different cast shadows would seem weird! In
this situation, you can composite these two shadow passes together first in a
lighten-only or darken-only mode, then use this to shadow your scene. Another
bonus to rendering separate shadow passes is that it saves time; an example
being you can use dmap shadows, then tweak them during compositing to simulate
the effects of raytraced shadows! For example, if you render hard cast shadows,
you can add a gradient blur to simulate the effect of having a shadow being
sharper near the object and fuzzier the farther away it gets. 
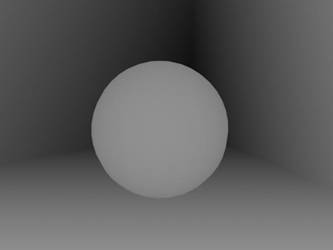
An occlusion pass is a pass that traps light realistically in places that would normally be dark, such as the surfaces near where two objects are touching. This is the best way to achieve realistic looking contact shadows. It also adds realism to a scene by filling little crevices, cracks, or scratches, which can bring out a surfaces texture without adding extra illumination to a scene. The way that occlusion is computed is that the renderer will look at each surface point on an object, and calculate how much light is blocked from nearby objects. Basically, it bases the shadowing on the proximity of nearby objects, without taking into account factors like brightness, color, or transparency. This is also a preset layer in Maya, and when you set it, a new surface shader should appear in your Hypershade. Select this new shader and click on the checkerboard next to Out Color, and you will see several key settings you can adjust to your liking:
· Samples- This number is the number of probe rays that will be sent out. The higher the number, the more rays, therefore yielding a smoother, cleaner image. However, this will take up more render time so be careful how high you bump it up!
· Max Distance- This represents the range within which geometry will be considered. If this number is zero, then the entire scene will be sampled. However, if this is a nonzero value, then only objects within this range will be occluded, and objects outside of this region will not. So, the lower the max distance (essentially), the less shadowing there will be. A low max distance will help just occlude really small regions like cracks and crevices.
· Falloff- Falloff will only affect your scene if the Max Distance is set to a nonzero value. The value range for falloff spans from 0 to 1.0. The lower the falloff number is, the stronger the occlusion is for short distances, and the softer it is over larger distances (Again, good for simulating light trapped in cracks etc.)
A depth pass is a grayscale render based on the depth (distance) from the camera. This produces an anti-aliased grayscale image for use in determining depth priority in a compositing application. In your depth pass render, light values will represent objects that are closer to the camera, and darker values will represent objects farther away. Using depth passes can simulate a camera’s limited depth of field, where distant objects will seem out of focus (atmospheric perspective.)
PART B: Using the Renderfarm and Batch Rendering
Using
the Renderfarm
Go to Start -> Programs -> Pixar -> RenderMan Artist Tools -> WindowsAFM.tcl If it asks you what to open this with, choose "Select this Program from a list" and select "Wish Application" (near the bottom).
Render script settings:
- Name of Maya file: navigate this to your file.
- Maya Project Directory: navigate this to the folder that you want your renders to go to. you should set this up logically: have a renders folder, and in that a folder for each shot.
- Render Command: C:/Program Files/Alias/Maya7.0/bin/render.exe
- ...and you should be able to leave everything else alone.
IMPORTANT: The script won't accept spaces in your input or output file
paths.
Using Batch Rendering
Go to your render settings, either by clicking the button or going to Window>Rendering Editors>Render Settings. Make sure that your render settings are correct and you only have one renderable camera! Then, check to make sure under Image File Output: Frame/Animation ext: select name.#.ext is set. If the path is incorrect, go to File>Project>Set... and choose the directory for your project. Then go to Render>Batch Render, click the option box and check Use all available processors. Finally, hit Batch Render and you’re all set!
Useful Rendering Tips
· Test render at low quality and resolution so that testing goes more quickly. You can also use IPR rendering to have an updated render every time you make changes!
· Before rendering, check to make sure that you are rendering in the correct image format so that you don’t render the whole scene out in a format that is incompatible with the compositing software.
·
If you DO accidentally render a whole sequence
in the wrong format (say Maya’s default, IFF ), use FCheck to convert the files
to the desired format rather than re-rendering them. To do this for an image
sequence, go to Save Animation and save out as a different format.